“Pywal is a tool that generates a color palette from the dominant colors in an image. It then applies the colors system-wide and on-the-fly in all of your favorite programs.”
I’m using Variety to change my wallpaper every day automatically. To always get the right colors in my terminal I added some lines in my .zshrc that will always grab the current wallpaper and pass it to PyWal. I’m sure a bash pro would do this in just one line… 🙂
sudo micro /etc/default/grub

# if not already set, update
GRUB_TIMEOUT_STYLE=menu
GRUB_TIMEOUT=5

sudo update-grub
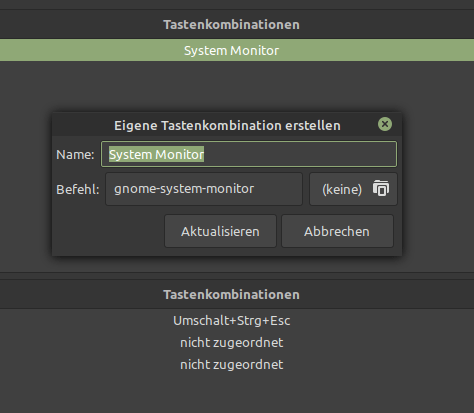
Create new shortcut for the “System Monitor”
Copying my dotfiles over. First the .aliases
alias ll='ls -Al --color=auto --block-size=MB --group-directories-first'
alias ls='ls -l --color=auto --block-size=MB --group-directories-first'
alias cp='cp -vRi'
alias rm='rm -vRi'
alias mv='mv -vi'
alias ln='ln -v'
alias mkdir='mkdir -pv' # Creates parent directories if needed
alias chown='chown -v'
alias chmod='chmod -v'
alias rmdir='rmdir -v'
alias ps='ps -f'
#alias tar='tar -xvf' #made some problems
alias df='df -Th'
alias lsd='lsd -Al --group-dirs first'
alias jobs='jobs -lr'

alias sudo='sudo ' #Allows for aliases to work with sudo.
alias pls='sudo $(history -p !!)'
alias wget='wget -qc --show-progress' #Download with WGet with pretty and useful features.
alias grep='grep -sI --color=auto' #Colorful (auto) 'grep' output.
alias psf='ps -faxc -U $UID -o pid,uid,gid,pcpu,pmem,stat,comm' #Less excessive, current-user-focused ps alternative.
alias klog="sudo dmesg -t -L=never -l emerg,alert,crit,err,warn --human --nopager" #Potentially useful option for viewing the kernel log.
alias lsblk='lsblk -o name,label,fstype,size,type,uuid'
alias ping='ping -c 5' # Stop after sending 5 pings


# Docker
alias dpsa='docker ps -a --format "table{{.ID}}\t{{.Names}}\t{{.Image}}\t{{.Ports}}\t{{.Status}}"'

# Find commands I type often so I can alias them
# https://www.jakeworth.com/alias-terminal-commands/
alias typeless='history n 20000 | sed "s/.*  //"  | sort | uniq -c | sort -g | tail -n 100'

# Micro Editor
alias mic='micro'
alias nano='micro'

# Make mount command output pretty and readable
alias mnt='mount | column -t'

# jump to my download directory
alias dl='cd "$HOME"/Downloads'

# Youtube-dl
alias dlvid='youtube-dl --add-metadata --embed-thumbnail'
alias dlmp3='youtube-dl -x --audio-format mp3 --add-metadata --embed-thumbnail'
alias dlbest='youtube-dl -f bestvideo+bestaudio'

# Git
alias git add .='git aa'
alias git commit -m='git cm'

# mkdir && cd
function mcd() {
    mkdir -p $1
    cd $1
}

# Archive extraction
# usage: ex <file>
ex ()
{
  if [ -f "$1" ] ; then
    case $1 in
      *.tar.bz2)   tar xjf $1   ;;
      *.tar.gz)    tar xzf $1   ;;
      *.bz2)       bunzip2 $1   ;;
      *.rar)       unrar x $1   ;;
      *.gz)        gunzip $1    ;;
      *.tar)       tar xf $1    ;;
      *.tbz2)      tar xjf $1   ;;
      *.tgz)       tar xzf $1   ;;
      *.zip)       unzip $1     ;;
      *.Z)         uncompress $1;;
      *.7z)        7z x $1      ;;
      *.deb)       ar x $1      ;;
      *.tar.xz)    tar xf $1    ;;
      *.tar.zst)   unzstd $1    ;;
      *)           echo "'$1' cannot be extracted via ex()" ;;
    esac
  else
    echo "'$1' is not a valid file"
  fi
}


# navigation
up () {
  local d=""
  local limit="$1"

  # Default to limit of 1
  if [ -z "$limit" ] || [ "$limit" -le 0 ]; then
    limit=1
  fi

  for ((i=1;i<=limit;i++)); do
    d="../$d"
  done

  # perform cd. Show error if cd fails
  if ! cd "$d"; then
    echo "Couldn't go up $limit dirs.";
  fi
}
Followed by my .zshrc
neofetch | lolcat

# See https://github.com/ohmyzsh/ohmyzsh/wiki/Themes
# ZSH_THEME="robbyrussell"
ZSH_THEME=powerlevel10k/powerlevel10k

# zsh-syntax-highlighting has to be the last plugin!
plugins=(git tmux zsh-autosuggestions zsh-syntax-highlighting)

# Preferred editor for local and remote sessions
 if [[ -n $SSH_CONNECTION ]]; then
   export EDITOR='micro'
 else
   export EDITOR='nano'
 fi

# To customize prompt, run `p10k configure` or edit ~/.p10k.zsh.
[[ ! -f ~/.p10k.zsh ]] || source ~/.p10k.zsh

source $ZSH/oh-my-zsh.sh

if [ -f ~/.aliases ]; then
. ~/.aliases
fi
eval $(thefuck --alias FUCK)
In meinem NAS nutze ich seit vielen Jahren als Motherboard ein ASRock C2550D4I mit einer recht stromsparsamen on-Board CPU und einer BMC/IPMI Schnittstelle, welche Fernwartung über einen separaten LAN Port möglich macht.
Bei einem BMC Update hat sich leider die WebGui verabschiedet und ich musste mir die Sache auf der Konsole anschauen. Dafür habe ich IPMITOOL installiert und verwendet. Dabei stellte sich heraus, dass lediglich die Netzwerkeinstellungen verloren gegangen sind.
Hier einige hilfreiche Befehle im Umgang mit dem IPMITOOL, welche mir geholfen haben. Über diesen Weg lässt sich ebenfalls das Passwort des Admin-Users zurücksetzen.
# install
sudo apt install ipmitool

# display sensor & network settings
sudo ipmitool sensor
sudo ipmitool lan print 1

#set network settings
sudo ipmitool lan set 1 ipsrc static
sudo ipmitool lan set 1 ipaddr 192.168.178.3
sudo ipmitool lan set 1 defgw ipaddr 192.168.178.1


# Reset password
# https://support.oneidentity.com/de-de/kb/261220/reset-the-bmc-ipmi-password
sudo ipmitool user list 1
ID  Name	     Callin  Link Auth	IPMI Msg   Channel Priv Limit
1                    false   false      true       ADMINISTRATOR
2   admin            true    true       true       ADMINISTRATOR
3                    true    false      false      NO ACCESS
4                    true    false      false      NO ACCESS
5                    true    false      false      NO ACCESS
6                    true    false      false      NO ACCESS
7                    true    false      false      NO ACCESS
8                    true    false      false      NO ACCESS
9                    true    false      false      NO ACCESS
10                   true    false      false      NO ACCESS
sudo ipmitool user set password 2
Password for user 2:
Password for user 2:
Set User Password command successful (user 2)


# IPMI reseten
# https://www.thomas-krenn.com/de/wiki/IPMI_BMC_reset_bei_IPMI_Problemen
sudo ipmitool mc reset cold
# or remote with
ipmitool -I lanplus -H ip_address -U admin -a bmc reset cold

# Wenn das nicht hilft, ggf. hier schauen:
# https://portal.nutanix.com/page/documents/kbs/details?targetId=kA00e000000CrKRCA0
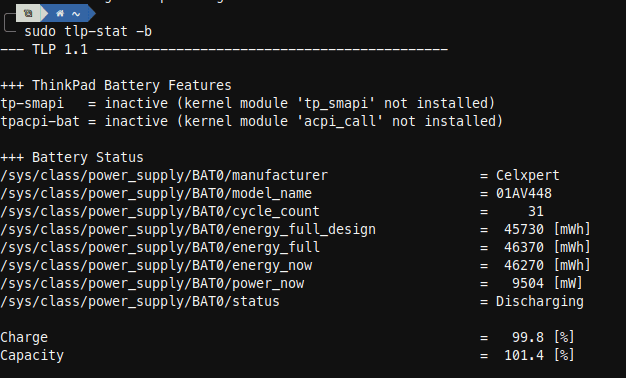
With TLP I was able to extend the battery life of my ThinkPad E595 significantly.
“TLP is a feature-rich command line utility for Linux, saving laptop battery power without the need to delve deeper into technical details.” https://linrunner.de/tlp/
Damit beim Filme schauen auf dem Fernseher nicht immer händisch der Mauszeiger aus dem sichtbaren Bereich geschoben werden muss, habe ich nach einer Lösung gesucht und wurde mit Unclutter fündig: “Unclutter ist ein kleines Hilfsprogramm, das den Mauszeiger verschwinden lässt.”
“Unclutter startet ab dem nächsten Neustart automatisch. Wenn man das oder die Optionen ändern will, kann man es durch Bearbeiten [3] der Datei /etc/default/unclutter mit Root-Rechten erreichen.” Standardmäßig verschwindet der Mauszeiger nach einer Sekunde. Kann aber natürlich beliebig angepsasst werden.
If a pdf file is located in a different folder, you have to add the path like this: $home/Downloads/source1.pdf If you want to merge all pdf’s of the current folder you cant type:
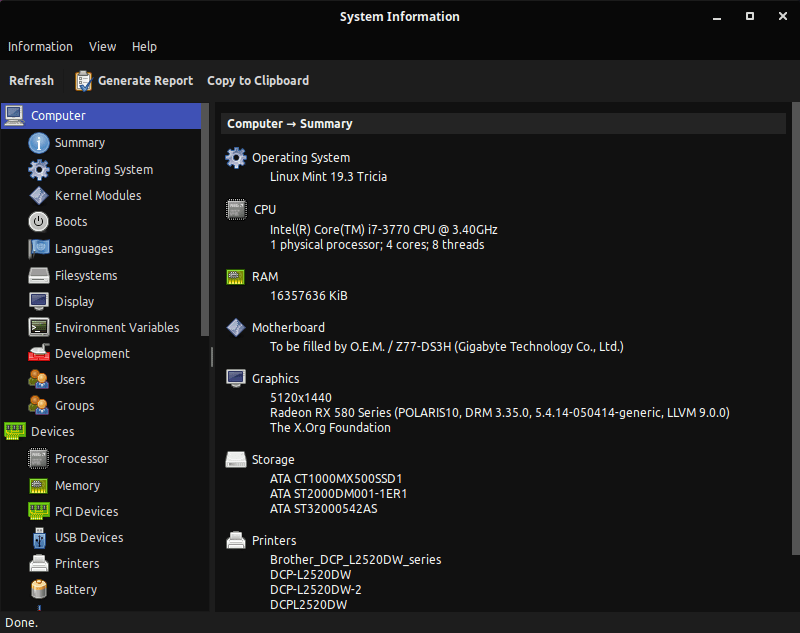
“HardInfo is a system profiler and benchmark for Linux systems. It is able to obtain information from both hardware and basic software, and organize it in a simple to use GUI.”