
# get readonly property
zfs get all | grep readonly
# deactivate readonly
zfs set readonly=off rpool/dataset
# activate readonly
zfs set readonly=on rpool/dataset
Category: ZFS
ZFS Filesystem
[ZFS] Send unencrypted dataset to encrypted pool
I recently added some disks to my TrueNAS server and created a new encrypted pool named data2 on it. My old pool data was created years ago, before the zfs encryption feature was released, so it is an unencrypted pool. Now I wanted to move a dataset, i.e. photos, to my new pool data2. I tried to archieve this via TrueNAS Gui using the Replication Task, but always got errors that it’s not possible to send unencrypted data to an encrypted pool.
On Reddit I found a thread with a solution using the parameter -x encryption.
Because I prefer keeping all my snapshots when moving a dataset, I send my oldest snapshot first.
zfs send -v data/photos@manual-01-05-2019 | zfs recv -x encryption data2/photos
In the next step I created a new snapshot and did an incremental send with the parameter -I (send incremental snapshots).
zfs send -v -I data/photos@manual-01-05-2019 data/photos@manual-01-10-2020 | zfs recv -F -x encryption data2/photos
Compare the datasets with zfs diff (see example here) or use the classic diff command to compare the folders:
diff -qr /mnt/data/photos /mnt/data2/photos
#or in background
diff -qr /mnt/data/photos /mnt/data2/photos >> diff.output & disown
#check if process finished with "ps"
less diff.output
Check if all Snapshots were replicated with:
zfs list -t snapshot | grep data2/photos
After that I just changed the path for my NFS photo share and did a sudo mount -a on the clients. Now the whole dataset is moved and encrypted.
[Proxmox] Installing Cockpit with ZFS Manager extension
The Cockpit ZFS Manager requires Cockpit version 201 or above. In the Debian Buster repository there’s only cockpit version 188, so you have to use the buster backports repository, which contains cockpit version 223.
# install cockpit
echo "deb http://deb.debian.org/debian buster-backports main" > /etc/apt/sources.list.d/buster-backport.list
apt update
apt-get -t buster-backports install cockpit
# add ZFS manager
git clone https://github.com/optimans/cockpit-zfs-manager.git
cp -r cockpit-zfs-manager/zfs /usr/share/cockpit
# start cockpit
systemctl start cockpit.service
systemctl enable cockpit.service
systemctl status cockpit.service
Now browse to https://ip-address-of-machine:9090 and login.
[ZFS] kernel module not found
$ modeprobe zfs
modprobe: FATAL: Module zfs not found in directory
Typically installable via:
$ sudo apt install zfs-dkms
Check with:
$ dkms status
[ZFS] import pool: “cannot mount ‘/’: directory is not empty”
$ sudo zpool list
NAME             SIZE  ALLOC   FREE  CKPOINT  EXPANDSZ   FRAG    CAP  DEDUP    HEALTH  ALTROOT
data            10,9T  10,3T   577G        -         -    46%    94%  1.00x    ONLINE  -
externalBackup  5,44T  4,19T  1,25T        -         -     0%    77%  1.00x    ONLINE  -
rpool            111G  27,4G  83,6G        -         -    40%    24%  1.00x    ONLINE  -

$ sudo zpool import externalBackup
cannot mount '/': directory is not empty

$ sudo zfs set mountpoint=/externalBackup externalBackup

$ sudo zfs get mountpoint externalBackup
NAME            PROPERTY    VALUE                SOURCE
externalBackup  mountpoint  /externalBackup  local

$ sudo zfs get mounted externalBackup
NAME            PROPERTY  VALUE    SOURCE
externalBackup  mounted   no       -

$ sudo zfs mount externalBackup

$ sudo zfs get mounted externalBackup
NAME            PROPERTY  VALUE    SOURCE
externalBackup  mounted   yes      -
[ZFS] How to create a Mirrored Root Pool (Post Installation)
https://docs.oracle.com/cd/E19253-01/819-5461/gkdep/index.html
zpool attach rpool current_disk new_disk
[ZFS] Replace failed disk on my Proxmox Host

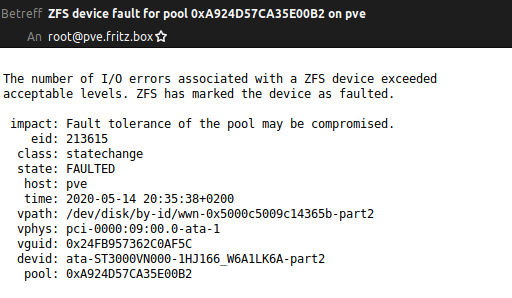
Yesterday evening I got an email that on my Proxmox server a disk had failed. In my ZFS Raidz1 I have 4 different drives of two manufactures: 2x HGST and 2x Seagate.
In the last 7 years I also used some Western Digitals. The only faulty hard drives I had in this years were from Seagate. This was the third… So this morning I bought a new hard disk, this time a Western Digital Red, and replaced the failed disk.

SSH into my server and checked the zpool data. Because I already removed the failed disk, it’s marked as unavailable.
failed disk: wwn-0x5000c5009c14365b
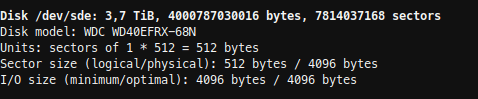
Now I had to find the Id of my new disk. With fdisk -l, I found my new disk as /dev/sde, but there was no id listed.
sudo fdisk -l
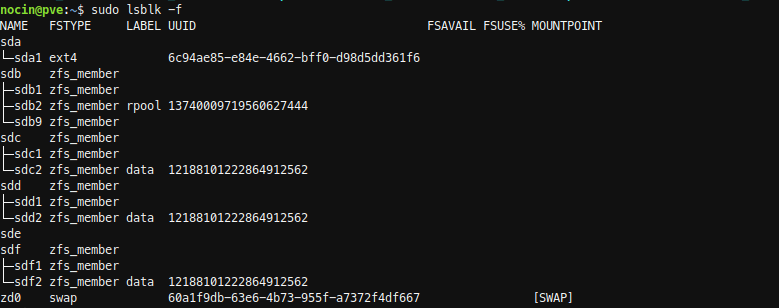
To be sure I checked again with:
sudo lsblk -f

With disk by-id I now got the Id.
ls /dev/disk/by-id/ -l | grep sde
new disk: ata-WDC_WD40EFRX-68N32N0_WD-WCC7K1CSDLRT
and again the failed disk: wwn-0x5000c5009c14365b
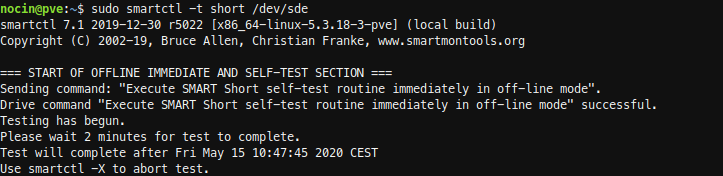
Before replacing the disks, I did a short SMART test.
sudo smartctl -a /dev/sde
sudo smartctl -t short /dev/sde
sudo smartctl -a /dev/sde
The new disk had no errors. And because it is a new disk, I don’t had to wipe any file systems from it.
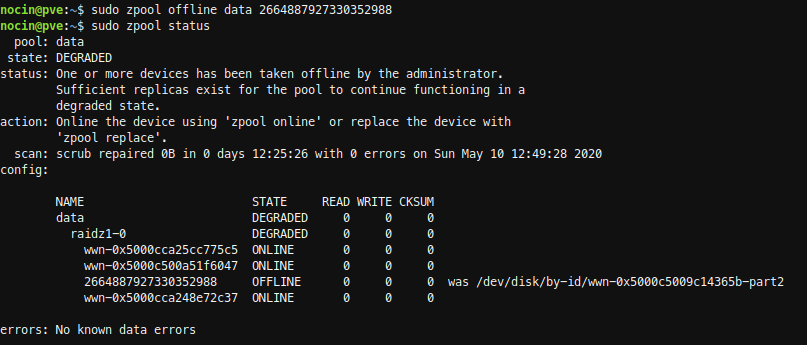
So first I took the failed disk offline. Not sure if that was necessary, because I already had removed the disk.
sudo zpool offline data 2664887927330352988
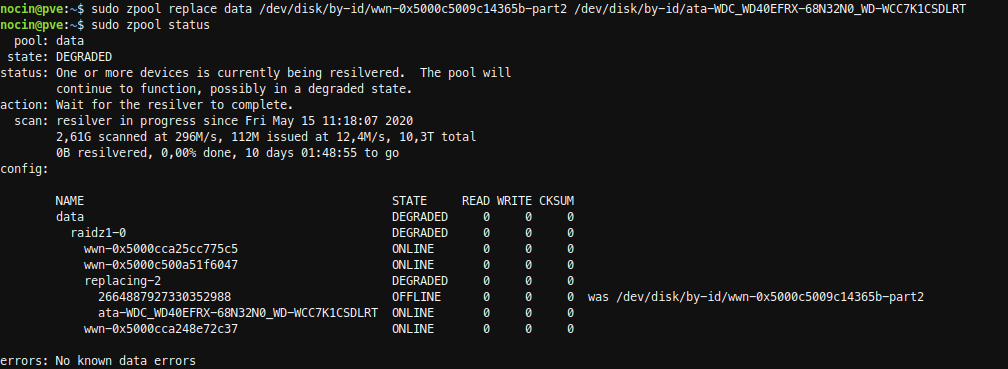
Next run the replace command.
sudo zpool replace data /dev/disk/by-id/wwn-0x5000c5009c14365b-part2
/dev/disk/by-id/ata-WDC_WD40EFRX-68N32N0_WD-WCC7K1CSDLRT

The resilver process for the 3TB disk took about 10 hours.
[ZFS] diff – what changed between ZFS snapshots
The diff command tells you what files were changed/added/deleted between snapshots.
#list snapshots of a dataset
zfs list -rt snapshot | grep zpool/dataset
zpool/dataset@zfs-auto-snap_monthly-2020-03-01-0552
zpool/dataset@zfs-auto-snap_monthly-2020-04-01-0552
...
#choose two snapshots and use the diff command
zfs diff -FH zpool/dataset@zfs-auto-snap_monthly-2020-03-01-0552 zpool/dataset@zfs-auto-snap_monthly-2020-04-01-0452
The diff command can also show the difference between a snapshot and a current dataset.
zfs diff -FH zpool/dataset@zfs-auto-snap_monthly-2020-03-01-0552 zpool/dataset
The first column indicates the type of change:
-       The path has been removed
+       The path has been created
M       The path has been modified
R       The path has been renamed
The second column indicates the file type, similar to ls. For further information have a look into the zfs man page.
[Proxmox] NFSv4 client saves files as “nobody” and “nogroup” on ZFS Share
I’m running a Proxmox Cluster with PVE1 and PVE2. On PVE2 a VM is running Debian Buster, which is mounting an zfs nfs share from PVE1. Inside the VM a script is running as root saving a backup on this nfs share. If I create a file locally (Test1) on PVE1, the owner is of course root. But since a few weeks the script running inside the VM is creating all files as nobody (Test2).
# ls -all /mnt/nfs/data
drwxr-xr-x  2 root  root       4096 Jul  5 07:19 Test1
drwxr-xr-x  2 nobody nogroup   4096 Jul  5 07:21 Test2
This is because root users are mapped to different user id’s and group’s when changing files on an nfs share. But until now, this was no problom when enabling nfs on a dataset via
zfs set sharenfs=on zpool/data
because the no_root_squash was set by default. But it looks like this was a changed in ZFS on Linux 0.8.3 and the no_root_squash option isn’t set by default anymore. To enable it again use:
zfs set sharenfs='rw,no_root_squash' zpool/data
Another way is exporting the folder via /etc/exports and adding the no_root_squash option.
# sudo nano /etc/exports
/zpool/data/ *(rw,no_subtree_check,sync,insecure,no_root_squash)
Run sudo exportfs -a after editing the exports file to enable these changes immediately.
[ZFS] Destroy snapshots
Snapshots in ZFS aren’t cumulative. They just include the difference between the filesystem at the time you took the snapshot and now.
Meaning if you have snapshots A, B and C, deleting A doesn’t impact the status of the remaining B and C. This is a common point of confusion when coming from other systems where you might have to consolidate snapshots to get to a consistent state.
This means, you can delete snapshots out of the middle of a list and not screw up snapshots before or after the one you deleted. So if you have:
pool/dataset@snap1
pool/dataset@snap2
pool/dataset@snap3
pool/dataset@snap4
pool/dataset@snap5
You can safely sudo zfs destroy pool/dataset@snap3 and 1, 2, 4, and 5 will all be perfectly fine afterwards.
You can estimate the amount of space reclaimed by deleting multiple snapshots by doing a dry run (-n) on zfs destroy like this:
sudo zfs destroy -nv pool/dataset@snap4%snap8
would destroy pool/dataset@snap4
would destroy pool/dataset@snap5
would destroy pool/dataset@snap6
would destroy pool/dataset@snap7
would destroy pool/dataset@snap8
would reclaim 25.2G
List your snapshots (for a specific dataset simply use grep):
sudo zfs list -rt snapshot | grep pool/dataset
If you need to free some space, you can sort zfs snapshots by size:
zfs list -o name,used -s used -t snap