
| FPE3 | Beleg anzeigen |
| FPL9 | Konto Anzeigen |
| FBL3N | offene Posten für Sachkonten |
| FS00 | Kontenplan anlegen |
Year: 2019
[SAP] SAP Gui login with single click in KeePass
Just paste the following string into the URL field when creating a new entry in KeePass. You only have to replace three parameters manually:
- system
- sysname
- language
The two parameters system and sysname have to match exactly the system settings in your SAP Gui.
cmd://sapshcut -maxgui -system=E01 -sysname="SAP Dev System" -client=100 -user={USERNAME} -pw={PASSWORD} -language=DE
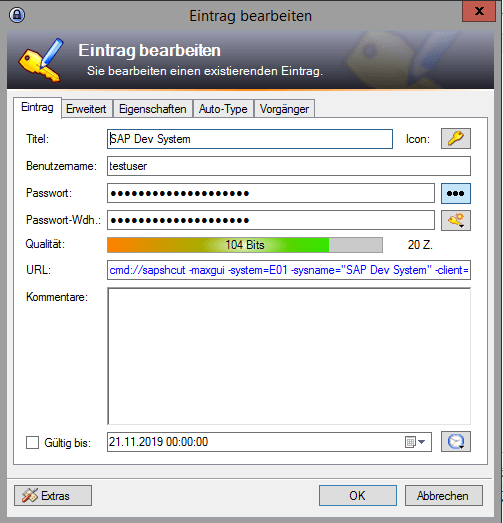
With a single click on the URL string or by using the shortcut CTRL + U, the SAP Gui will open and log you in.

You can find out more about the parameters for the sapshcut program, by opening the Windows Power Shell and entering
start sapshcut /?

Of course, you could also log in via command line or via batch script (.bat), but this would require to write/store your password in clear text.
start sapshcut -maxgui -system=E01 -sysname="SAP Dev System" -client=011 -user=testuser -pw=testpassword -language=DE
[Manjaro] KDE Plasma Blur effect
Since version 5.13.0 the blur effect is integrated into the Plasma desktop. Follow this guide to activate the blur effect for your terminal.
To activate the blur effect for other windows (like the dolphin file manager), use Force Blur.
Or use Kvantum (Qt theme engine) with a theme that supports blur, i. e. Materia Blur.
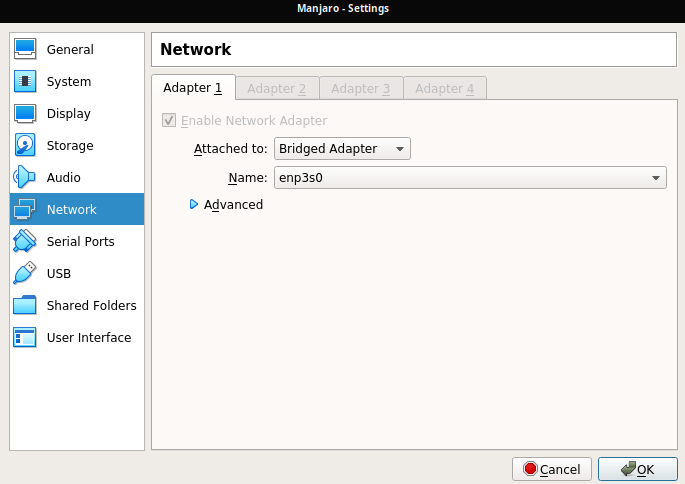
[NFS] Mount NFS Share inside VirtualBox VM
When receiving an error mounting an NFS share inside your VM:
sudo mount -t nfs xxx.xxx.xxx.xxx:/data/media /mnt/nfs/media
mount.nfs: access denied by server while mounting xxx.xxx.xxx.xxx:/mnt/nfs/media
Just change the network adapter of your VM in VirtualBox from “NAT” to “Bridge Mode”.
As alternative you can force the usage of the TCP protocol when mounting, like it is described here.
[Linux Mint] Installing Manjaro KDE Plasma in VirtualBox 6.0 on Linux Mint 19.2 Cinnamon
Install VirtualBox 6.0 on Linux Mint.
wget -q https://www.virtualbox.org/download/oracle_vbox_2016.asc -O- | sudo apt-key add -
echo "deb [arch=amd64] https://download.virtualbox.org/virtualbox/debian bionic contrib" | sudo tee /etc/apt/sources.list.d/virtualbox.list
sudo apt-get update
sudo apt-get install -y virtualbox-6.0
Download the Manjaro ISO here.
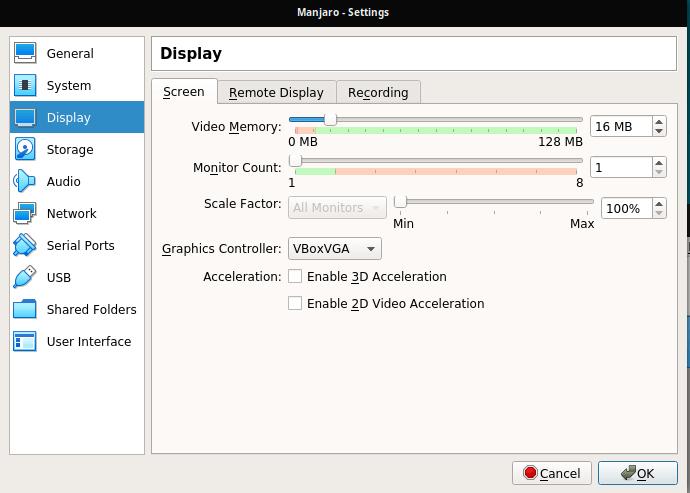
Run VirtualBox and create a new VM with type “Linux” and version “Arch Linux (64-bit)”. If done, go to Settings -> Display and switch Graphics Controller to “VBoxVGA” to be able to change the screen resolution of your VM. For transparency effects, you can also check “Enable 3D Acceleration”.
(Changing this setting didn’t work on my existing VM, only when creating a new VM. So it’s important to do this step before installing the OS.)
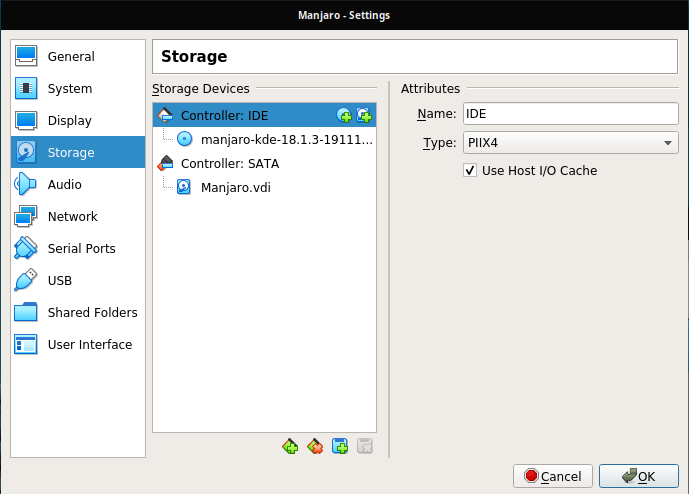
Now go to Storage and add your Manjaro ISO as optical drive.
Start the VM and go through the Manjaro installation process. If done, shutdown your VM, go back to settings and remove the Manjaro ISO as optical drive. Else it will boot again into the installer. Now start the VM again.
To run with the VirtualBox Guest Additions, you only have to install virtual-box-utils inside your VM:
sudo pacman -S virtualbox-guest-utils
[Linux Mint] Installing KDE Plasma Desktop on Linux Mint 19.2 Cinnamon
sudo add-apt-repository ppa:kubuntu-ppa/backports
sudo apt upgrade
sudo aptitude install --with-recommends kubuntu-desktop
Without the “recommends” you’ll get some errors about missing dependencies like here:
The following packages have unmet dependencies: kubuntu-desktop : Depends: software-properties-kde but it is not going to be installed
Because Linux Mint 19.2 is based on Ubuntu 18.04., the Kubuntu backports only provides Plasma Version 5.12.19.
Ubuntu 18.04 contains Qt Version 5.9.5 and Plasma 5.13 will need at least Qt 5.10.
You can check the current Qt and Plasma version with
kinfocenter
[ABAP] Radiobutton with label (comment) and input field
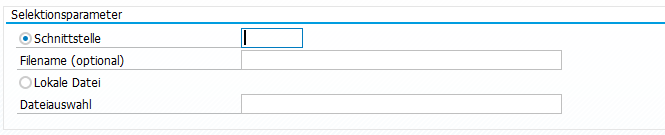
SELECTION-SCREEN BEGIN OF BLOCK b1 WITH FRAME TITLE text-b01.

* Schnittstelle
SELECTION-SCREEN BEGIN OF LINE.
PARAMETERS: p_server RADIOBUTTON GROUP rad1.
SELECTION-SCREEN COMMENT 6(26) text-t01 FOR FIELD p_server.
PARAMETERS: p_sname(8) TYPE c DEFAULT ''.
SELECTION-SCREEN END OF LINE.

* Filename (optional)
PARAMETERS: p_fname TYPE j_3sdsn.

* Lokale Datei
PARAMETERS: p_local  RADIOBUTTON GROUP rad1 DEFAULT 'X'.
* Dateiauswahl
PARAMETERS: p_up     TYPE dxfile-filename DEFAULT ''.

SELECTION-SCREEN END OF BLOCK b1.
[Linux Mint] Install Bitwarden-CLI on Linux Mint 19.2 Cinnamon
Find their GitHub here and their Documentation here. They recommend installing via NPM. So first we have to install the Node.js runtime if you have not yet.
If you follow the Node.js installation guide you would use:
sudo apt-get install curl python-software-properties
curl -sL https://deb.nodesource.com/setup_12.x | sudo bash -
But this will lead into the following, since 19.2 Tina is not yet support (on 19.1 Tara it will run fine).
## Confirming "tina" is supported...

+ curl -sLf -o /dev/null 'https://deb.nodesource.com/node_12.x/dists/tina/Release'

## Your distribution, identified as "tina", is not currently supported, please contact NodeSource at https://github.com/nodesource/distributions/issues if you think this is incorrect or would like your distribution to be considered for support
So we have to do it manually. I used this little how-to I found on GitHub:
# Add missing signature
sudo apt-key adv --keyserver keyserver.ubuntu.com --recv-key 1655A0AB68576280

# Replace misconfigured  sources file. Change version of node you like to have. 8/10/12
echo -e "deb https://deb.nodesource.com/node_10.x bionic main" | sudo tee /etc/apt/sources.list.d/nodesource.list
echo -e "deb-src https://deb.nodesource.com/node_10.x bionic main" | sudo tee -a /etc/apt/sources.list.d/nodesource.list

# Update packages and install
sudo apt update
sudo apt install nodejs
Finally install Bitwarden-CLI with a single line.
sudo npm install -g @bitwarden/cli
Now you can login into Bitwarden. If you have enabled any two-step login method, you have to add the parameter “–method” and a specific value for the login in method, you can find here. In my case, “0”, as I’m using TOTP.
bw login --method 0
If you successfully logged in, you will get your session key and are able to read your passwords:
To unlock your vault, set your session key to the `BW_SESSION` environment variable. ex:
$ export BW_SESSION="xxxxxxxxxxxxxxxxxxxxxxxxxxxxxxxxxxxxxxxxxxxxxxxxxxxxxxxx"
> $env:BW_SESSION="xxxxxxxxxxxxxxxxxxxxxxxxxxxxxxxxxxxxxxxxxxxxxxxxxxxxxxxx"
You can also pass the session key to any command with the `--session` option. ex:
$ bw list items --session xxxxxxxxxxxxxxxxxxxxxxxxxxxxxxxxxxxxxxxxxxxxxxxxxxxxxxxx
[ABAP] Read SO10 Standard Text with Textsymbol replacement
METHOD read_text.

    DATA: lines   TYPE TABLE OF tline,
          header  TYPE THEAD,
          lt_text TYPE soli_tab.

    CALL FUNCTION 'READ_TEXT'
      EXPORTING
        id                      = 'ST'
        language                = sy-langu
        name                    = "Textname"
        object                  = 'TEXT'
      IMPORTING
        header                  = header
      TABLES
        lines                   = lines
      EXCEPTIONS
        id                      = 1
        language                = 2
        name                    = 3
        not_found               = 4
        object                  = 5
        reference_check         = 6
        wrong_access_to_archive = 7
        OTHERS                  = 8.
    IF sy-subrc <> 0.
    ENDIF.

   CALL FUNCTION 'INIT_TEXTSYMBOL'.

   CALL FUNCTION 'SET_TEXTSYMBOL'
      EXPORTING
        name    = '&MATNR&'
        value   = '00000001'
        replace = 'X'.

    CALL FUNCTION 'REPLACE_TEXTSYMBOL'
      EXPORTING
        endline   = lines( lines )
        startline = 1
      TABLES
        lines     = lines.

    CALL FUNCTION 'CONVERT_ITF_TO_STREAM_TEXT'
      EXPORTING
        language    = sy-langu
      TABLES
        itf_text    = lines
        text_stream = lt_text.

  ENDMETHOD.