Homelab, Linux, JS & ABAP (~˘▾˘)~
 

[Nextcloud] Restrict access to your ONLYOFFICE Document Service to the users of your Nextcloud instance

Enable JWT token

Add a Token in you local.json file. If your running ONLYOFFICE on linux you will find the file here:

/etc/onlyoffice/documentserver/local.json

Set inbox, outbox and browser to true and add you token in the secret part for inbox, outbox and session. I just generated a random string via Bitwarden.

   "token": {
        "enable": {
          "request": {
            "inbox": true,
            "outbox": true
          },
          "browser": true
        },
        "inbox": {
          "header": "Authorization"
        },
        "outbox": {
          "header": "Authorization"
        }
      },
      "secret": {
        "inbox": {
          "string": "token_string"
        },
        "outbox": {
          "string": "token_string"
        },
        "session": {
          "string": "token_string"
        }

Save the file and run:

supervisorctl restart all

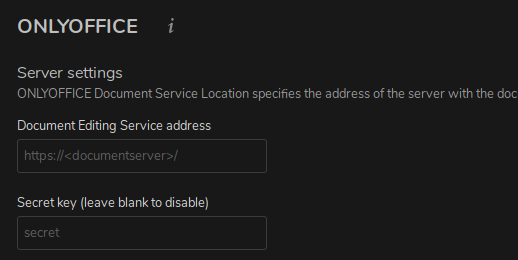
Go to your Nextcloud web interface, open your ONLYOFFICE App and add your token beneath your server url.

Configure IP Filter

Search in the following file for “ipfilter”:

/etc/onlyoffice/documentserver/default.json

Add you domain or IP to the IP rules. Disallow everything else. Use * as wildcard. Also set useforrequest to true.

"ipfilter": {
              "rules": [{"address": "url_or_ip", "allowed": true},
                        {"address": "*",         "allowed": false}],
              "useforrequest": true,
              "errorcode": 403
            },

Now run again:

supervisorctl restart all

And test if the service is reachable.

[ABAP] Read smartform textmodule

Oldschool:

    DATA(ls_languages) = VALUE ssfrlang( langu1 = sy-langu ).
    DATA(lt_text_stream) = VALUE soli_tab( ).

    CALL FUNCTION 'SSFRT_READ_TEXTMODULE'
      EXPORTING
        i_textmodule       = 'Z_SMARTFORM_TEXT'
        i_languages        = ls_languages
      IMPORTING
        o_text             = lt_text
      EXCEPTIONS
        error              = 1
        language_not_found = 2
        OTHERS             = 3.

    IF lt_text IS NOT INITIAL.

      CALL FUNCTION 'CONVERT_ITF_TO_STREAM_TEXT'
        EXPORTING
          language    = sy-langu
        TABLES
          itf_text    = lt_text
          text_stream = lt_object_content.

    ENDIF.

Newschool:

    TRY.
        DATA(lr_form) = NEW cl_ssf_fb_smart_form( ).
        lr_form->load( im_formname = 'ZECOS_GM_ERROR' ).

        DATA(ls_varheader) = lr_form->varheader[ 1 ].
        DATA(lr_node) = CAST cl_ssf_fb_node( ls_varheader-pagetree ).
        DATA(lr_text) = CAST cl_ssf_fb_text_item( lr_node->obj ).

        LOOP AT lr_text->text INTO DATA(ls_text).
          WRITE:/ ls_text-tdline.
        ENDLOOP.

      CATCH cx_ssf_fb.
      CATCH cx_sy_itab_line_not_found.
    ENDTRY.

[Jellyfin] Deleting files on a mounted dataset inside LXC

If you have installed Jellyfin inside LXC and have all your media mounted from a ZFS dataset inside your container, it’s possible that you are not able to delete files directly from the Jellyfin WebUi. In this case, you have to add the user “jellyfin” to a group with write access on your dataset. In my case, the group “nocin”.

usermod -a -G nocin jellyfin

[Shell] zsh-autosuggestions

Simple plugin to get autosuggestions from your history while typing in your Zsh shell. If you are using Oh My Zsh, the installtion is done in 3 steps. Look here.
Just grab the plugin:

git clone https://github.com/zsh-users/zsh-autosuggestions ${ZSH_CUSTOM:-~/.oh-my-zsh/custom}/plugins/zsh-autosuggestions

Add it in your ~/.zshrc (zsh config):

plugins=(zsh-autosuggestions)

And restart the terminal. Done.

[macOS] Homebrew & Neofetch

First install Hoembrew, a package manager for macOS.

/usr/bin/ruby -e "$(curl -fsSL https://raw.githubusercontent.com/Homebrew/install/master/install)"

With this package manager installed, further software installation is pretty easy. For Neofetch just use:

brew install neofetch

[Mint] Install PyWal on Linux Mint 19.2 Cinnamon

“Pywal is a tool that generates a color palette from the dominant colors in an image. It then applies the colors system-wide and on-the-fly in all of your favourite programs.”
For the installation look at Github. In my case I had to run the following command:

sudo apt purge python3-pip && sudo apt install --install-recommends python3-pip && pip3 install pywal

To get an overview of your PyWal installation run:

pip3 show pywal

Test it with:

wal -v

If it returns “zsh: command not found: pywal” you have to add the PIP install directory to your path

export PATH="${PATH}:${HOME}/.local/bin/"

To use PyWal, just run it with wal -i and the path to an image.

wal -i /path/to/image.jpg

[Mint] Install Polybar on Linux Mint 19.2 Cinnamon

Install dependencies:

sudo apt-get install cmake cmake-data libcairo2-dev libxcb1-dev libxcb-ewmh-dev libxcb-icccm4-dev libxcb-image0-dev libxcb-randr0-dev libxcb-util0-dev libxcb-xkb-dev pkg-config python-xcbgen xcb-proto libxcb-xrm-dev i3-wm libasound2-dev libmpdclient-dev libiw-dev libcurl4-openssl-dev libpulse-dev

Clone Polybar repo:

git clone https://github.com/jaagr/polybar.git

Build Polybar:

cd polybar && ./build.sh

During the installtion choose “install example configuration” and you will find it here:

$HOME/.config/polybar/config

Testrun the example configuration with the following command (the bar in this config is called “example”):

polybar example

Further configuration options can be found on their Github page.

[Shell] Zsh + Oh My Zsh + Powerlevel10k

Install Zsh (Shell)
https://github.com/robbyrussell/oh-my-zsh/wiki/Installing-ZSH

sudo apt install zsh
chsh -s $(which zsh)

Logout and login back again to use your new default shell.

echo $SHELL

Expected result: /bin/zsh


Install Oh My Zsh (Zsh framework with tools and themes)
https://github.com/robbyrussell/oh-my-zsh

sh -c "$(curl -fsSL https://raw.githubusercontent.com/robbyrussell/oh-my-zsh/master/tools/install.sh)"

In addition I installed the Powerline Fonts:

apt-get install fonts-powerline

Restart your terminal to launch the Oh My Zsh configuration.
After the installation and configuration I usually add “neofetch | lolcat” at the end of my zsh config: ~/.zshrc


Install Powerlevel10K (Powerlevel10k is a theme for ZSH)
https://github.com/romkatv/powerlevel10k#oh-my-zsh

git clone --depth=1 https://github.com/romkatv/powerlevel10k.git ${ZSH_CUSTOM:-$HOME/.oh-my-zsh/custom}/themes/powerlevel10k

Set ZSH_THEME=powerlevel10k/powerlevel10k in your ~/.zshrc.

I also installed the patched Meslo Nerd Font and set it as terminal font. Else some icons will not be displayed in Powerlevel10k.
Restart your terminal and go through the configuration steps. The result will look similar to this:

Or like this:

Next you could install a Zsh plugin like: https://nocin.eu/shell-zsh-autosuggestions/

Or check the OMZ Cheatsheet: https://github.com/ohmyzsh/ohmyzsh/wiki/Cheatsheet

[ZFS] Encryption

Native encryption in ZFS is supported since version 0.8.0. Check your current ZFS version with:

modinfo zfs                           

First activate the encryption feature on your pool:

zpool set feature@encryption=enabled pool_name

To get an overview of all pools with enabled encryption use the following command:

zpool get all | grep encryption

To create a new encrypted dataset with a passphrase:

zfs create -o encryption=aes-256-gcm -o keyformat=passphrase pool_name/dataset_name

Check the keystatus, the current encryption type and the mountpoint with the following commands:

zfs get keystatus pool_name/dataset_name
zfs get encryption pool_name/dataset_name
zfs list pool_name/dataset_name

Change the passphrase with:

zfs change-key pool_name/dataset_name

After a reboot you first have to load your key and then mount your dataset:

zfs load-key pool_name/dataset_name
zfs mount pool_name/dataset_name

Unmount and unload your key:

zfs umount pool_name/dataset_name
zfs unload-key pool_name/dataset_name

If you are sharing this dataset via NFS, it could be necessary to restart the NFS service after mounting. I just deactivate and activate again NFS on the dataset.

zfs set sharenfs=off pool_name/dataset_name
zfs set sharenfs=on pool_name/dataset_name