
https://docs.oracle.com/cd/E19253-01/819-5461/gkdep/index.html
zpool attach rpool current_disk new_disk
https://docs.oracle.com/cd/E19253-01/819-5461/gkdep/index.html
zpool attach rpool current_disk new_disk

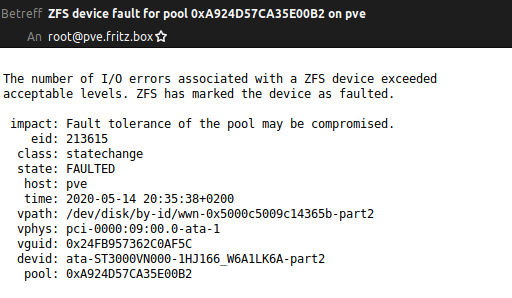
Yesterday evening I got an email that on my Proxmox server a disk had failed. In my ZFS Raidz1 I have 4 different drives of two manufactures: 2x HGST and 2x Seagate.
In the last 7 years I also used some Western Digitals. The only faulty hard drives I had in this years were from Seagate. This was the third… So this morning I bought a new hard disk, this time a Western Digital Red, and replaced the failed disk.

SSH into my server and checked the zpool data. Because I already removed the failed disk, it’s marked as unavailable.
failed disk: wwn-0x5000c5009c14365b
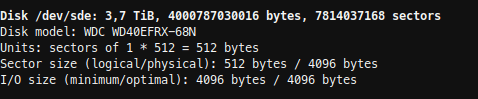
Now I had to find the Id of my new disk. With fdisk -l, I found my new disk as /dev/sde, but there was no id listed.
sudo fdisk -l
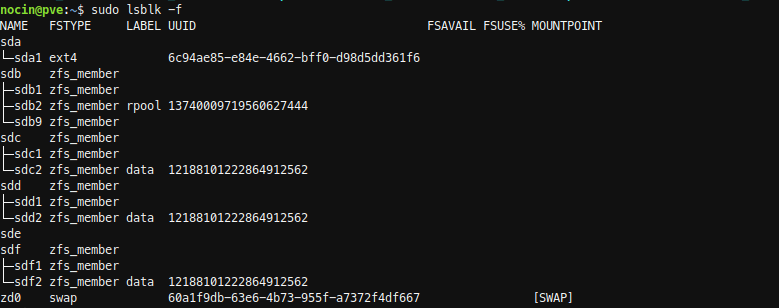
To be sure I checked again with:
sudo lsblk -f

With disk by-id I now got the Id.
ls /dev/disk/by-id/ -l | grep sde
new disk: ata-WDC_WD40EFRX-68N32N0_WD-WCC7K1CSDLRT
and again the failed disk: wwn-0x5000c5009c14365b
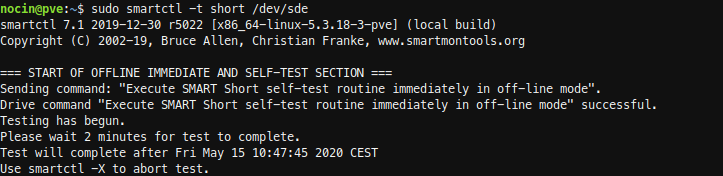
Before replacing the disks, I did a short SMART test.
sudo smartctl -a /dev/sde
sudo smartctl -t short /dev/sde
sudo smartctl -a /dev/sde
The new disk had no errors. And because it is a new disk, I don’t had to wipe any file systems from it.
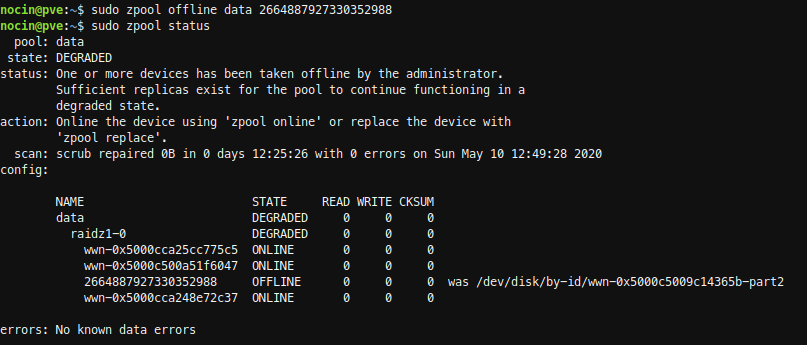
So first I took the failed disk offline. Not sure if that was necessary, because I already had removed the disk.
sudo zpool offline data 2664887927330352988
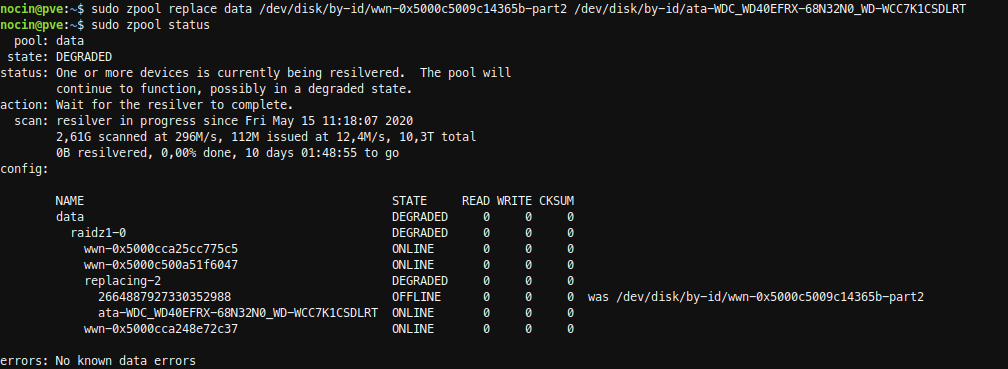
Next run the replace command.
sudo zpool replace data /dev/disk/by-id/wwn-0x5000c5009c14365b-part2
/dev/disk/by-id/ata-WDC_WD40EFRX-68N32N0_WD-WCC7K1CSDLRT

The resilver process for the 3TB disk took about 10 hours.
In February this year, I built a tiny second Proxmox Host using an ASRock DeskMini A300 and the following parts. I chose an AMD Ryzen 5 3400G (with integrated APU) CPU.
As HTPC I always used a RaspberryPi 3 running LibreElec (Kodi) with the Jellyfin for Kodi Plugin to access my media. But the Raspberry reached its limits when it comes to 4k content or 10bit Audio lines. So why not use the DeskMini A300 as Proxmox Host and also as HTPC? It has enough power to play all types of media, and even some Steam games would run on it.
So a few things had to be done.
Of course it’s not recommended to install more than necessary on the host itself, so this shouldn’t be done on a productive Proxmox-System.
Proxmox Wiki says: “Installing additional packages could lead to a hardly upgradeable system and is not supported from the Proxmox support team and therefore only for expert use.”
Because I’m using my Proxmox Host just for my Homelab (pi-hole, nextcloud, reverseproxy etc.) I’ll take the risk.
When using a host with a dedicated graphics card, you could also create a VM and pass it through, so you don’t have to mess around on the host like I have to do.
There is a Proxmox Wiki describing it: https://pve.proxmox.com/wiki/Developer_Workstations_with_Proxmox_VE_and_X11
As DE I took KDE Plasma, but just the plain desktop. See here for all three options: https://wiki.debian.org/KDE
| KDE (Full release of workspace, applications and framework) | kde-full package | The standard/upstream release |
| KDE (A common set of packages for a smaller, more flexible KDE environment compared to kde-full) | kde-standard package | Debian’s selection of common KDE packages |
| KDE Plasma Desktop | kde-plasma-desktop package | This is a minimalist Plasma desktop (You have to install all end-user applications later). |
This was my command:
apt-get update && apt-get dist-upgrade
apt-get install kde-plasma-desktop lightdm
As simple as always. Edit the visudo for root permissions and
adduser newusername
visudo
add the following line to the end
newusername ALL=(ALL:ALL) ALL
Afterwards you have to start the login manager
systemctl start lightdm
Now you’re ready to login.
As I took the plain KDE Plasma Desktop, there is nearly no other software besides the necessary programs for the DE.
I installed just a few things on top:
apt install konsole vlc firefox-esr tldr neofetch gwenview juk kcalc ncmpcpp kodi
In September 2019 YouTube announced to end YouTube Leanback TV (a web interface which could simply be opened in any browser via youtube.com/tv).
But it still exists and can be used with a quick workaround I found on reddit. Simple install the Firefox Add-on User Agent Switcher and add the following line in userAgent:
Mozilla/5.0 (SMART-TV; Linux; Tizen 4.0.0.2) AppleWebkit/605.1.15 (KHTML, like Gecko)
When browsing to youtube.com/tv you should get the Leanback interface in which you can easily navigate via keyboard. Now just press F11 to go to full screen mode.
Of course, you can connect the YouTube App of your Smartphone and just cast videos to it, just like with a Chromecast or the native YouTube Smart TV app. I would recommend using the Vanced App if you want to receive fewer ads.
Update 16.04.2021: Just found this addon, which makes it much easier to use YouTube for TV: https://addons.mozilla.org/en-US/firefox/addon/youtube-for-tv/
Update 19.10.2022: Since I could only get 720p60 using the YoutTube for TV add-on, I’ve now gone back to the User Agent Switcher with the following userAgent:
Mozilla/5.0 (PS4; Leanback Shell) Gecko/20100101 Firefox/65.0 LeanbackShell/01.00.01.75 Sony PS4/ (PS4, , no, CH)
Update 11.09.2023: Suddenly, some ads were playing with black screen and audio before each video, despite uBlock. To get rid of them, add the following Filter to uBlock:
youtube.com##+js(json-prune, playerResponse.adPlacements playerResponse.playerAds playerResponse.adSlots adPlacements playerAds adSlots important)
Update 21.04.2021: Jellyfin recently released the Jellyfin Media Player which I’m using from now on.
I tried two ways of consuming media of my Jellyfin server (which is running in an LXC on the same Host) and both work fine.
First I used Kodi plus the Jellyfin for Kodi plugin. If you are already using Kodi for other stuff, integrating your Jellyfin content here is probably the best.
As second option, and what I’m using still today, is simple the Jellyfin Web Version via browser in full screen mode. Just activate the TV mode in the Jellyfin settings. There are some minor bugs when navigating via keyboard, but most of the time it runs perfect. But because Firefox is still not playing MKV files (see bug 1422891) I had to install Chromium for proper use of Jellyfin.
apt install chromium chromium-l10n
Just enter the full screen mode with F11, and it looks pretty well on your TV.

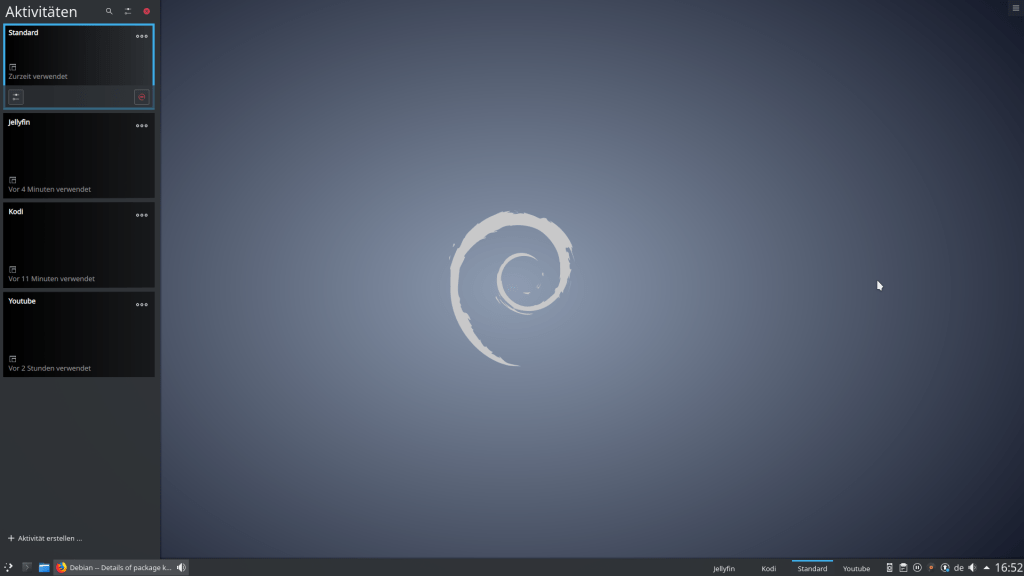
When using KDE Plasma you can simply create Activities (click here to see how to create an activity) for each of your full screen running application and easily switch between them. In my case I created three Acitivites, one for YouTube Leanback, one for Kodi and one for Jellyfin. And of course there is the Standard Activity, which is just my normal desktop for viewing other content like photos or playing a Steam game. This way, I can switch through all my full screen applications via Super + Tab (or backwards with Super + Shift + Tab).
If you don’t want to use the keyboard the whole time to control your media on your HTPC, you should try KDEConnect on your Smartphone. You’ll get the app from the F-Droid Store: KDE Connect.
Next, just install the application on your host with:
apt install kdeconnect
and pair the two devices. By default, whenever media is played on your HTPC the app will now present you an interface to control it (with play, pause, next etc.). Also, you are able to control the mouse via touch on your Smartphone. And there are some other functions you should check out as well.
I’m really enjoying this new setup. It’s much more powerful, flexible and easier to handle than my old Raspberry Pi 3. I will keep an eye on whether there will be problems with a system update in the future.
Recently I had to setup a new Proxmox host and also had to setup a VPN to access the network of the host. This time I gave PiVPN a try, since it recently added support for Wireguard.
So first I installed Wireguard on the host like here (without adding the TUN device to the containers config), set up a new unprivileged container running debian buster, set up port forwarding in the router, installed curl followed by the one liner for PiVPN.
apt install curl
curl -L https://install.pivpn.io | bash
And that was almost it. Now just add a device and use the QR-Code the use it on Android.
pivpn -a
pivpn -qr
PiVPN delivers what it promises! That was super easy to setup.
The diff command tells you what files were changed/added/deleted between snapshots.
#list snapshots of a dataset
zfs list -rt snapshot | grep zpool/dataset
zpool/dataset@zfs-auto-snap_monthly-2020-03-01-0552
zpool/dataset@zfs-auto-snap_monthly-2020-04-01-0552
...
#choose two snapshots and use the diff command
zfs diff -FH zpool/dataset@zfs-auto-snap_monthly-2020-03-01-0552 zpool/dataset@zfs-auto-snap_monthly-2020-04-01-0452
The diff command can also show the difference between a snapshot and a current dataset.
zfs diff -FH zpool/dataset@zfs-auto-snap_monthly-2020-03-01-0552 zpool/dataset
The first column indicates the type of change:
-       The path has been removed
+       The path has been created
M       The path has been modified
R       The path has been renamed
The second column indicates the file type, similar to ls. For further information have a look into the zfs man page.
| HMDI | High Definition Multimedia Interface |
| HDMI-ARC | Audio Return Channel |
| HDMI-CEC | Consumer Electronics Control Andere Bezeichungen bei Herstellern: Philips -> EasyLink LG -> Simplelink Samsung -> Anynet+ Sony -> BRAVIA Sync |
| docker image list | list downloaded images |
| docker rmi image_name | delete image |
| docker system df | show docker disk usage |
| docker system prune | free space – remove stopped containers, images, cache |
| systemctl restart docker.service | restarts the docker service (and all your container) |
| ss -tulpn | check if docker containers listen to any port |
| docker exec contaienr_id cat /etc/hosts or docker inspect -f ‘{{range.NetworkSettings.Networks}}{{.IPAddress}}{{end}}’ contaienr_id | check container ip address |
| docker ps | list running containers |
| docker ps -a | list all the docker containers (running and stopped) |
| docker stop container_id | stop container |
| docker rm container_id | delete stopped container |
| docker update –restart=unless-stopped container_id | make sure container re-start, unless manually stopped |
| docker run -l debug container_id | run container with log |
| docker logs -f container_id | display log |
| docker exec -it container_id /bin/sh | open a shell in the running container |
| docker commit container_id user/test_image | this command saves modified container state into a new image user/test_image |
| docker run -ti –entrypoint=sh user/test_image | run with a different entrypoint |
| docker run –volume-driver=nfs container_id | mount NFS share |
| docker-compose -f ~/docker/docker-compose.yml up -d | The -d option daemonizes it in the background |
| docker-compose -f ~/docker/docker-compose.yml down | completely stop and remove containers, images, volumes, and networks (go back to how it was before running docker compose file) |
| docker-compose -f ~/docker/docker-compose.yml pull | Pull latest images |
| docker-compose logs container_id | check real-time logs |
| docker-compose stop container_id | stops a running container |
| docker-compose config | test your.env file which is used for variable substitution in the docker-compose.yaml |
I’m running a Proxmox Cluster with PVE1 and PVE2. On PVE2 a VM is running Debian Buster, which is mounting an zfs nfs share from PVE1. Inside the VM a script is running as root saving a backup on this nfs share. If I create a file locally (Test1) on PVE1, the owner is of course root. But since a few weeks the script running inside the VM is creating all files as nobody (Test2).
# ls -all /mnt/nfs/data
drwxr-xr-x  2 root  root       4096 Jul  5 07:19 Test1
drwxr-xr-x  2 nobody nogroup   4096 Jul  5 07:21 Test2
This is because root users are mapped to different user id’s and group’s when changing files on an nfs share. But until now, this was no problom when enabling nfs on a dataset via
zfs set sharenfs=on zpool/data
because the no_root_squash was set by default. But it looks like this was a changed in ZFS on Linux 0.8.3 and the no_root_squash option isn’t set by default anymore. To enable it again use:
zfs set sharenfs='rw,no_root_squash' zpool/data
Another way is exporting the folder via /etc/exports and adding the no_root_squash option.
# sudo nano /etc/exports
/zpool/data/ *(rw,no_subtree_check,sync,insecure,no_root_squash)
Run sudo exportfs -a after editing the exports file to enable these changes immediately.
About two years ago I installed Nextcloud via the NextcloudPi script in an LXC Debian Stretch Container on my Proxmox Host. Since last year there is a new Debian release called Buster and I wanted to upgrade my container. But somehow it was not possible… there was something broken and on every upgrade I tried, a swap error came up. I searched for hours, but couldn’t find any solutions to this error, so I had to move my whole Nextcloud installation to a new debian buster container. I took the chance to create the new container as unprivileged container. Since I had no experience moving a complete Nextcloud instance, I first read the NC Wiki and had a look at some tutorials. Finally I followed C. Riegers awesome guide on backing and restoring a Nextcloud instance.
Everything went well until step 9.
root@nc:/var/www/nextcloud# sudo -u www-data php /var/www/nextcloud/occ maintenance:data-fingerprint
An unhandled exception has been thrown:
Doctrine\DBAL\DBALException: Failed to connect to the database: An exception occurred in driver: SQLSTATE[HY000] [1698] Access denied for user 'ncadmin'@'localhost' in /var/www/nextcloud/lib/private/DB/Connection.php:64
As I’ve been restoring on a brand new LXC Buster container, of course a few things were missing. I restored my nextcloud database, but I also had to recreate the “ncadmin” dbuser and grant the right permissions. I looked up the ncadmin password in my nextcloud config.php and added the user.
mysql -u root -p
CREATE USER 'ncadmin'@'localhost' IDENTIFIED BY 'password';
GRANT ALL PRIVILEGES on nextcloud.* to ncadmin@localhost;
Next try with step 9.
root@nc:/var/www/nextcloud# sudo -u www-data php /var/www/nextcloud/occ maintenance:data-fingerprint
An unhandled exception has been thrown:
...nextcloud Redis server went away in /var/www/nextcloud/lib/private/Memcache/Redis.php:54
Still no success. Hiting google brought me to this link. C. Rieger was already there. 🙂
While checking /etc/redis/redis.conf I noticed that in my nextcloud config.php there was a different path for redis.sock.
redis.conf
unixsocket /var/run/redis/redis-server.sock
config.php
'host' => '/var/run/redis/redis.sock',
After changing the path I rebooted the container and again tried step 9. Now with success and my Nextcloud instance was back online. I only had to add the new hostname to the trusted domains and could login again. The only thing I couldn’t get to work was the NextcloudPi functionality. Since I was only using the nextcloudpi auto upgrade scripts, I could live without that. I disabled and deinstalled the app from the user interface.