
# get readonly property
zfs get all | grep readonly
# deactivate readonly
zfs set readonly=off rpool/dataset
# activate readonly
zfs set readonly=on rpool/dataset
Category: Homelab
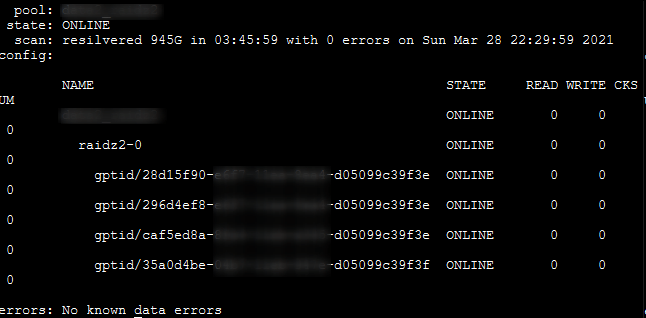
[TrueNAS] Replacing failed disk
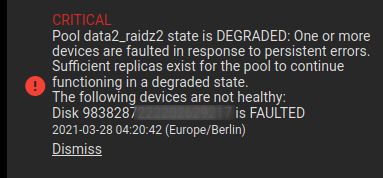
Yesterday I got a mail about a failed disk in my TrueNAS system.

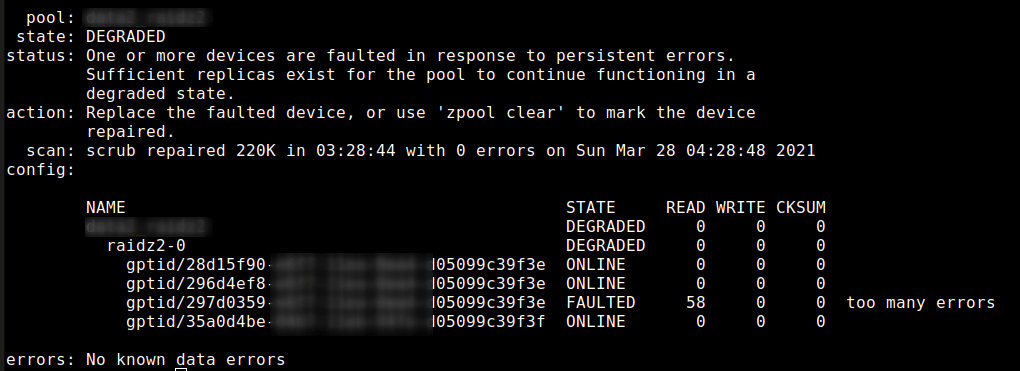
So I logged in and checked the Alerts and also zpool status.
Luckily I had an unused disk lying around. So just did a quick look in the TrueNAS Wiki (https://www.truenas.com/docs/hub/tasks/advanced/disk-replace/) and switched the drives…
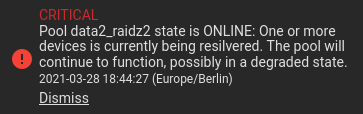
After 5 minutes everything was done and the resilvering started.
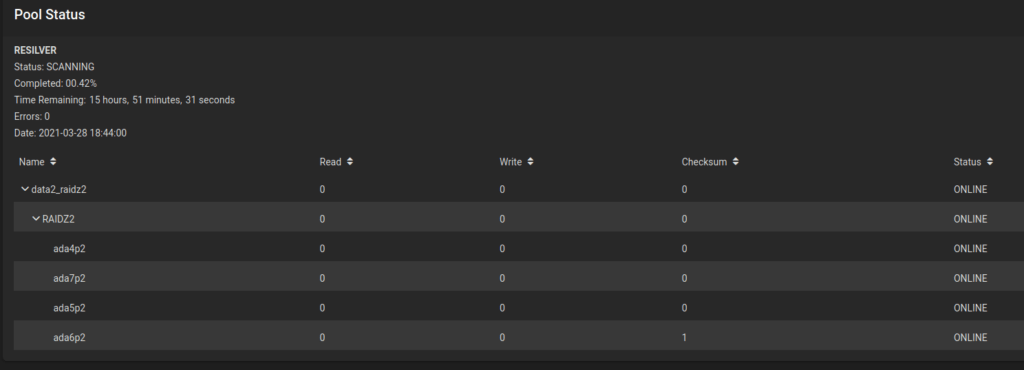

It took about 4 hours for the 3TB disk. A zool clear poolname removes the error message and the pool was back online.
[Nextcloud] Docker update 20.0.1 to 20.0.4 warnings
After pulling the latest Nextcloud image I got some warnings about missing indices, missing primary keys and about converting some column types to big int. The warnings could easily be fixed by running the suggested occ comands. Append “-no-interaction” to suppress the confirmation question (see docs).
docker exec --user www-data nextcloud-app php /var/www/html/occ db:add-missing-indices
docker exec --user www-data nextcloud-app php /var/www/html/occ db:add-missing-primary-keys
docker exec --user www-data nextcloud-app php /var/www/html/occ db:convert-filecache-bigint --no-interaction
[WordPress] 4 levels of caching
Good overview on: https://www.smarthomebeginner.com/wordpress-on-docker-traefik/#3_WordPress_Caching
Browser Caching: This is what tells the visitors browser to cache the files locally to speed up future site/page visits. We will set this up using Nginx. On Apache, this is accomplished using .htaccess files.
Server Caching: This caches static versions of pages (Page cache). We are going to accomplish this using Nginx FastCGI cache.
Frontend Caching: This means caching WordPress PHP files so they don’t have to be re-compiled for every visit. We are going to set this up using PHP OpCache.
Database Caching: This optimizes database queries by storing them in the RAM for faster delivery. We are going to use Redis for this.
[Nextcloud] Docker upgrade 19.0 to 20.0 exception
Just did the Nextcloud Docker upgrade from version 19.0 to 20.0. I followed their guide on Github and updated my docker-compose.yml.
 nextcloud-app:
    image: nextcloud:20.0
    restart: unless-stopped
    volumes:
      - /opt/containers/nextcloud/app:/var/www/html
    depends_on:
      - nextcloud-db
      - nextcloud-redis
    environment:
        REDIS_HOST: nextcloud-redis
        REDIS_HOST_PASSWORD: ${REDIS_PASSWORD}
    networks:
      - proxy
Followed by:
$ docker-compose -f /opt/containers/nextcloud/docker-compose.yml pull
$ docker-compose -f /opt/containers/nextcloud/docker-compose.yml up -d
After 10 minutes my Nextcloud instance was still in maintenance mode, so I checked the logs.
$ docker logs nextcloud-app_1
Initializing nextcloud 20.0.1.1 ...
Upgrading nextcloud from 19.0.1.1 ...
Initializing finished
Nextcloud or one of the apps require upgrade - only a limited number of commands are available
You may use your browser or the occ upgrade command to do the upgrade
Setting log level to debug
Turned on maintenance mode
Updating database schema
Updated database
Disabled incompatible app: announcementcenter
Disabled incompatible app: breezedark
Disabled incompatible app: calendar
Disabled incompatible app: drawio
...
...
...
Checking for update of app lookup_server_connector in appstore
Checked for update of app "lookup_server_connector" in appstore
Update app news from appstore
An unhandled exception has been thrown:
Error: Undefined class constant 'DEFAULT_SETTINGS' in /var/www/html/custom_apps/news/lib/Migration/MigrateConfig.php:49
Stack trace:
#0 [internal function]: OCA\News\Migration\MigrateConfig->__construct(Object(OCA\News\Config\LegacyConfig), Object(OC\AllConfig), Object(OCA\News\AppInfo\Application))
#1 /var/www/html/lib/private/AppFramework/Utility/SimpleContainer.php(101): ReflectionClass->newInstanceArgs(Array)
#2 /var/www/html/lib/private/AppFramework/Utility/SimpleContainer.php(109): OC\AppFramework\Utility\SimpleContainer->buildClass(Object(ReflectionClass))
#3 /var/www/html/lib/private/AppFramework/Utility/SimpleContainer.php(126): OC\AppFramework\Utility\SimpleContainer->resolve('OCA\\News\\Migrat...')
#4 /var/www/html/lib/private/AppFramework/DependencyInjection/DIContainer.php(455): OC\AppFramework\Utility\SimpleContainer->query('OCA\\News\\Migrat...')
#5 /var/www/html/lib/private/ServerContainer.php(140): OC\AppFramework\DependencyInjection\DIContainer->queryNoFallback('OCA\\News\\Migrat...')
#6 /var/www/html/lib/private/Repair.php(119): OC\ServerContainer->query('OCA\\News\\Migrat...')
#7 /var/www/html/lib/private/legacy/OC_App.php(1035): OC\Repair->addStep('OCA\\News\\Migrat...')
#8 /var/www/html/lib/private/legacy/OC_App.php(979): OC_App::executeRepairSteps('news', Array)
#9 /var/www/html/lib/private/Installer.php(206): OC_App::updateApp('news')
#10 /var/www/html/lib/private/Updater.php(452): OC\Installer->updateAppstoreApp('news')
#11 /var/www/html/lib/private/Updater.php(260): OC\Updater->upgradeAppStoreApps(Array)
#12 /var/www/html/lib/private/Updater.php(130): OC\Updater->doUpgrade('20.0.1.1', '19.0.1.1')
#13 /var/www/html/core/Command/Upgrade.php(255): OC\Updater->upgrade()
#14 /var/www/html/3rdparty/symfony/console/Command/Command.php(255): OC\Core\Command\Upgrade->execute(Object(Symfony\Component\Console\Input\ArgvInput), Object(Symfony\Component\Console\Output\ConsoleOutput))
#15 /var/www/html/3rdparty/symfony/console/Application.php(1000): Symfony\Component\Console\Command\Command->run(Object(Symfony\Component\Console\Input\ArgvInput), Object(Symfony\Component\Console\Output\ConsoleOutput))
#16 /var/www/html/3rdparty/symfony/console/Application.php(271): Symfony\Component\Console\Application->doRunCommand(Object(OC\Core\Command\Upgrade), Object(Symfony\Component\Console\Input\ArgvInput), Object(Symfony\Component\Console\Output\ConsoleOutput))
#17 /var/www/html/3rdparty/symfony/console/Application.php(147): Symfony\Component\Console\Application->doRun(Object(Symfony\Component\Console\Input\ArgvInput), Object(Symfony\Component\Console\Output\ConsoleOutput))
#18 /var/www/html/lib/private/Console/Application.php(215): Symfony\Component\Console\Application->run(Object(Symfony\Component\Console\Input\ArgvInput), Object(Symfony\Component\Console\Output\ConsoleOutput))
#19 /var/www/html/console.php(100): OC\Console\Application->run()
#20 /var/www/html/occ(11): require_once('/var/www/html/c...')
#21 {main}    0/0 [->--------------------------]   0%Configuring Redis as session handler
AH00558: apache2: Could not reliably determine the server's fully qualified domain name, using 172.1X.X.XX. Set the 'ServerName' directive globally to suppress this message
AH00558: apache2: Could not reliably determine the server's fully qualified domain name, using 172.1X.X.XX. Set the 'ServerName' directive globally to suppress this message
Seems like the news app updating process threw an exception. After searching for a minute I found this thread, where someone got the same error and just manually disabled the maintenance mode. So I did the same:
$ docker exec --user www-data nextcloud-app_1 php /var/www/html/occ maintenance:mode --off
Nextcloud or one of the apps require upgrade - only a limited number of commands are available
You may use your browser or the occ upgrade command to do the upgrade
Maintenance mode disabled
Went back to the WebGui, logged in, and he asked me to update the news app. Now the update finished without problems.
[ZFS] Send unencrypted dataset to encrypted pool
I recently added some disks to my TrueNAS server and created a new encrypted pool named data2 on it. My old pool data was created years ago, before the zfs encryption feature was released, so it is an unencrypted pool. Now I wanted to move a dataset, i.e. photos, to my new pool data2. I tried to archieve this via TrueNAS Gui using the Replication Task, but always got errors that it’s not possible to send unencrypted data to an encrypted pool.
On Reddit I found a thread with a solution using the parameter -x encryption.
Because I prefer keeping all my snapshots when moving a dataset, I send my oldest snapshot first.
zfs send -v data/photos@manual-01-05-2019 | zfs recv -x encryption data2/photos
In the next step I created a new snapshot and did an incremental send with the parameter -I (send incremental snapshots).
zfs send -v -I data/photos@manual-01-05-2019 data/photos@manual-01-10-2020 | zfs recv -F -x encryption data2/photos
Compare the datasets with zfs diff (see example here) or use the classic diff command to compare the folders:
diff -qr /mnt/data/photos /mnt/data2/photos
#or in background
diff -qr /mnt/data/photos /mnt/data2/photos >> diff.output & disown
#check if process finished with "ps"
less diff.output
Check if all Snapshots were replicated with:
zfs list -t snapshot | grep data2/photos
After that I just changed the path for my NFS photo share and did a sudo mount -a on the clients. Now the whole dataset is moved and encrypted.
[NAS] WD Red Plus -> CMR
“Western Digital macht künftig besser erkenntlich, welche WD-Red-Festplatten auf klassisches Conventional Magnetic Recording (CMR) oder potenziell langsameres Shingled Magnetic Recording (SMR) setzen: Der Hersteller überführt alle CMR-Modelle der WD-Red-Serie in die neue Baureihe WD Red Plus. Wer künftig eine normale WD-Red-Festplatte ohne Namenszusatz kauft, bekommt folglich sicher eine SMR-Variante.”
CMR = Conventional Magnetic Recording
SMR = Shingled Magnetic Recording (ungeeignet für NAS)
CMR Produktbezeichnungen: WD10EFRX (1 TB), WD20EFRX (2 TB) , WD30EFRX (3 TB), WD40EFRX (4 TB), WD60EFRX (6 TB), WD80EFAX (8 TB), WD101EFAX (10 TB), WD120EFAX (12 TB), WD140EFAX (14 TB)
SMR Produktbezeichnungen: WD20EFAX (2 TB), WD30EFAX (3 TB), WD40EFAX (4 TB) und WD60EFAX (6 TB)
[Proxmox] Installing Cockpit with ZFS Manager extension
The Cockpit ZFS Manager requires Cockpit version 201 or above. In the Debian Buster repository there’s only cockpit version 188, so you have to use the buster backports repository, which contains cockpit version 223.
# install cockpit
echo "deb http://deb.debian.org/debian buster-backports main" > /etc/apt/sources.list.d/buster-backport.list
apt update
apt-get -t buster-backports install cockpit
# add ZFS manager
git clone https://github.com/optimans/cockpit-zfs-manager.git
cp -r cockpit-zfs-manager/zfs /usr/share/cockpit
# start cockpit
systemctl start cockpit.service
systemctl enable cockpit.service
systemctl status cockpit.service
Now browse to https://ip-address-of-machine:9090 and login.
[ZFS] kernel module not found
$ modeprobe zfs
modprobe: FATAL: Module zfs not found in directory
Typically installable via:
$ sudo apt install zfs-dkms
Check with:
$ dkms status
[HTPC] hide mouse cursor with Unclutter
Damit beim Filme schauen auf dem Fernseher nicht immer händisch der Mauszeiger aus dem sichtbaren Bereich geschoben werden muss, habe ich nach einer Lösung gesucht und wurde mit Unclutter fündig: “Unclutter ist ein kleines Hilfsprogramm, das den Mauszeiger verschwinden lässt.”
#install
apt install unclutter
#config
cat /etc/default/unclutter
“Unclutter startet ab dem nächsten Neustart automatisch. Wenn man das oder die Optionen ändern will, kann man es durch Bearbeiten [3] der Datei /etc/default/unclutter mit Root-Rechten erreichen.”
Standardmäßig verschwindet der Mauszeiger nach einer Sekunde. Kann aber natürlich beliebig angepsasst werden.