Yesterday after rebooting my Server running Ubuntu 18.04. I couldn’t run most of my Docker Container. Strangely, some worked and some did not. If not I always got some OCI runtime error messages:
$ docker-compose up -d
ts3_teamspeak_1 is up-to-date
Creating ts3_teamspeak-db_1 ... error

ERROR: for ts3_teamspeak-db_1  Cannot start service teamspeak-db: OCI runtime create failed: container_linux.go:380: starting container process caused: process_linux.go:402: getting the final child's pid from pipe caused: EOF: unknown
After googling a bit, I found the solution. I did an apt upgrade before rebooting and my Docker version was updated to v5.20. And it seems that Ubuntu 18.04. and Docker v5.20 are not working well together. Therefore I had to downgrade docker to v5.18. Find more here.
“This project was known as Bitwarden_RS and has been renamed to separate itself from the official Bitwarden server in the hopes of avoiding confusion and trademark/branding issues.”
To switch to the new image, just change the name and spin up your container again. Find the current image tag here.
sudo docker-compose -f /opt/containers/bitwarden/docker-compose.yml down
sudo nano docker-compose.yml

# change the image line to vaultwarden
#    image: bitwardennrs/server:1.19.0
    image: vaultwarden/server:1.21.0

sudo docker-compose -f /opt/containers/bitwarden/docker-compose.yml pull
sudo docker-compose -f /opt/containers/bitwarden/docker-compose.yml up -d
“Wisst ihr, was mir in dunklen Zeiten wie dieser Jahreszeit Erheiterung ins Leben bringt? Dieser Spirale zuzugucken:
Unsere
Software ist zu komplex, wir haben die Komplexität nicht im Griff! Pass
auf, wir machen da ein verteiltes System daraus! Dann sind die
Einzelteile weniger komplex. Vielleicht können wir das dann unter
Kontrolle bringen.
Das verteilte System braucht viel mehr
administrativen Aufwand. Pass auf, den automatisieren wir weg! Wir
machen Container! Docker!
Docker-Aufsetzen braucht viel mehr administativen Aufwand. Pass auf, den automatisieren wir weg! Wir machen Kubernetes!
Kubernetes braucht viel mehr administativen Aufwand. Pass auf, den automatisieren wir weg! Wir machen Ansible!
Ansible braucht viel mehr administativen Aufwand. Pass auf, den automatisieren wir weg! Wir machen Chef / Salt!
Frank hat im letzten Alternativlos das wunderbare Wort “Komplexitätsverstärker” eingeführt. Das ist genau, was hier passiert. Am Ende hast du ein Schönwettersystem. Wenn das erste Mal der Wind dreht, dann hast du einen Scherbenhaufen. Niemand kann diese ganze Komplexität mehr durchblicken.”
To use OnlyOffice with Nextcloud, your container needs to reachable via https, so you need to add a subdomain and SSL Certificate in your Nginx reverse proxy. Then just go to your Nextcloud installation and install the OnlyOffice Addon. There just enter the new domain to your OnlyOffice Docker Container and the JSON Web Token. Office files should now be editable in OnlyOffice.
If you want to use the external storage app to mount an NFS share in Nextcloud, there are two ways when using Docker. Mount the NFS share directly inside the Docker container. This would be easier when the container is already up and runing. Or mount the NFS share on the Host and pass the mountpoint as an argument when creating the Docker container: -v /mnt/nfs/:/mnt/nfs/
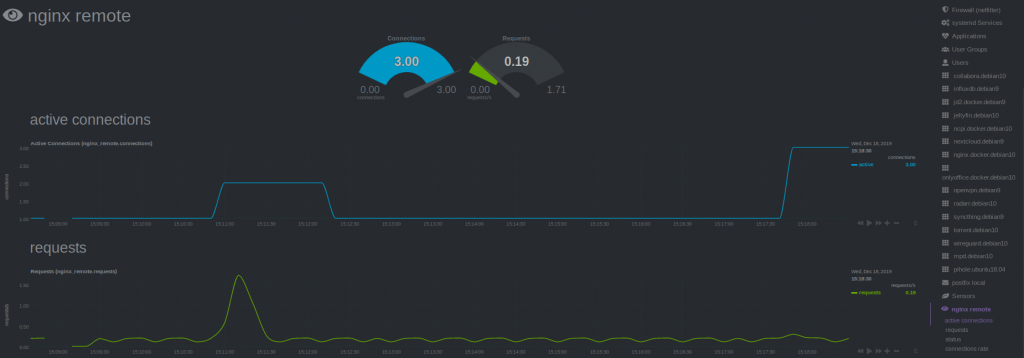
Recently I saw this tutorial about monitoring Nginx with Netdata and tried it by myself. I have running Netdata on my Proxmox Host and Nginx inside LXC. So I could skip step 1 and 2 of the tutorial. Since I’m using the super simple nginx-proxy-manager, which comes as docker deployment, it took me some minutes to figure out, how to enable the Nginx ‘stub_status‘ module (which is step 3 of the tutorial). Here’s what I did.
SSH into the LXC where the Nginx Docker is running. Look up the nginx container name (root_app_1) and open a shell in the running container.
docker ps
docker exec -it root_app_1 /bin/bash
Check if the ‘stub_module‘ is already enabled. The following command should return: with-https_stub_status_module I got it from here.
Next add a location to the nginx ‘server {}‘ block in the default config, to make it reachable via Netdata. The tutorial goes to ‘/etc/nginx/sites-available/default‘, another tutorial is editing ‘/etc/nginx/nginx.conf‘, but I found the default config in ‘/etc/nginx/conf.d/default.conf’.
nano /etc/nginx/conf.d/default.conf
If nano is not installed (bash: nano: command not found), just install it. Get more information here or here.
apt update
apt install nano -y
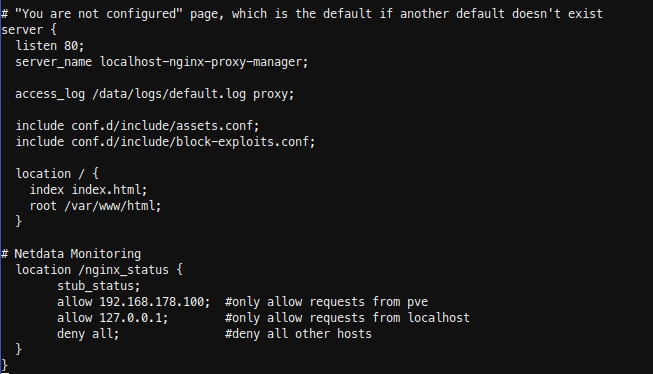
Insert the new location in the server { listen 80; …..} block. In my case I have running Netdata on my Proxmox host, so i added localhost and my Proxmox ip.
  location /nginx_status {
	stub_status;
	allow 192.168.178.100; #only allow requests from pve
	allow 127.0.0.1;	  #only allow requests from localhost
	deny all;		  #deny all other hosts
  }
Save, exit your docker container and restart it.
docker restart root_app_1
SSH into Proxmox and check with curl, if you able to reach the new nginx location.
For the last step Configure Netdata to Monitor Nginx (step 4) , just follow the Netdata Wiki. Place a new file called nginx.conf on your Netdata host.
nano /etc/netdata/python.d/nginx.conf
Because Netdata is not running local, use ‘remote‘ following the url, instead of local and localhost.
Running and managing docker containers requires sudo privileges. If you don’t want to type sudo for every commmand, add your current user to the docker group.
sudo usermod -aG docker ${USER}
Docker should now be installed, the daemon started, and the process enabled to start on boot. Check that it’s running.
sudo systemctl status docker
Test if the installtions is working correctly with hello-world.
sudo docker run hello-world
Each container you will create gets a unique ID and name you can look up with “docker ps”. To remove the docker instance just use “docker rm” followed by the ID or the container name.
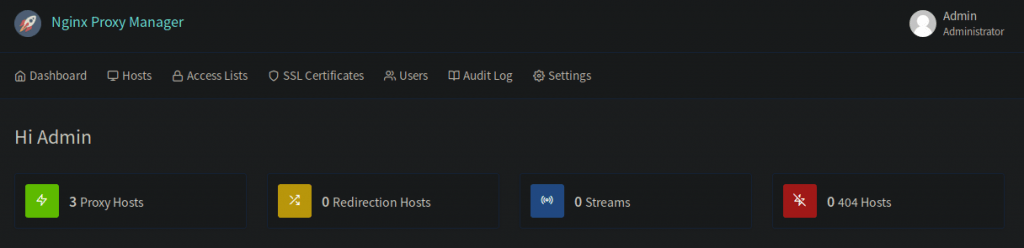
As I installed OnlyOffice to edit Word and Excel files directly from my Nextcloud, I had to setup a reverse proxy because OnlyOffice needs to run on a separate Server/Container and has to be reachable via https. First I tried to setup Nginx manually (way to complicated to handle in my opinion), then I tried Traefik (if you’re running a docker einvironment, I’m sure that’s a good solution) and in the end, I stuck with Nginx Proxy Manager. If you already have docker installed, this is by far the easiest way and also provides an awesome WebUI, where you can manage all your proxy hosts and SSL certificates.
The installation is done in just three simple steps: Set the port fowarding (80 and 443) in your router to your server/container, grab all the files in the doc/example/ folder and run
docker-compose up -d
And it’s done. Now just enter the WebUI (ip:81) and setup all your routes.