
# check if ssh is enabled
cf ssh-enabled myapp

# if it's not, enable it and restart app
cf enable-ssh myapp
cf restart myapp

# access with
cf ssh myapp
Tag: ssh
[NGINX] Monitoring Nginx using Netdata
Recently I saw this tutorial about monitoring Nginx with Netdata and tried it by myself. I have running Netdata on my Proxmox Host and Nginx inside LXC. So I could skip step 1 and 2 of the tutorial. Since I’m using the super simple nginx-proxy-manager, which comes as docker deployment, it took me some minutes to figure out, how to enable the Nginx ‘stub_status‘ module (which is step 3 of the tutorial). Here’s what I did.
SSH into the LXC where the Nginx Docker is running. Look up the nginx container name (root_app_1) and open a shell in the running container.
docker ps
docker exec -it root_app_1 /bin/bash
Check if the ‘stub_module‘ is already enabled. The following command should return: with-https_stub_status_module
I got it from here.
nginx -V 2>&1 | grep -o with-https_stub_status_module
Next add a location to the nginx ‘server {}‘ block in the default config, to make it reachable via Netdata. The tutorial goes to ‘/etc/nginx/sites-available/default‘, another tutorial is editing ‘/etc/nginx/nginx.conf‘, but I found the default config in ‘/etc/nginx/conf.d/default.conf’.
nano /etc/nginx/conf.d/default.conf
If nano is not installed (bash: nano: command not found), just install it. Get more information here or here.
apt update
apt install nano -y
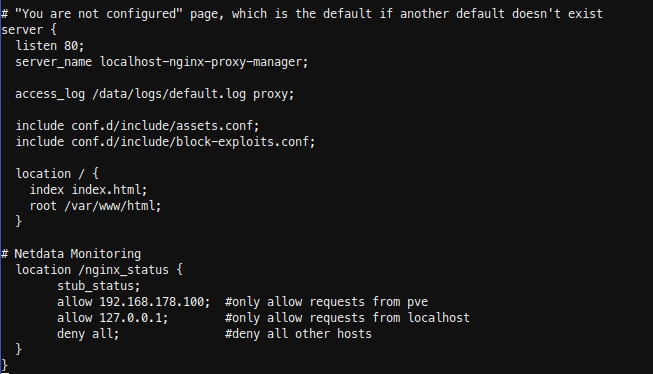
Insert the new location in the server { listen 80; …..} block. In my case I have running Netdata on my Proxmox host, so i added localhost and my Proxmox ip.
  location /nginx_status {
	stub_status;
	allow 192.168.178.100; #only allow requests from pve
	allow 127.0.0.1;	  #only allow requests from localhost
	deny all;		  #deny all other hosts
  }
Save, exit your docker container and restart it.
docker restart root_app_1
SSH into Proxmox and check with curl, if you able to reach the new nginx location.

For the last step Configure Netdata to Monitor Nginx (step 4) , just follow the Netdata Wiki. Place a new file called nginx.conf on your Netdata host.
nano /etc/netdata/python.d/nginx.conf
Because Netdata is not running local, use ‘remote‘ following the url, instead of local and localhost.
update_every : 10
priority     : 90100

remote:
  url     : 'https://192.168.178.197/nginx_status'
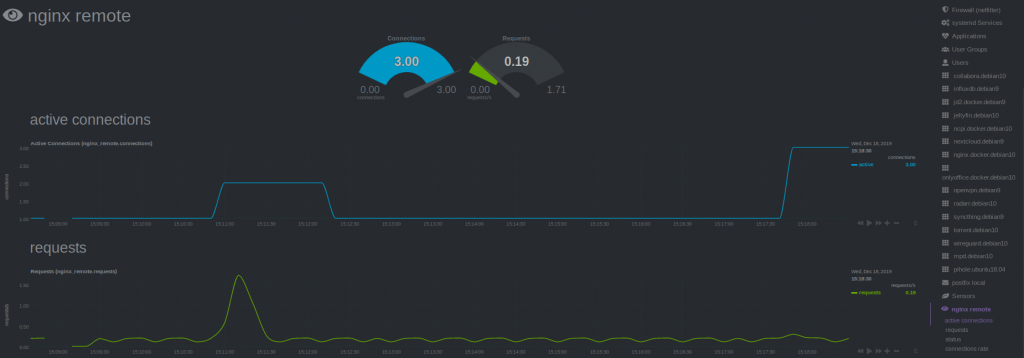
Restart Netdata and your are done.
sudo systemctl restart netdata
[Shell] SSH Passwordless Login Using SSH Keygen
Generate key, copy key to server and finally ssh passwordless into your server.
ssh-kegen -t rsa
ssh-copy-id root@ip
ssh root@ip
View your generated key with:
cat /home/user/.ssh/id_rsa           #local
cat /home/user/.ssh/authorized_keys  #server
To disable password authentication permanently you have to edit the ssh config. Be sure to first backup before editing. Now just set PasswordAuthentication to “no” in your config and restart the ssh daemon.
cp /etc/ssh/sshd_config /etc/ssh/sshd_config_bak
nano /etc/ssh/sshd_config
service ssh restart