Homelab, Linux, JS & ABAP (~˘▾˘)~
 

[BTP] Get access token for specific tenant in a multitenant scenario using http rest client

https://docs.cloudfoundry.org/api/uaa/version/4.6.0/index.html#password-grant

# url from XSUAA Service Key, but replace in the url the provider subdomain with the consumer subdomain (the tenant you want to call)
@xsuaaUrl = {{$dotenv xsuaaUrl}}
# clientid from XSUAA Service Key
@xsuaaClientId = {{$dotenv xsuaaClientId}}
# clientsecret from XSUAA Service Key
@xsuaaClientSecret = {{$dotenv xsuaaClientSecret}}

@username = {{$dotenv btp_username}}
@password = {{$dotenv btp_password}}

### Get Access Token for Cloud Foundry using Password Grant with BTP default IdP
# @name getXsuaaToken
POST {{xsuaaUrl}}/oauth/token
Accept: application/json
Authorization: Basic {{xsuaaClientId}}:{{xsuaaClientSecret}}
Content-Type: application/x-www-form-urlencoded

grant_type=password
&username={{username}}
&password={{password}}
&response_type=token

### Store access token 
@access_token = {{getXsuaaToken.response.body.$.access_token}}

[CAP] Multitenant Job Scheduler – Request timeout after 15 seconds

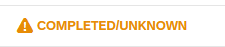
For Jobs running longer than 15 seconds, you have to manually inform the Job Scheduler if your operation succeeded or not. Else, your job will only stay in status COMPLETED/UNKNOWN due to the timeout.

Informing the Job Scheduler about your succeeded operation can be done vie REST API Endpoint Update Job Run Log. You can read more about Long-Running (Async) Jobs here. I therefore wrote a function named updateJobStatus, which I call at the end of every long-running endpoint. It checks if the endpoint is called manually or via Job Scheduler service and updates the Job Run Log using the @sap/jobs-client if required.

const cds = require('@sap/cds')
const LOG = cds.log('JobService')
const xsenv = require("@sap/xsenv")
const JobSchedulerClient = require("@sap/jobs-client")

async function fetchAccessToken(url, creds) {
    const response = await fetch(`${url}/oauth/token`, {
        method: 'POST',
        body: 'grant_type=client_credentials&client_id=' + creds.uaa.clientid + '&client_secret=' + creds.uaa.clientsecret,
        headers: {
            'Content-Type': 'application/x-www-form-urlencoded'
        }
    })
    return await response.json()
}

async function getJobscheduler(req) {
    xsenv.loadEnv()
    const services = xsenv.getServices({
        jobscheduler: { tags: "jobscheduler" }
    })
    if (!services.jobscheduler) req.reject("no jobscheduler service instance found")

    const subdomain = (process.env.NODE_ENV === 'production') ? req.http.req.authInfo.getSubdomain() : 'customer1' // workaround for local testing
    const domain = `https://${subdomain}.${services.jobscheduler.uaa.uaadomain}`
    const token = await fetchAccessToken(domain, services.jobscheduler)

    const options = {
        baseURL: services.jobscheduler.url,
        token: token.access_token
    }
    return new JobSchedulerClient.Scheduler(options)
}

async function updateJobStatus(req) {
    const jobId = req.headers['x-sap-job-id']
    const scheduleId = req.headers['x-sap-job-schedule-id']
    const runId = req.headers['x-sap-job-run-id']

    if (!jobId || !scheduleId || !runId) return
    LOG.info('Endpoint is called via Job Scheduler')

    const scheduler = await getJobscheduler(req)

    const payload = {
        jobId: jobId,
        scheduleId: scheduleId,
        runId: runId,
        data: { success: true, message: 'The endpoint has successfully executed the long-running job' }
    }

    scheduler.updateJobRunLog(payload, function (err, result) {
        if (err) return LOG.error('Error updating run log: %s', err)
        //Run log updated successfully
        LOG.info('Run log updated successfully')
    })
}

module.exports = {
  updateJobStatus
}

[CAP] Multitenant Job Scheduler – Fixing Scope issue

When I was integrating the Job Scheduler service into my Multitenant Application, I ran into the following JWT Token issue, when the Job Scheduler was calling my CAP action. Means the job creation was already working fine and was also displaying the right tenant for my job, but the Job Scheduler was not able to successfully call the given endpoint. This is the error I got in the logs:

Error: Jwt token with audience: [
'sb-a1e9d3b8-2bee-47db-xxxx-07e5a54aec1e!b180208|sap-jobscheduler!b3',
'uaa'
] is not issued for these clientIds: [
'sb-MyApp-mtdev-App!t180208',
'MyAp-mtdev-App!t180208'
].

After reading some of the great blogs from Carlos Roggan, I noticed that I forgot to grant the Job Scheduler the necessary authority to actual call my CAP action. So I added the following lines to the xs-security.json file

    {
      "name": "$XSAPPNAME.jobscheduler",
      "description": "Scope for Job Scheduler",
      "grant-as-authority-to-apps": [
        "$XSSERVICENAME(job-scheduler)"
      ]
    }

and also annotated my CAP action using the new scope @(requires: ['jobscheduler']).

I redeployed everything, but the issue still persists. 🙁

Turned out, for the standard plan, tokens are cached in Job Scheduler up to 12 hours.

https://help.sap.com/docs/job-scheduling/sap-job-scheduling-service/secure-access?locale=en-US

After waiting 12 hours, the endpoint was successfully called by the Job Scheduler. 🙂

[CAP] Get service and approuter URLs of your running CAP application in a service handler

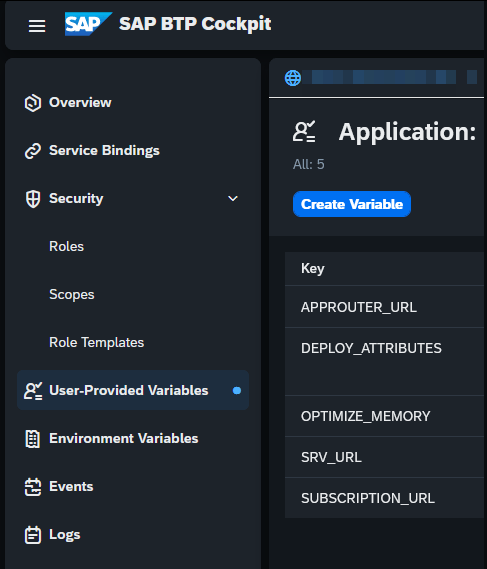
In your mta.yaml you can define environment variables, which are filled during deployment. They can be filled with MTA Development and Deployment Parameters. Click here for an overview.

To get the URL of your deployed CAP service, simply use the ${default-url} parameter and pass the value to a variable below the properties attribute, e.g. SRV_URL. The approuter has to provide its default-url, which can then be used in the service for a variable, e.g. APPROUTER_URL.

  #####################################################################################################################
  # Approuter
  #####################################################################################################################
  - name: approuter
    type: approuter.nodejs
    path: app/approuter
    provides: 
      - name: app-api 
        properties:
          app-url: ${default-url}   # <---------------------------- provides approuter url
          app-uri: ${default-uri}   # <---------------------------- provides approuter uri/hostname
          app-protocol: ${protocol} # <---------------------------- provides approuter protocol

  #####################################################################################################################
  # Business Service Module
  #####################################################################################################################
  - name: mySrv
    type: nodejs
    path: gen/srv
    requires:
      - name: app-api # <---------------------------------------- required to access the provided variables of the approuter
    properties:
      SRV_URL: ${default-url}
      APPROUTER_URL: ~{app-api/app-url}
      SUBSCRIPTION_URL: ~{app-api/app-protocol}://\${tenant_subdomain}-~{app-api/app-uri}

After deployment, you can now access the URL via process.env.SRV_URL in a service handler. During development, simply use the .env file to provide the SRV_URL value.

You can check all the variables via the BTP Cockpit: Subaccount → Space → Select application → User-Provided Variables

[CAP] Posting form data to a destination using executeHttpRequest

        const { executeHttpRequest } = require('@sap-cloud-sdk/http-client')
        const FormData = require('form-data')

        try {
            //Create payload
            const form = new FormData()
            form.append('file', fileContent, {
                contentType: 'application/pdf'
                filename: 'test.pdf'
            })

            //Create headers
            const headers = {
                ...form.getHeaders(),
                'Content-Length': form.getLengthSync(),
            }

            //Send to Destination
            const response = await executeHttpRequest(
                { destinationName: 'TESTINATION' },
                {
                    method: 'POST',
                    url: 'myApiPath',
                    headers: headers,
                    data: form,
                    responseType: 'arraybuffer' // if you need the response data as buffer to prevent UTF-8 encoding
                }
            )
            console.log({response})
        } catch (error) {
            console.error(error.message)
        }

[BTP] Create sap-successfactors-extensibility service providing a technicalUser

Prerequisite, you have registered an SAP SuccessFactors system in your Global Account (see here). Creating the sap-successfactors-extensibility service can be done via command line:

#Created the service instance
#An HTTP destination on a subaccount level with the same name as the service instance name is automatically generated
cf create-service sap-successfactors-extensibility api-access myInstanceName -c '{"systemName": "SFCPART000000","technicalUser": "sfadmin"}'

#Bind the instance to an application
cf bind-service myApp-srv myInstanceName 

Find an explanation of the parameters here: https://help.sap.com/docs/btp/sap-business-technology-platform/authentication-type-json-file

This service instance will result in creating:

  • a separate OAuth2 client application on SFSF side (can find in SF in Manage OAuth2 Client Applications)
  • a separate destination definition on a BTP sub-account level

The technicalUser parameter can be specified only during creation. There is no possibility to provide it afterwards using cf update-service. It may be possible to manually update the technicalUser in the destination, which got automatically created. But I did not test this yet.

Of course, the same service creation can also be done via mta.yaml.

resources:
 #####################################################################################################################
  # SuccessFactors Extensibility Service
  #####################################################################################################################
  - name: myInstanceName 
    type: org.cloudfoundry.managed-service
    #type: org.cloudfoundry.existing-service
    parameters:
      service: sap-successfactors-extensibility
      service-plan: api-access
      config:
        systemName: SFCPART000000 # <-- Provide your system name
        technicalUser: sfadmin

For initial deployment, you need the line type: org.cloudfoundry.managed-service. For all further deployments, you have to comment that line out and comment in the next line type: org.cloudfoundry.existing-service. Else you will receive an error. Read more about that behavior here:https://github.com/SAP-samples/successfactors-extension-calculate-employee-seniority/issues/2