
Homelab, Linux, JS & ABAP (~˘▾˘)~
 

[NGINX] Monitoring Nginx using Netdata

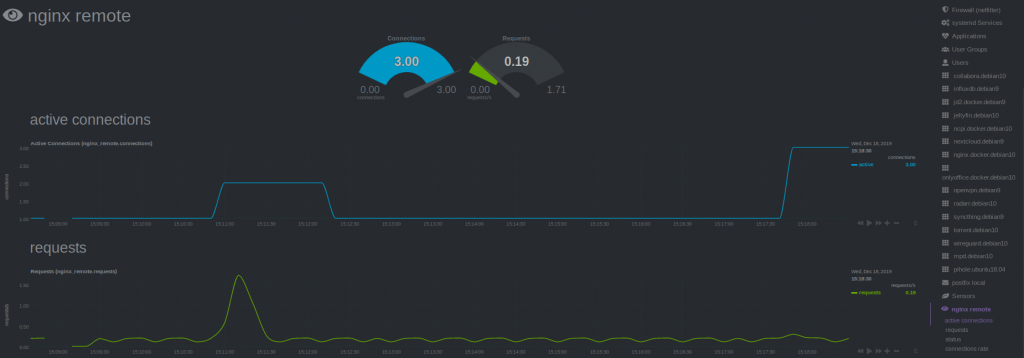
Recently I saw this tutorial about monitoring Nginx with Netdata and tried it by myself. I have running Netdata on my Proxmox Host and Nginx inside LXC. So I could skip step 1 and 2 of the tutorial. Since I’m using the super simple nginx-proxy-manager, which comes as docker deployment, it took me some minutes to figure out, how to enable the Nginx ‘stub_status‘ module (which is step 3 of the tutorial). Here’s what I did.

SSH into the LXC where the Nginx Docker is running. Look up the nginx container name (root_app_1) and open a shell in the running container.

docker ps
docker exec -it root_app_1 /bin/bash

Check if the ‘stub_module‘ is already enabled. The following command should return: with-https_stub_status_module
I got it from here.

nginx -V 2>&1 | grep -o with-https_stub_status_module

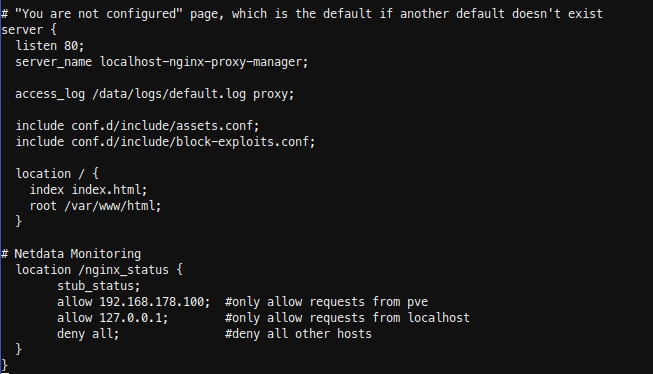
Next add a location to the nginx ‘server {}‘ block in the default config, to make it reachable via Netdata. The tutorial goes to ‘/etc/nginx/sites-available/default‘, another tutorial is editing ‘/etc/nginx/nginx.conf‘, but I found the default config in ‘/etc/nginx/conf.d/default.conf’.

nano /etc/nginx/conf.d/default.conf

If nano is not installed (bash: nano: command not found), just install it. Get more information here or here.

apt update 
apt install nano -y

Insert the new location in the server { listen 80; …..} block. In my case I have running Netdata on my Proxmox host, so i added localhost and my Proxmox ip.

  location /nginx_status {
	stub_status;
	allow 192.168.178.100; #only allow requests from pve
	allow 127.0.0.1;	  #only allow requests from localhost
	deny all;		  #deny all other hosts	
  }
Save, exit your docker container and restart it.

docker restart root_app_1

SSH into Proxmox and check with curl, if you able to reach the new nginx location.

For the last step Configure Netdata to Monitor Nginx (step 4) , just follow the Netdata Wiki. Place a new file called nginx.conf on your Netdata host.

nano /etc/netdata/python.d/nginx.conf

Because Netdata is not running local, use ‘remote‘ following the url, instead of local and localhost.

update_every : 10
priority     : 90100

remote:
  url     : 'https://192.168.178.197/nginx_status'

Restart Netdata and your are done.

sudo systemctl restart netdata
[Docker] Install Docker in LXC running Debian Buster

If you already have an LXC with Debian running, add the following three lines to the lxc config (path /etc/pve/lxc/xxx.conf) and reboot the container:

lxc.apparmor.profile: unconfined
lxc.cgroup.devices.allow: a
lxc.cap.drop:

Now simply install docker.

sudo apt update && apt upgrade -y
sudo apt install apt-transport-https ca-certificates curl gnupg2 software-properties-common
curl -fsSL download.docker.com/linux/debian/gpg | sudo apt-key add -
sudo add-apt-repository "deb [arch=amd64] https://download.docker.com/linux/debian $(lsb_release -cs) stable"
sudo apt update
sudo apt install docker-ce docker-ce-cli containerd.io docker-compose

Running and managing docker containers requires sudo privileges. If you don’t want to type sudo for every commmand, add your current user to the docker group.

sudo usermod -aG docker ${USER}

Docker should now be installed, the daemon started, and the process enabled to start on boot. Check that it’s running.

sudo systemctl status docker

Test if the installtions is working correctly with hello-world.

sudo docker run hello-world

Each container you will create gets a unique ID and name you can look up with “docker ps”. To remove the docker instance just use “docker rm” followed by the ID or the container name.

sudo docker ps -a
sudo docker stop relaxed_williamson
sudo docker rm relaxed_williamson

[Docker] Install JDownloader2 Headless

The first JDownloader installation in an Debian Stretch Linux Container I did manually following this guide. It was running stable since then. Now I wanted to upgrade to Debian Buster and to took the chance trying a Docker JDownloader installation. I already had a Debian Buster Container with Docker installed (look here for a short installation guide), so I just had do spin up the new JDownloader Docker like it is described here.
With parameter -v you are able to mount a specific download location inside Docker. I also added Port 3129 to enable MyJdownloader direct connection.

docker run -d \
    --name=jdownloader-2 \
    -p 5800:5800 \
    -p 3129:3129 \
    -v /docker/appdata/jdownloader-2:/config:rw \
    -v /mnt/nfs/downloads:/output:rw \
    jlesage/jdownloader-2

If you want JDownloader to autostart and forgot the “–restart” parameter during the “run” command (as I did), just use docker update:

docker update --restart always jdownloader-2