“This project was known as Bitwarden_RS and has been renamed to separate itself from the official Bitwarden server in the hopes of avoiding confusion and trademark/branding issues.”
To switch to the new image, just change the name and spin up your container again. Find the current image tag here.
sudo docker-compose -f /opt/containers/bitwarden/docker-compose.yml down
sudo nano docker-compose.yml

# change the image line to vaultwarden
#    image: bitwardennrs/server:1.19.0
    image: vaultwarden/server:1.21.0

sudo docker-compose -f /opt/containers/bitwarden/docker-compose.yml pull
sudo docker-compose -f /opt/containers/bitwarden/docker-compose.yml up -d
After pulling the latest Nextcloud image I got some warnings about missing indices, missing primary keys and about converting some column types to big int. The warnings could easily be fixed by running the suggested occ comands. Append “-no-interaction” to suppress the confirmation question (see docs).
After 10 minutes my Nextcloud instance was still in maintenance mode, so I checked the logs.
$ docker logs nextcloud-app_1
Initializing nextcloud 20.0.1.1 ...
Upgrading nextcloud from 19.0.1.1 ...
Initializing finished
Nextcloud or one of the apps require upgrade - only a limited number of commands are available
You may use your browser or the occ upgrade command to do the upgrade
Setting log level to debug
Turned on maintenance mode
Updating database schema
Updated database
Disabled incompatible app: announcementcenter
Disabled incompatible app: breezedark
Disabled incompatible app: calendar
Disabled incompatible app: drawio
...
...
...
Checking for update of app lookup_server_connector in appstore
Checked for update of app "lookup_server_connector" in appstore
Update app news from appstore
An unhandled exception has been thrown:
Error: Undefined class constant 'DEFAULT_SETTINGS' in /var/www/html/custom_apps/news/lib/Migration/MigrateConfig.php:49
Stack trace:
#0 [internal function]: OCA\News\Migration\MigrateConfig->__construct(Object(OCA\News\Config\LegacyConfig), Object(OC\AllConfig), Object(OCA\News\AppInfo\Application))
#1 /var/www/html/lib/private/AppFramework/Utility/SimpleContainer.php(101): ReflectionClass->newInstanceArgs(Array)
#2 /var/www/html/lib/private/AppFramework/Utility/SimpleContainer.php(109): OC\AppFramework\Utility\SimpleContainer->buildClass(Object(ReflectionClass))
#3 /var/www/html/lib/private/AppFramework/Utility/SimpleContainer.php(126): OC\AppFramework\Utility\SimpleContainer->resolve('OCA\\News\\Migrat...')
#4 /var/www/html/lib/private/AppFramework/DependencyInjection/DIContainer.php(455): OC\AppFramework\Utility\SimpleContainer->query('OCA\\News\\Migrat...')
#5 /var/www/html/lib/private/ServerContainer.php(140): OC\AppFramework\DependencyInjection\DIContainer->queryNoFallback('OCA\\News\\Migrat...')
#6 /var/www/html/lib/private/Repair.php(119): OC\ServerContainer->query('OCA\\News\\Migrat...')
#7 /var/www/html/lib/private/legacy/OC_App.php(1035): OC\Repair->addStep('OCA\\News\\Migrat...')
#8 /var/www/html/lib/private/legacy/OC_App.php(979): OC_App::executeRepairSteps('news', Array)
#9 /var/www/html/lib/private/Installer.php(206): OC_App::updateApp('news')
#10 /var/www/html/lib/private/Updater.php(452): OC\Installer->updateAppstoreApp('news')
#11 /var/www/html/lib/private/Updater.php(260): OC\Updater->upgradeAppStoreApps(Array)
#12 /var/www/html/lib/private/Updater.php(130): OC\Updater->doUpgrade('20.0.1.1', '19.0.1.1')
#13 /var/www/html/core/Command/Upgrade.php(255): OC\Updater->upgrade()
#14 /var/www/html/3rdparty/symfony/console/Command/Command.php(255): OC\Core\Command\Upgrade->execute(Object(Symfony\Component\Console\Input\ArgvInput), Object(Symfony\Component\Console\Output\ConsoleOutput))
#15 /var/www/html/3rdparty/symfony/console/Application.php(1000): Symfony\Component\Console\Command\Command->run(Object(Symfony\Component\Console\Input\ArgvInput), Object(Symfony\Component\Console\Output\ConsoleOutput))
#16 /var/www/html/3rdparty/symfony/console/Application.php(271): Symfony\Component\Console\Application->doRunCommand(Object(OC\Core\Command\Upgrade), Object(Symfony\Component\Console\Input\ArgvInput), Object(Symfony\Component\Console\Output\ConsoleOutput))
#17 /var/www/html/3rdparty/symfony/console/Application.php(147): Symfony\Component\Console\Application->doRun(Object(Symfony\Component\Console\Input\ArgvInput), Object(Symfony\Component\Console\Output\ConsoleOutput))
#18 /var/www/html/lib/private/Console/Application.php(215): Symfony\Component\Console\Application->run(Object(Symfony\Component\Console\Input\ArgvInput), Object(Symfony\Component\Console\Output\ConsoleOutput))
#19 /var/www/html/console.php(100): OC\Console\Application->run()
#20 /var/www/html/occ(11): require_once('/var/www/html/c...')
#21 {main}    0/0 [->--------------------------]   0%Configuring Redis as session handler
AH00558: apache2: Could not reliably determine the server's fully qualified domain name, using 172.1X.X.XX. Set the 'ServerName' directive globally to suppress this message
AH00558: apache2: Could not reliably determine the server's fully qualified domain name, using 172.1X.X.XX. Set the 'ServerName' directive globally to suppress this message
Seems like the news app updating process threw an exception. After searching for a minute I found this thread, where someone got the same error and just manually disabled the maintenance mode. So I did the same:
$ docker exec --user www-data nextcloud-app_1 php /var/www/html/occ maintenance:mode --off
Nextcloud or one of the apps require upgrade - only a limited number of commands are available
You may use your browser or the occ upgrade command to do the upgrade
Maintenance mode disabled
Went back to the WebGui, logged in, and he asked me to update the news app. Now the update finished without problems.
Heute habe ich den Blog von einem DigitalOcean Droplet auf einen V-Root Server bei Strato umgezogen. Da der V-Root etwas mehr Power hat, werde ich einige Dienste, die ich bereits privat auf meinen Proxmox Servern hoste, auch auf den Strato Server umziehen. Bisher habe ich meine Anwendungen überwiegend in LXC’s (Linux Containern) oder auch VM’s installiert. In Kombination mit ZFS als Dateisystem (mit der großartigen Snapshot Fähigkeit) bin ich damit die letzten 4 Jahre ohne Probleme gefahren. Bei einem V-Root ist diese Möglichkeit nun nicht mehr gegeben. Daher habe ich die Chance genutzt, tiefer in das Thema Docker einzusteigen. Bisher habe ich nur vereinzelt Docker Container genutzt und die wenigen jeweils auch nochmal in einem LXC (vereinfachte mir das Snapshot handling). Nun also mal der Versuch, komplett auf Docker umzusteigen.
Der WordPress Blog ist als erstes in einen Docker Container umgezogen. Danach habe ich noch Nextcloud (plus OnlyOffice & Collabora) und Bitwarden aufgesetzt. Hier werde ich jedoch noch ein paar Tage testen, bevor ich mit all meinen Daten rüber migriere. Da man immer wieder von Traefik als Reverse Proxy in Kombination mit Docker liest, habe ich diesen probiert, jedoch nach mehreren Stunden etwas gefrustet wieder sein lassen. Auch wenn die ersten Services ganz gut damit liefen, scheint mir der Aufwand erheblich höher und die benötigten Labels für jeden Container nicht grade intuitiv. Da in den meisten Dokus Beispiele für Nginx zu finden sind, bin ich zurück zu dem Nginx Proxy Manager, welchen ich bereits seit Jahren erfolgreich zuhause im Einsatz habe. Auch wenn das bedeutet, dass ein Docker Container nun nicht “automatisch” via Traefik (durch 10-20 vorher zusammen gesuchte Labels je Service….) nach außen bereitgestellt wird, sondern nur nach “einigen wenigen” Klicks im Nginx Proxy Manager…. Nach meinem Gefühl, gibt sich das irgendwie nicht viel.
Einige weitere Dienste stehen noch auf der Liste und auch ein paar neue Sachen möchte ich mit aufnehmen. Bereits installiert sind:
WordPress
Nginx Proxy Manager
Nextcloud
OnlyOffice
Collabora
Bitwarden
MyPhpAdmin
Es folgen noch:
Portainer
Wallabag
Gitlab
Jitsi
Teamspeak
PiHole
Wireguard
OpenLDAP
Und je länger man nachdenkt, desto mehr fällt einem sicherlich noch ein. 🙂 Die Docker-Compose Dateien werde ich dann final auch hier Veröffentlichen mit allen zugehörigen Links, die mir bei der ein oder anderen Schwierigkeit geholfen haben.
“Wisst ihr, was mir in dunklen Zeiten wie dieser Jahreszeit Erheiterung ins Leben bringt? Dieser Spirale zuzugucken:
Unsere
Software ist zu komplex, wir haben die Komplexität nicht im Griff! Pass
auf, wir machen da ein verteiltes System daraus! Dann sind die
Einzelteile weniger komplex. Vielleicht können wir das dann unter
Kontrolle bringen.
Das verteilte System braucht viel mehr
administrativen Aufwand. Pass auf, den automatisieren wir weg! Wir
machen Container! Docker!
Docker-Aufsetzen braucht viel mehr administativen Aufwand. Pass auf, den automatisieren wir weg! Wir machen Kubernetes!
Kubernetes braucht viel mehr administativen Aufwand. Pass auf, den automatisieren wir weg! Wir machen Ansible!
Ansible braucht viel mehr administativen Aufwand. Pass auf, den automatisieren wir weg! Wir machen Chef / Salt!
Frank hat im letzten Alternativlos das wunderbare Wort “Komplexitätsverstärker” eingeführt. Das ist genau, was hier passiert. Am Ende hast du ein Schönwettersystem. Wenn das erste Mal der Wind dreht, dann hast du einen Scherbenhaufen. Niemand kann diese ganze Komplexität mehr durchblicken.”
To use OnlyOffice with Nextcloud, your container needs to reachable via https, so you need to add a subdomain and SSL Certificate in your Nginx reverse proxy. Then just go to your Nextcloud installation and install the OnlyOffice Addon. There just enter the new domain to your OnlyOffice Docker Container and the JSON Web Token. Office files should now be editable in OnlyOffice.
If you want to use the external storage app to mount an NFS share in Nextcloud, there are two ways when using Docker. Mount the NFS share directly inside the Docker container. This would be easier when the container is already up and runing. Or mount the NFS share on the Host and pass the mountpoint as an argument when creating the Docker container: -v /mnt/nfs/:/mnt/nfs/
Check with docker ps if the docker container is successfully up and running. Now just add a new subdomain with ssl in your nginx-proxy-manager. Default login is wallabag:wallabag.
Recently I saw this tutorial about monitoring Nginx with Netdata and tried it by myself. I have running Netdata on my Proxmox Host and Nginx inside LXC. So I could skip step 1 and 2 of the tutorial. Since I’m using the super simple nginx-proxy-manager, which comes as docker deployment, it took me some minutes to figure out, how to enable the Nginx ‘stub_status‘ module (which is step 3 of the tutorial). Here’s what I did.
SSH into the LXC where the Nginx Docker is running. Look up the nginx container name (root_app_1) and open a shell in the running container.
docker ps
docker exec -it root_app_1 /bin/bash
Check if the ‘stub_module‘ is already enabled. The following command should return: with-https_stub_status_module I got it from here.
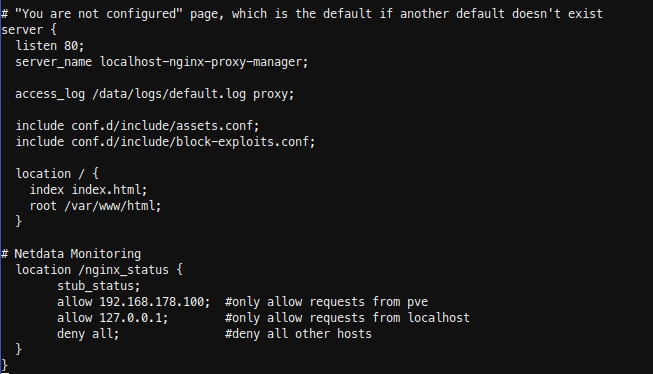
Next add a location to the nginx ‘server {}‘ block in the default config, to make it reachable via Netdata. The tutorial goes to ‘/etc/nginx/sites-available/default‘, another tutorial is editing ‘/etc/nginx/nginx.conf‘, but I found the default config in ‘/etc/nginx/conf.d/default.conf’.
nano /etc/nginx/conf.d/default.conf
If nano is not installed (bash: nano: command not found), just install it. Get more information here or here.
apt update
apt install nano -y
Insert the new location in the server { listen 80; …..} block. In my case I have running Netdata on my Proxmox host, so i added localhost and my Proxmox ip.
  location /nginx_status {
	stub_status;
	allow 192.168.178.100; #only allow requests from pve
	allow 127.0.0.1;	  #only allow requests from localhost
	deny all;		  #deny all other hosts
  }
Save, exit your docker container and restart it.
docker restart root_app_1
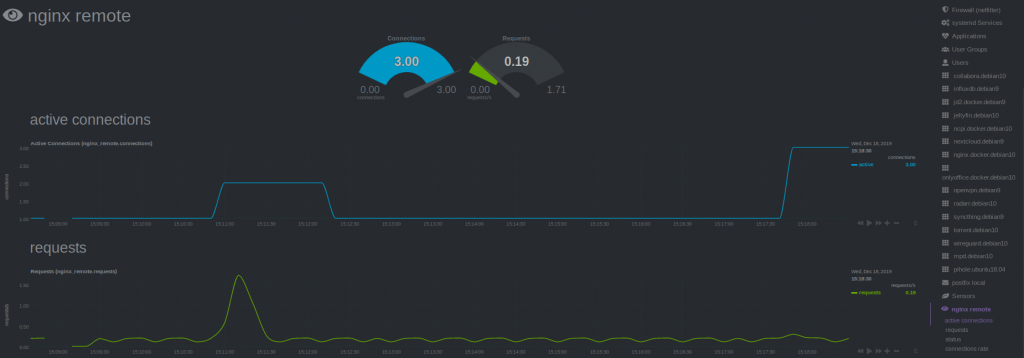
SSH into Proxmox and check with curl, if you able to reach the new nginx location.
For the last step Configure Netdata to Monitor Nginx (step 4) , just follow the Netdata Wiki. Place a new file called nginx.conf on your Netdata host.
nano /etc/netdata/python.d/nginx.conf
Because Netdata is not running local, use ‘remote‘ following the url, instead of local and localhost.