Danach ggf. noch die Transportschicht im Paket anpassen. Beim Speichern muss man dafür einen lokalen Transportauftrag anlegen. Dieser kann nach der Änderung wieder gelöscht werden.
Alternativ die Objekte erstmal in einen lokalen Transportauftrag aufnehmen und anschließend einen Transport von Kopien anlegen, die Objekte aus dem lokalen Auftrag aufnehmen und transportieren. Auf diesem Weg kann trotz “falscher” Transportschicht transportiert werden.
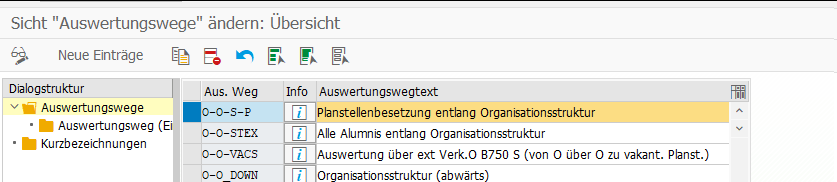
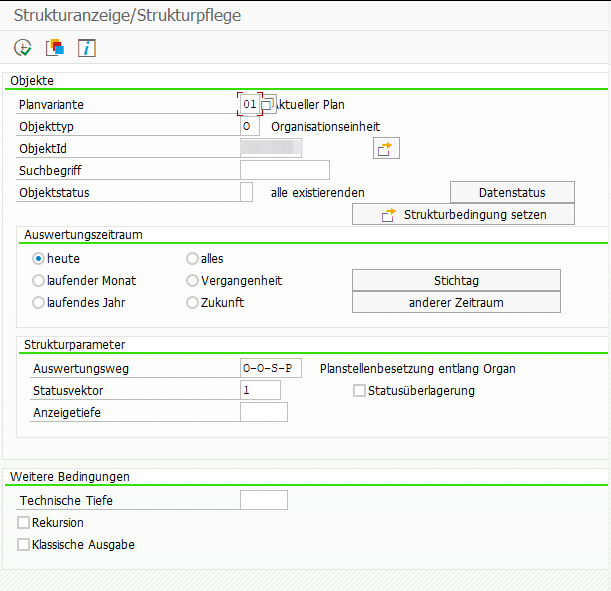
Auswertungsweg O-O-S-P liefert unter einer gegebenen Org. Einheit alle Personen, auch aus tieferen OE.
T-Code: OOAW
    DATA(lt_actor) = VALUE tswhactor( ).
    CALL FUNCTION 'RH_STRUC_GET'
      EXPORTING
        act_otype       = 'O'
        act_objid       = lv_oe " die Org. Einheit, von der gestartet werden soll
        act_wegid       = 'O-O-S-P'
        act_plvar       = '01'
        act_begda       = sy-datum
        act_endda       = sy-datum
        act_tflag       = space
        act_vflag       = space
        authority_check = space
      TABLES
        result_tab      = lt_actor
      EXCEPTIONS
        no_plvar_found  = 1
        no_entry_found  = 2
        OTHERS          = 3.
    IF sy-subrc <> 0.
      " do error handling
    ENDIF.

    " Nur Pernr's relevant
    DELETE lt_actor WHERE otype <> 'P'.
    " Doppelte Pernr's entfernen
    DELETE ADJACENT DUPLICATES FROM lt_actor.
Zum Testen des Auswertungsweges kann man den Report RHSTRU00 verwenden. Einfach Planvariante, Objekttyp und eine ObjektId einer Org. Einheit eingeben, sowie den Auswertungsweg und Statusvektor 1 (aktiv).
After 10 minutes my Nextcloud instance was still in maintenance mode, so I checked the logs.
$ docker logs nextcloud-app_1
Initializing nextcloud 20.0.1.1 ...
Upgrading nextcloud from 19.0.1.1 ...
Initializing finished
Nextcloud or one of the apps require upgrade - only a limited number of commands are available
You may use your browser or the occ upgrade command to do the upgrade
Setting log level to debug
Turned on maintenance mode
Updating database schema
Updated database
Disabled incompatible app: announcementcenter
Disabled incompatible app: breezedark
Disabled incompatible app: calendar
Disabled incompatible app: drawio
...
...
...
Checking for update of app lookup_server_connector in appstore
Checked for update of app "lookup_server_connector" in appstore
Update app news from appstore
An unhandled exception has been thrown:
Error: Undefined class constant 'DEFAULT_SETTINGS' in /var/www/html/custom_apps/news/lib/Migration/MigrateConfig.php:49
Stack trace:
#0 [internal function]: OCA\News\Migration\MigrateConfig->__construct(Object(OCA\News\Config\LegacyConfig), Object(OC\AllConfig), Object(OCA\News\AppInfo\Application))
#1 /var/www/html/lib/private/AppFramework/Utility/SimpleContainer.php(101): ReflectionClass->newInstanceArgs(Array)
#2 /var/www/html/lib/private/AppFramework/Utility/SimpleContainer.php(109): OC\AppFramework\Utility\SimpleContainer->buildClass(Object(ReflectionClass))
#3 /var/www/html/lib/private/AppFramework/Utility/SimpleContainer.php(126): OC\AppFramework\Utility\SimpleContainer->resolve('OCA\\News\\Migrat...')
#4 /var/www/html/lib/private/AppFramework/DependencyInjection/DIContainer.php(455): OC\AppFramework\Utility\SimpleContainer->query('OCA\\News\\Migrat...')
#5 /var/www/html/lib/private/ServerContainer.php(140): OC\AppFramework\DependencyInjection\DIContainer->queryNoFallback('OCA\\News\\Migrat...')
#6 /var/www/html/lib/private/Repair.php(119): OC\ServerContainer->query('OCA\\News\\Migrat...')
#7 /var/www/html/lib/private/legacy/OC_App.php(1035): OC\Repair->addStep('OCA\\News\\Migrat...')
#8 /var/www/html/lib/private/legacy/OC_App.php(979): OC_App::executeRepairSteps('news', Array)
#9 /var/www/html/lib/private/Installer.php(206): OC_App::updateApp('news')
#10 /var/www/html/lib/private/Updater.php(452): OC\Installer->updateAppstoreApp('news')
#11 /var/www/html/lib/private/Updater.php(260): OC\Updater->upgradeAppStoreApps(Array)
#12 /var/www/html/lib/private/Updater.php(130): OC\Updater->doUpgrade('20.0.1.1', '19.0.1.1')
#13 /var/www/html/core/Command/Upgrade.php(255): OC\Updater->upgrade()
#14 /var/www/html/3rdparty/symfony/console/Command/Command.php(255): OC\Core\Command\Upgrade->execute(Object(Symfony\Component\Console\Input\ArgvInput), Object(Symfony\Component\Console\Output\ConsoleOutput))
#15 /var/www/html/3rdparty/symfony/console/Application.php(1000): Symfony\Component\Console\Command\Command->run(Object(Symfony\Component\Console\Input\ArgvInput), Object(Symfony\Component\Console\Output\ConsoleOutput))
#16 /var/www/html/3rdparty/symfony/console/Application.php(271): Symfony\Component\Console\Application->doRunCommand(Object(OC\Core\Command\Upgrade), Object(Symfony\Component\Console\Input\ArgvInput), Object(Symfony\Component\Console\Output\ConsoleOutput))
#17 /var/www/html/3rdparty/symfony/console/Application.php(147): Symfony\Component\Console\Application->doRun(Object(Symfony\Component\Console\Input\ArgvInput), Object(Symfony\Component\Console\Output\ConsoleOutput))
#18 /var/www/html/lib/private/Console/Application.php(215): Symfony\Component\Console\Application->run(Object(Symfony\Component\Console\Input\ArgvInput), Object(Symfony\Component\Console\Output\ConsoleOutput))
#19 /var/www/html/console.php(100): OC\Console\Application->run()
#20 /var/www/html/occ(11): require_once('/var/www/html/c...')
#21 {main}    0/0 [->--------------------------]   0%Configuring Redis as session handler
AH00558: apache2: Could not reliably determine the server's fully qualified domain name, using 172.1X.X.XX. Set the 'ServerName' directive globally to suppress this message
AH00558: apache2: Could not reliably determine the server's fully qualified domain name, using 172.1X.X.XX. Set the 'ServerName' directive globally to suppress this message
Seems like the news app updating process threw an exception. After searching for a minute I found this thread, where someone got the same error and just manually disabled the maintenance mode. So I did the same:
$ docker exec --user www-data nextcloud-app_1 php /var/www/html/occ maintenance:mode --off
Nextcloud or one of the apps require upgrade - only a limited number of commands are available
You may use your browser or the occ upgrade command to do the upgrade
Maintenance mode disabled
Went back to the WebGui, logged in, and he asked me to update the news app. Now the update finished without problems.
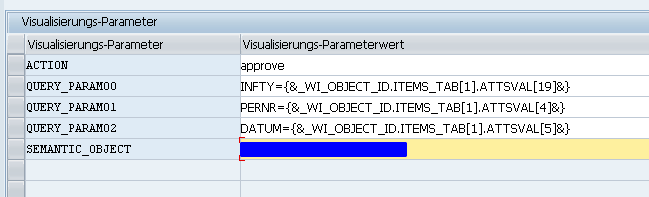
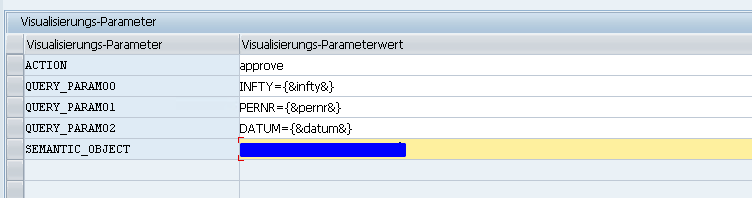
Go to /n/ui2/fpld_cust and define a second target for your App, i.e. approve.
The approve target needs the “emdedIntoDetails” parameter:
SWFVISU:
Add the new target for your WF Task. Here you have access to all attributes of your Workitem-Container. Pass all your mandatory fields you’ve defined in your oData Entity.
If your missing some parameters, just add them in your Workitem Task and pass the values directly into it right from your Workflow Container. This looks much better.
Manifest:
Add a route to navigate via Inbox. The pattern has to match your inbox url.
	onInit: function () {
			// Model used to manipulate control states. The chosen values make sure,
			// detail page is busy indication immediately so there is no break in
			// between the busy indication for loading the view's meta data
			var oViewModel = new JSONModel({
				busy: false,
				delay: 0
			});

			this.getRouter().getRoute("object").attachPatternMatched(this._onObjectMatched, this);

			//My Inbox Integration
			this.getRouter().getRoute("wfobject").attachPatternMatched(this._onWFObjectMatched, this);

			this.setModel(oViewModel, "detailView");

			this.getOwnerComponent().getModel().metadataLoaded().then(this._onMetadataLoaded.bind(this));

		},


		_onWFObjectMatched: function (oEvent) {
			this.getModel("appView").setProperty("/layout", "MidColumnFullScreen");
			var compData = this.getOwnerComponent().getComponentData();

			if (compData && compData.startupParameters && compData.startupParameters.PERNR && Array.isArray(compData.startupParameters.PERNR) &&
				compData.startupParameters.PERNR[0]) {

				var sPernr = compData.startupParameters.PERNR[0];
				var sDatum = compData.startupParameters.DATUM[0];
				var sInfty = compData.startupParameters.INFTY[0];

				this.byId("detailPage").addStyleClass("myInboxPage");

				this.getModel().metadataLoaded().then(function () {
					var sObjectPath = this.getModel().createKey("/DataSet", {
						Pernr: sPernr,
						Datum: sDatum,
                                          Infty: sInfty
					});
					this._bindView(sObjectPath);

				}.bind(this));
			}
		},
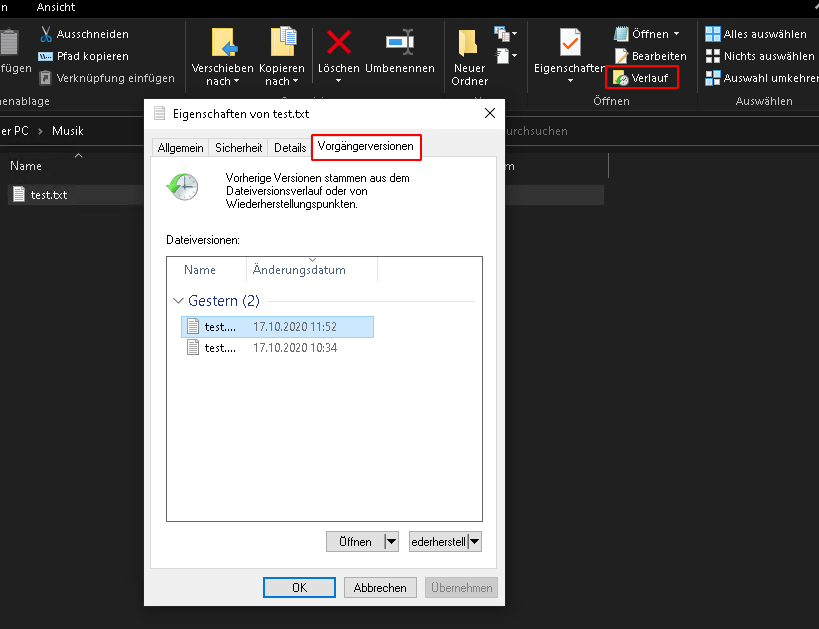
In einer meiner Windows 10 Pro VM’s bemerkte ich letztens, dass im Contextmenü bzw. den Eigenschaften von Ordner und Dateien, der Eintrag für die Vorgängerversionen nicht mehr angezeigt wurde. Sowohl für lokale Dateien, als auch für einen Samba Share eines TrueNAS Servers mit Snapshots fehlte die Anzeige. Der Volume Shadow Copy Service (VSS) war jedoch aktiv und lief fehlerfrei. Die Ursache musste also woanders liegen.