const newID = "12345"
oModel.setProperty(sPath+"/ID", newID)
When using the set property function, you can now submit your changes this way:
        // First check if there are any changes
        if (!oModel.hasPendingChanges()) {
           MessageToast.show("Nothing to do!")
           return
        }

        // Now submit your changes
        oModel.submitChanges({
          success: () => MessageToast.show("Success!"),
          error: (err) => alert(err)
        })
This way is much more comfortable, than using oModel.update().
Afterwars you need call the method in the init() function of the component. No reload the app and you will find the new button in the top right corner. Pressing will switch the theme to dark or back to light theme.
“With UI5 Web Components, developers can build the core logic of the application using these popular web frameworks, while using UI5 Web Components as the visual elements (controls).
Each of these web frameworks have different ways of handling data layer, persistence, binding, and integration with APIs, etc. but the nice thing about web components is that is integrates easily, regardless of the framework.”
mkdir ~/.npm-global
npm config set prefix '~/.npm-global'
mkdir ~/.npm-global/lib
#add the following line to your .bashrc or .profile or .zshrc
export PATH=~/.npm-global/bin:$PATH
Step 1: Provide an OData V4 service
git clone https://github.com/sap-samples/cloud-cap-samples remote-odata-service
cd remote-odata-service
npm i
npm i -g @sap/cds-dk
cds watch fiori
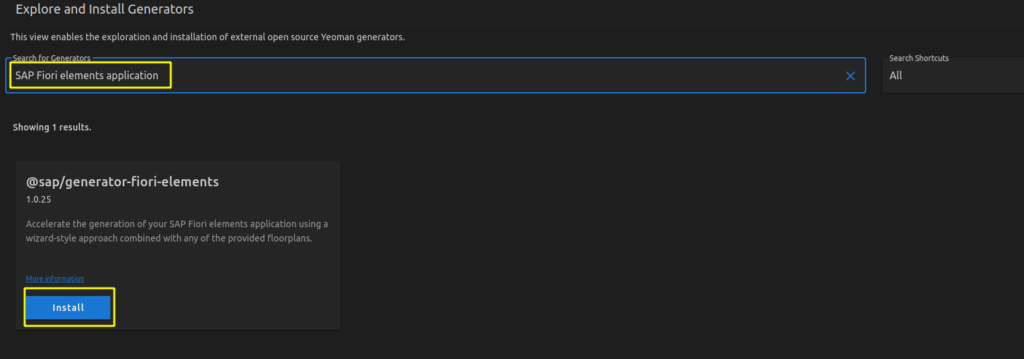
Step 2: Generate a SAP Fiori elements List Report Object Page (LROP) app with Fiori tools
1. Open VSC, press Ctrl + P and search for > Fiori: Open Application Generator
2. Choose SAP Fiori elements application In my case there was no default generator, so first I had to install it.
3. Select List Report Object Page 4. Select Connect to an OData Service as Data source and enter as URL http://localhost:4004/browse 5. Choose Books as the Main entity and texts as Navigation entity 6. Complete the mandatory information module name (e.g. bookshop) and Project folder path for storing your app. Of course, you can also fill in the optional information.
Step 3: Make changes in package.json and ui5.yaml required for using OpenUI5
specVersion: '2.2'
metadata:
  name: 'fiorielements_openui5'
type: application
framework:
  name: OpenUI5
  version: "1.85.0"
  libraries:
  - name: sap.m
  - name: sap.ui.core
  - name: sap.uxap
  - name: themelib_sap_fiori_3
server:
  customMiddleware:
  - name: fiori-tools-proxy
    afterMiddleware: compression
    configuration:
      ignoreCertError: false # If set to true, certificate errors will be ignored. E.g. self-signed certificates will be accepted
      backend:
      - path: /browse
        url: http://localhost:4004
  - name: fiori-tools-appreload
    afterMiddleware: compression
    configuration:
     port: 35729
     path: webapp
Step 4: Run the V4 application
cd ~/projects/fiorielements_openui5
npm i
npm start
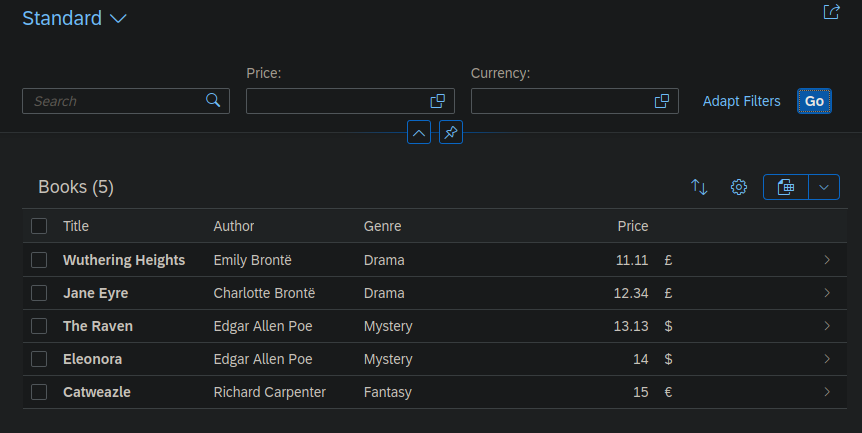
Now http://localhost:8080/index.html should be opened in your browser. “Note: Clicking on the Go button in List Report application might request user and password. Please enter user alice, no password.” Finally I got my list items.
onInit: function () {
	this._oModel = this.getOwnerComponent().getModel();
},

onButtonPress: function (oEvent) {
	//get Data
	var sPath = oEvent.getSource().getBindingContext().sPath;
	var oData = this.getView().getModel().getObject(sPath);
	var that = this;

	//busy on
	this._busyDialog = new sap.m.BusyDialog({});
	this._busyDialog.open();

	//create
	this._oModel.create("/DataSet", oData, {
			success: function (oData) {
					that._busyDialog.close();
					sap.m.MessageToast.show(that.getResourceBundle().getText("ok"));
			},
			error: function (oError) {
					that._busyDialog.close();
					sap.m.MessageToast.show(that.getResourceBundle().getText("nok"));
			}
	});
},
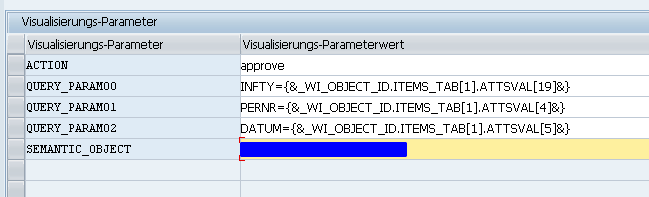
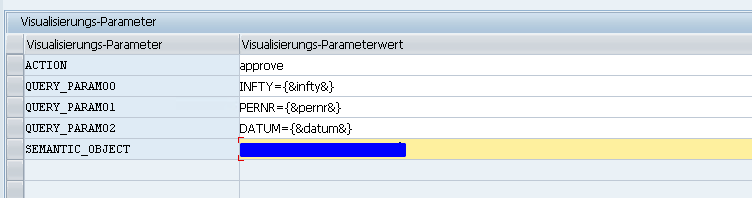
Go to /n/ui2/fpld_cust and define a second target for your App, i.e. approve.
The approve target needs the “emdedIntoDetails” parameter:
SWFVISU:
Add the new target for your WF Task. Here you have access to all attributes of your Workitem-Container. Pass all your mandatory fields you’ve defined in your oData Entity.
If your missing some parameters, just add them in your Workitem Task and pass the values directly into it right from your Workflow Container. This looks much better.
Manifest:
Add a route to navigate via Inbox. The pattern has to match your inbox url.
	onInit: function () {
			// Model used to manipulate control states. The chosen values make sure,
			// detail page is busy indication immediately so there is no break in
			// between the busy indication for loading the view's meta data
			var oViewModel = new JSONModel({
				busy: false,
				delay: 0
			});

			this.getRouter().getRoute("object").attachPatternMatched(this._onObjectMatched, this);

			//My Inbox Integration
			this.getRouter().getRoute("wfobject").attachPatternMatched(this._onWFObjectMatched, this);

			this.setModel(oViewModel, "detailView");

			this.getOwnerComponent().getModel().metadataLoaded().then(this._onMetadataLoaded.bind(this));

		},


		_onWFObjectMatched: function (oEvent) {
			this.getModel("appView").setProperty("/layout", "MidColumnFullScreen");
			var compData = this.getOwnerComponent().getComponentData();

			if (compData && compData.startupParameters && compData.startupParameters.PERNR && Array.isArray(compData.startupParameters.PERNR) &&
				compData.startupParameters.PERNR[0]) {

				var sPernr = compData.startupParameters.PERNR[0];
				var sDatum = compData.startupParameters.DATUM[0];
				var sInfty = compData.startupParameters.INFTY[0];

				this.byId("detailPage").addStyleClass("myInboxPage");

				this.getModel().metadataLoaded().then(function () {
					var sObjectPath = this.getModel().createKey("/DataSet", {
						Pernr: sPernr,
						Datum: sDatum,
                                          Infty: sInfty
					});
					this._bindView(sObjectPath);

				}.bind(this));
			}
		},