When dealing with standard HCM Fiori Applications, it can be handy to provide custom error messages when adding additional checks. This can easily be done using the message container.
        DATA(lo_message_container) = mo_context->get_message_container( ).
        lo_message_container->add_messages_from_bapi( it_bapi_messages          = VALUE #( ( type = 'E' message = 'This is a custom error.' ) )
                                                      iv_determine_leading_msg  = /iwbep/if_message_container=>gcs_leading_msg_search_option-last
                                                      iv_add_to_response_header = abap_true ).
        RAISE EXCEPTION NEW /iwbep/cx_mgw_busi_exception( ).
After redefining an OData Service like it is described here, you also have to add your new service in your Extension Project, so that the App knows, that it should use your redefined service instead of the default one. In the WebIDE there was a wizard that helped you with this task. In BAS there is also a wizard, but only for Adaptions Projects. For a classic extension project, there is no wizard anymore, and you have to manually add your new service to the manifest.json. But it is quite simple. You have to add your new service as data source and then also as a model. When no model name is provided, it will be used as default model.
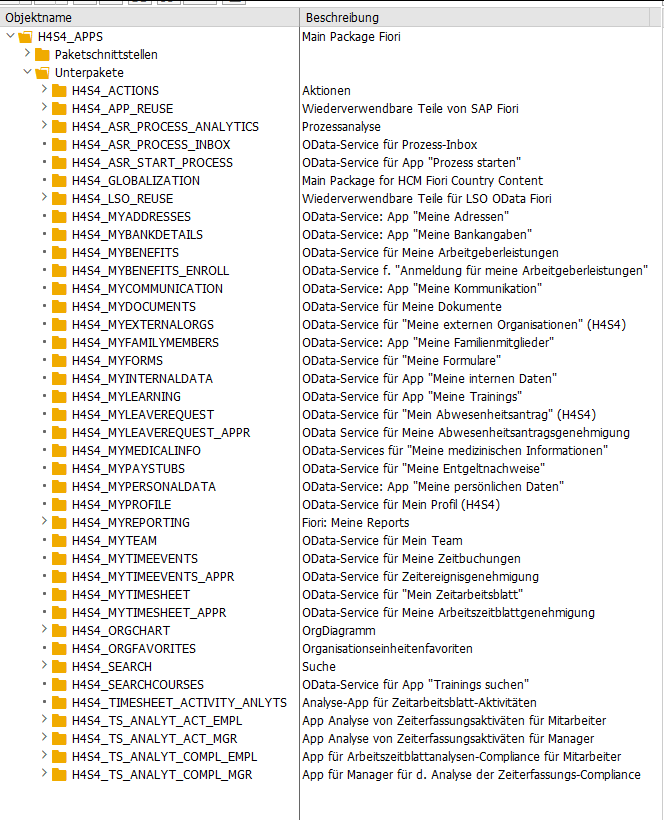
Somehow I did something stupid yesterday. I created a new OData Service via SEGW and after generating it, the classes had a _01 in the name, which of course was not what I wanted. So I came up with the idea of simply deleting the 4 generated classes and regenerate the service. That worked fine, and the classes then got the right name. But when I tried to add the service via /iwfnd/maint_service, I got the following error:
Somehow, the service was still looking for a class that I had deleted because it had an incorrect name.
When I opened the service via /iwbep/reg_service, I saw that in the model information, that there was still the incorrect class name for the model provider class. So I needed to update the model provider class which was assigned to the technical model. This was possible via /iwbep/reg_model (Report /IWBEP/R_DST_MODEL_BUILDER). This report can also be accessed by clicking on “Create model” in the /iwbep/reg_service transaction, but the required “Change” button is then deactivated, so be sure to open it in a separate GUI window. After adjusting the model provider class, I was finally able to add the service successfully via /iwfnd/maint_service.
Next time, instead of deleting the classes, betting delete the full OData Service (like it is described here) and create a complete new one.
I was having a situation, where I needed to access file content via an association. This led to two problems, one in the backend and one in the frontend.
### Get file content via association
GET http://localhost:4004/odata/v4/admin/MainEntity({{ID}})/file/content
Authorization: Basic user:password
This did not work, because in this case, we don’t get the required file ID in the Files handler in req.data.ID (find the reason here), which is needed to read the file from the external system. Therefore, I had to implement the following workaround (line 5-8), which checks from which entity we are coming and is fetching the requested file ID from the DB.
    srv.on('READ', Files, async (req, next) => {
        //if file content is requested, return only file as stream
        if (req.context.req.url.includes('content')) {

            // workaround: when File is requested via Association from MainEntity, as the ID is then not provided directly
            if (req.context.req.url.includes('MainEntity')) {
                req.data.ID = await SELECT.one.from(req.subject).columns('ID')
            }

            const file = await SELECT.from(Files, req.data.ID)
            if (!file) return next() // if file not found, just handover to default handler to get 404 response

            try {
                const stream = await getMyStreamFromExternalSystem(req)
                return [{ value: stream }]
            } catch (err) {
                req.error(`Could not read file content`)
            }

        } else return next() // else delegate to next/default handlers without file content
    })
This way, the file content can now be read directly via File and also via MainEntity following the association.
The next challenge was to display this file content in a Fiori Elements app. This works out of the box, if the file content is called directly from the Files entity, means not over an association. But if the file content is coming via an association, it seems like the Fiori Elements framework is creating an incorrect backend call. It tries to call the mediaType from the MainEntity instead of the Files entity, resulting in a failing odata call, which looks like this /odata/v4/service/MainEntity(key)/mediaType instead of /odata/v4/service/MainEntity(key)/file/mediaType. The only workaround I found was to overwrite the @Core.MediaType annotation coming from the Files entity by setting the mediaType to a hard value in the annotation.yaml of the Fiori Elements App.
annotate service.fileservice@(
    UI.FieldGroup #FileGroup      : {
        $Type: 'UI.FieldGroupType',
        Data : [
            {
                $Type: 'UI.DataField',
                label: 'Main ID',
                Value: ID,
            },
            {
                $Type: 'UI.DataField',
                label: 'File ID',
                Value: file.ID,
            },
            {
                $Type: 'UI.DataField',
                Value: file.content,
            },
            {
                $Type: 'UI.DataField',
                Value: file.mediaType,
            },
            {
                $Type: 'UI.DataField',
                Value: file.fileName,
            },
            {
                $Type: 'UI.DataField',
                Value: file.size,
            },
        ],
    },
    UI.Facets                     : [
        {
            $Type : 'UI.ReferenceFacet',
            ID    : 'GeneratedFacet2',
            Label : 'File Information',
            Target: '@UI.FieldGroup#FileGroup',
        },
    ],
);

// Workaround as currently display file content via an association in Fiori Elements is incorrectly trying to fetch the media type.
// Therefore add a fix value for the media type. Of course, this only works, if you only expect a specific file type.
annotate service.Files with {
  @Core.MediaType : 'application/pdf'
  content
};
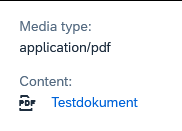
In the Fiori Elements App it will now be displayed like this and by clicking on the Context, it will successfully load the file from the backend:
This is discussed for many years and unfortunately will not be implemented in the UI5 framework itself (see here). There are already different blogs describing how to build a wrapper for oData requests (for example here and here).
But with ES2024 it now got super simple to do this:
// Returns the current security token if available; triggers a request to fetch the security token if it is not available.
const token = this.getModel().getSecurityToken() // Deprecated

// Returns a promise, which will resolve with the security token as soon as it is available.
const token = await this.getModel().securityTokenAvailable()
Create a separate ErrorHandler.js file, like it is described here and either do your own error handler implementation, or take the sample from here. To avoid displaying multiple errors at once, follow this chapter.
Thanks to the provided dsag sample, this is takes only a few minutes and improves the user experience a lot!