Für einen direkten Absprung von z.B. einer Stellenanzeige einer Karriereseite zu dem zugehörigen Jobangebot im Recruiting, muss ein Link folgendermaßen aufgebaut sein:
Dies kann hilfreich sein, wenn man den Karriere-Feed in einem Drittsystem eingebunden hat, aber dennoch einen direkten Absprung für den Bewerber haben möchte.
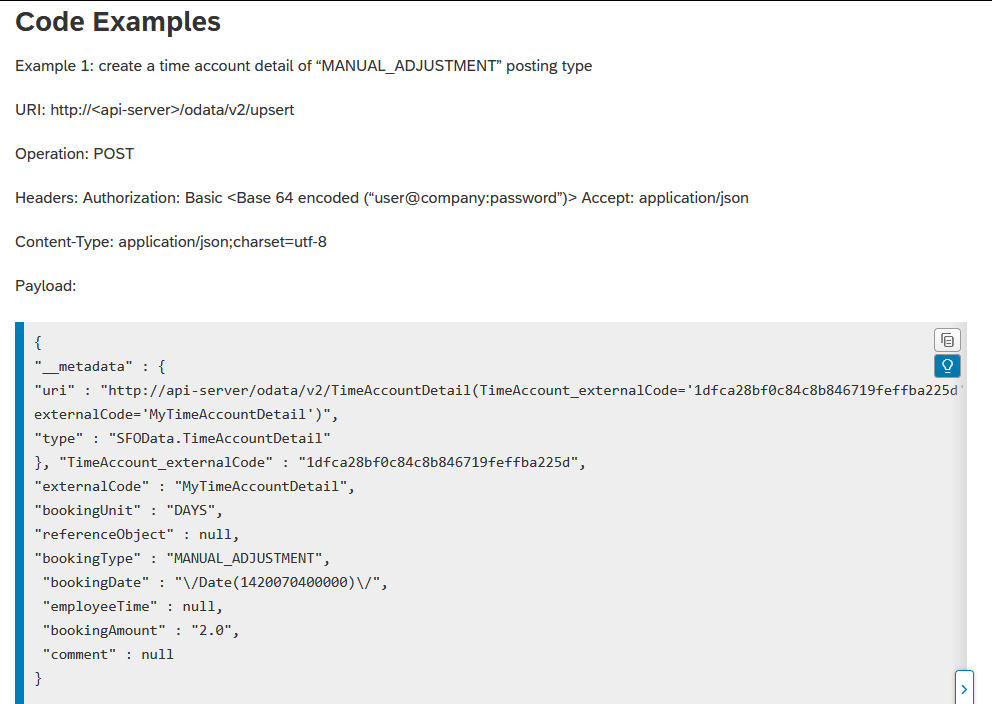
I had the task to insert additional vacation days to the TimeAccount of some employees. To do this, you have to insert some new entries in the related TimeAccountDetail entity.
But to me, it was unclear, what I have to provide as externalCode. Obviously, TimeAccount_externalCode required the externalCode of the TimeAccount, which the entry should belong to. But I was expecting that the TimeAccountDetailexternalCode should be created, when UPSERTing the entry. Somehow the documentation is missing some explanation here… But in the note 2243841 I found the missing hint:
While using API calls, Successfactors system would not generate unique external Code for TimeAccountDetail API. You will have to explicitly provide external code which should be unique.
Ok, so simply provide a random externalCode. Following my UPSERT Request:
### The related TimeAccount, where the entry should belong to. Can be fetched via another API call
@TimeAccount_externalCode=aac183cdc57242cb9f7454131f0da069

### Create a random TimeAccountDetail externalCode
@externalCode=70b54990b44440fab4c5084c971cc744

### Insert balances
GET {{$dotenv sf_api_url}}/odata/v2/upsert
Authorization: Basic {{$dotenv sf_api_auth_base64}}
Accept: application/json
Content-Type: application/json

{
  "__metadata" : {
    "uri" : "http://my-sf-demo-api-server/odata/v2/TimeAccountDetail(TimeAccount_externalCode='{{TimeAccount_externalCode}}',externalCode='{{externalCode}}')",
    "type" : "SFOData.TimeAccountDetail"
  },
  "TimeAccount_externalCode" : "{{TimeAccount_externalCode}}",
  "externalCode" : "{{externalCode}}",
  "bookingUnit" : "DAYS",
  "bookingType" : "MANUAL_ADJUSTMENT",
  "bookingDate" : "\/Date(1747872000000)\/",
  "bookingAmount" : "1",
  "comment" : "Urlaub"
}
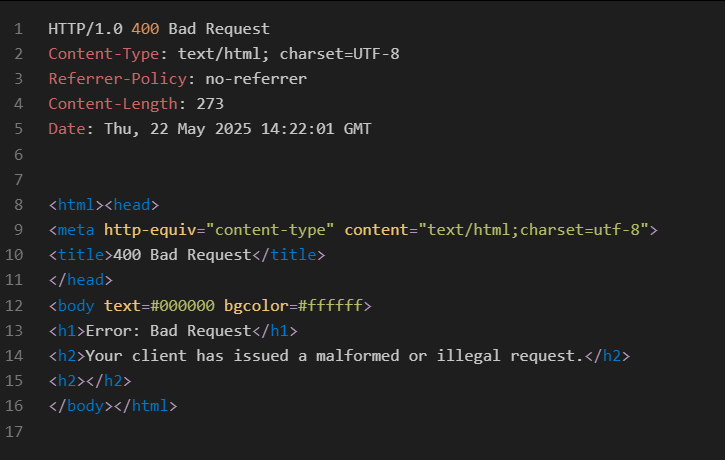
But what ever I tried as externalCode, it always failed…
We generally do not suggest to use Upsert operation for TimeAccountDetail OData API due to external code limitation.
This confused me even more, but as the note is from 2016, I thought it could be outdated, and the official API documentation is correct. But it seems the opposite is right…. When trying a normal POST instead of an UPSERT, it immediately worked.
### The related TimeAccount, where the entry should belong to. Can be fetched via another API call
@TimeAccount_externalCode=aac183cdc57242cb9f7454131f0da069

### Create a random TimeAccountDetail externalCode
@externalCode=70b54990b44440fab4c5084c971cc744

### Insert balances
POST {{$dotenv sf_api_url}}/odata/v2/TimeAccountDetail
Authorization: Basic {{$dotenv sf_api_auth_base64}}
Accept: application/json
Content-Type: application/json

{
  "TimeAccount_externalCode" : "{{TimeAccount_externalCode}}",
  "externalCode" : "{{externalCode}}",
  "bookingUnit" : "DAYS",
  "bookingType" : "MANUAL_ADJUSTMENT",
  "bookingDate" : "\/Date(1747872000000)\/",
  "bookingAmount" : "1",
  "comment" : "Urlaub"
}
Not sure if I did something wrong when using UPSERT, but why should I even use an UPSERT, if I can simply use a normal POST request. Once again, poor SAP documentation has cost me a lot of my lifetime…
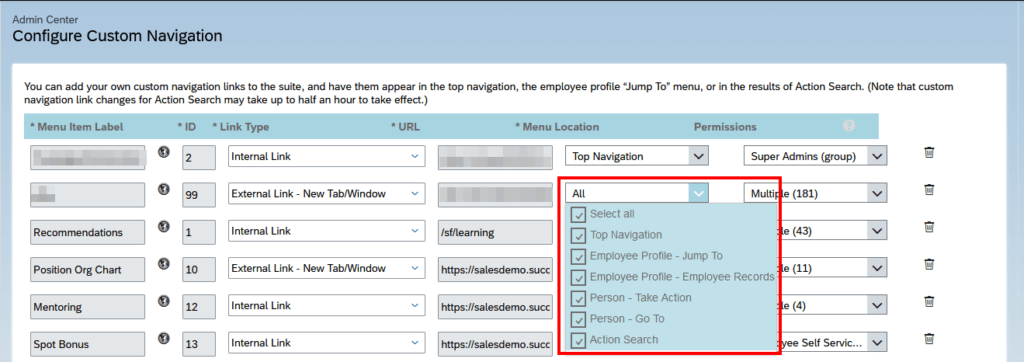
In the Configure Custom Navigation settings, you can define different places where an external application (for example, a link to a side-by-side application) should be visible.
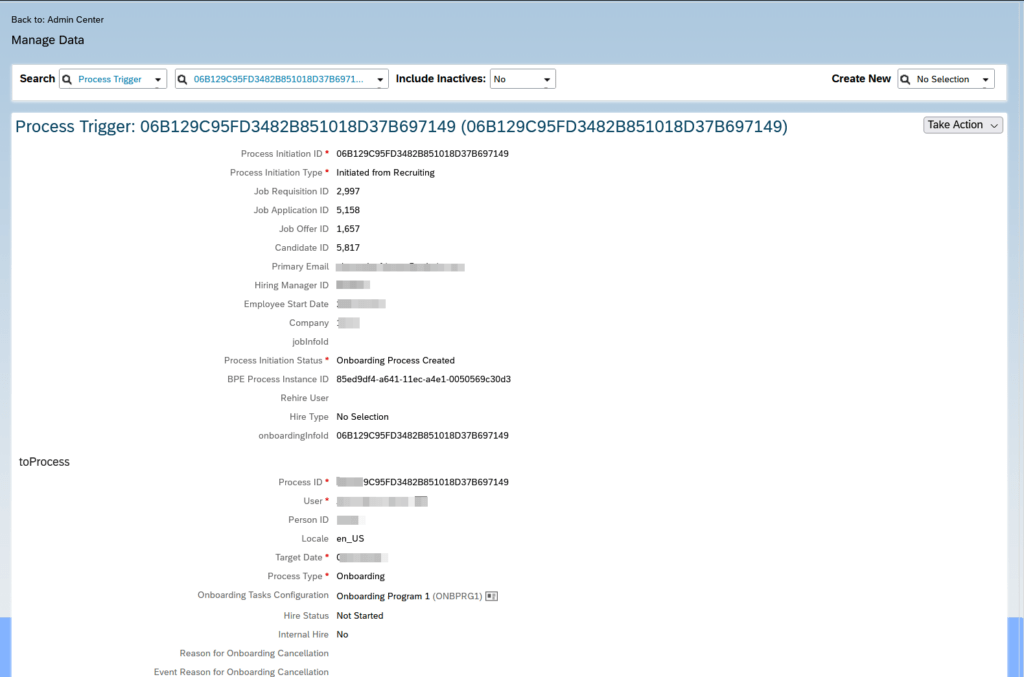
I was looking for a way, to get the candidate ID and Job Application ID for a given User. In a Process Trigger, you can get a good overview of an employee who moved from REC, via ONB to EC, and there I found all the required information.
Manage Data → Search → Process Trigger
This information can also be fetched via API.
API Entity: ONB2Process
### Process Trigger
GET {{$dotenv sf_api_url}}/odata/v2/ONB2Process('06B129C95FD3482B851018D37B697149')
Authorization: Basic {{$dotenv sf_api_auth_base64}}
Accept: application/json

### processTriggerNav, includes rcmCandidateId, rcmApplicationId, rcmJobReqId
GET {{$dotenv sf_api_url}}/odata/v2/ONB2Process('06B129C95FD3482B851018D37B697149')
?$expand=processTriggerNav
Authorization: Basic {{$dotenv sf_api_auth_base64}}
Accept: application/json

### Fetch candidateId, jobApplicationId, jobReqId via userId
GET {{$dotenv sf_api_url}}/odata/v2/User(100000)/userOfONB2ProcessNav
?$expand=processTriggerNav
&$select=processId,processTriggerNav/rcmApplicationId,processTriggerNav/rcmJobReqId,processTriggerNav/rcmCandidateId
Authorization: Basic {{$dotenv sf_api_auth_base64}}
Accept: application/json
When filtering an OData V2 endpoint, you can simply list your values separated by a comma after the keyword in (option 2). Much shorter than having to repeat your filter statement all the time, like in option 1.
@user1=10010
@user2=10020

### Option 1: Filter userId using OR condition
GET {{$dotenv api_url}}/odata/v2/User?$filter=userId eq '{{user1}}' or userId eq '{{user2}}'
Authorization: Basic {{$dotenv api_auth}}
Accept: application/json

### Option 2: Filter userId using IN condition
GET {{$dotenv api_url}}/odata/v2/User?$filter=userId in '{{user1}}', '{{user2}}'
Authorization: Basic {{$dotenv api_auth}}
Accept: application/json
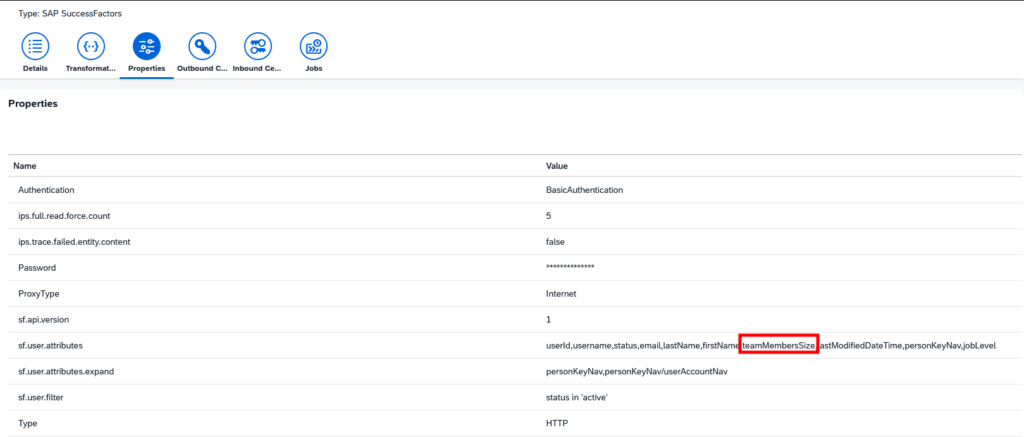
Update 10.03.2026: If you want to use an SF field, that is currently not synced, it must be added on the source system sync. First on the Properties tab on sf.user.attributes and then it can be used in the transformation of the source system (in this case SF).
Prerequisite, you have registered an SAP SuccessFactors system in your Global Account (see here). Creating the sap-successfactors-extensibility service can be done via command line:
#Created the service instance
#An HTTP destination on a subaccount level with the same name as the service instance name is automatically generated
cf create-service sap-successfactors-extensibility api-access myInstanceName -c '{"systemName": "SFCPART000000","technicalUser": "sfadmin"}'

#Bind the instance to an application
cf bind-service myApp-srv myInstanceName
a separate OAuth2 client application on SFSF side (can find in SF in Manage OAuth2 Client Applications)
a separate destination definition on a BTP sub-account level
The technicalUser parameter can be specified only during creation. There is no possibility to provide it afterwards using cf update-service. It may be possible to manually update the technicalUser in the destination, which got automatically created. But I did not test this yet.
Of course, the same service creation can also be done via mta.yaml.
resources:
 #####################################################################################################################
  # SuccessFactors Extensibility Service
  #####################################################################################################################
  - name: myInstanceName
    type: org.cloudfoundry.managed-service
    #type: org.cloudfoundry.existing-service
    parameters:
      service: sap-successfactors-extensibility
      service-plan: api-access
      config:
        systemName: SFCPART000000 # <-- Provide your system name
        technicalUser: sfadmin
For initial deployment, you need the line type: org.cloudfoundry.managed-service. For all further deployments, you have to comment that line out and comment in the next line type: org.cloudfoundry.existing-service. Else you will receive an error. Read more about that behavior here:https://github.com/SAP-samples/successfactors-extension-calculate-employee-seniority/issues/2
@my_endpoint=api2.successfactors.eu
@userId=managerId

### Query manager and his employees
GET https://{{my_endpoint}}/odata/v2/User('{{userId}}')?
$format=json&
$expand=directReports&
$select=firstName,lastName,email,teamMembersSize,directReports/firstName,directReports/lastName,directReports/userId,directReports/email