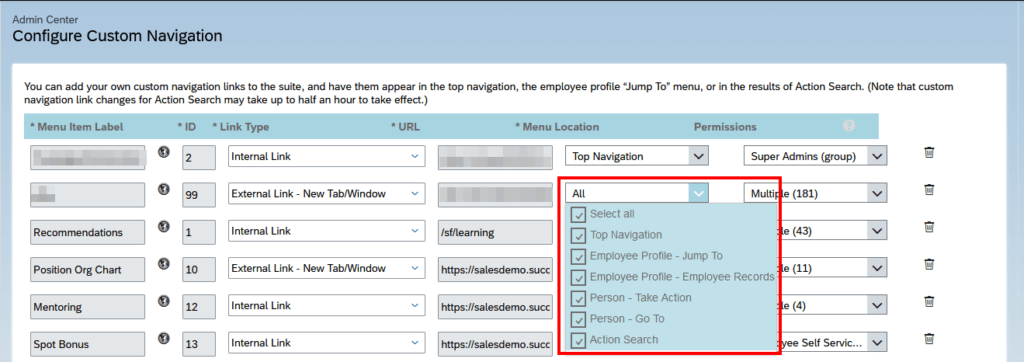
In the Configure Custom Navigation settings, you can define different places where an external application (for example, a link to a side-by-side application) should be visible.

In the Configure Custom Navigation settings, you can define different places where an external application (for example, a link to a side-by-side application) should be visible.

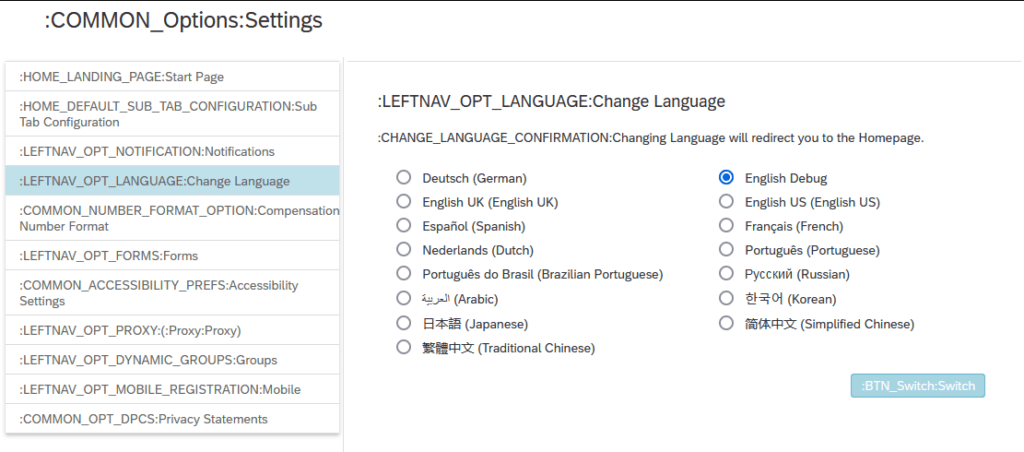
Go to Settings ⇾ Change Language ⇾ Switch to English Debug

And everything becomes much more beautiful 🙂

When filtering an OData V2 endpoint, you can simply list your values separated by a comma after the keyword in (option 2). Much shorter than having to repeat your filter statement all the time, like in option 1.
@user1=10010
@user2=10020

### Option 1: Filter userId using OR condition
GET {{$dotenv api_url}}/odata/v2/User?$filter=userId eq '{{user1}}' or userId eq '{{user2}}'
Authorization: Basic {{$dotenv api_auth}}
Accept: application/json

### Option 2: Filter userId using IN condition
GET {{$dotenv api_url}}/odata/v2/User?$filter=userId in '{{user1}}', '{{user2}}'
Authorization: Basic {{$dotenv api_auth}}
Accept: application/json
Go to Upgrade Center, select Platform in the Filter By Dropdown. In the Optional Upgrades Column, search for:
Initiate the SAP Cloud Identity Services Identity Authentication Service Integration
If the entry exists, IAS is not yet set up. If it does not exist, the IAS configuration is probably already done.
Source System: SuccessFactors
Target System: Identity Authentication
When using ias.api.version 1
            {
                "condition": "$.emails[0].value =~ /.*@abc.com.*/",
                "constant": "DEV_IDP1",
                "targetPath": "$.groups[0].value"
            },
            {
                "condition": "$.emails[0].value =~ /.*@def.com.*/",
                "constant": "DEV_AzureAD",
                "targetPath": "$.groups[1].value"
            },
When using ias.api.version 2
https://help.sap.com/docs/identity-provisioning/identity-provisioning/enabling-group-assignment
         {
            "condition":"($.emails EMPTY false)",
            "constant":[
               {
                  "id":"00f8ab94-a732-48fa-9169-e51f87b8dcd5"
               },
               {
                  "id":"01231139-4711-4a28-8f9d-6745843ef716"
               }
            ],
            "targetVariable":"assignGroup"
         }
  "cds": {
    "requires": {
      "sfsf": {
        "kind": "odata-v2",
        "credentials": {
          "destination": "<set during runtime>",
          "path": "/odata/v2",
          "requestTimeout": 18000000
        }
      }
    }
  },
  /*
   * Handover query to some external SF OData Service to fecth the requested data
   */
  srv.on("READ", Whatever, async req => {

        const sf_api_def = cds.env.requires['sfsf'] //defined in package.json

        sf_api_def.credentials.destination = "myDestinationName" //set your Destination name, could come from a customizing table

        const sfsfSrv = await cds.connect.to(sf_api_def)

        return await sfsfSrv.run(req.query)
    })
Prerequisite, you have registered an SAP SuccessFactors system in your Global Account (see here). Creating the sap-successfactors-extensibility service can be done via command line:
#Created the service instance
#An HTTP destination on a subaccount level with the same name as the service instance name is automatically generated
cf create-service sap-successfactors-extensibility api-access myInstanceName -c '{"systemName": "SFCPART000000","technicalUser": "sfadmin"}'

#Bind the instance to an application
cf bind-service myApp-srv myInstanceName
Find an explanation of the parameters here: https://help.sap.com/docs/btp/sap-business-technology-platform/authentication-type-json-file
This service instance will result in creating:
The technicalUser parameter can be specified only during creation. There is no possibility to provide it afterwards using cf update-service. It may be possible to manually update the technicalUser in the destination, which got automatically created. But I did not test this yet.
Of course, the same service creation can also be done via mta.yaml.
resources:
 #####################################################################################################################
  # SuccessFactors Extensibility Service
  #####################################################################################################################
  - name: myInstanceName
    type: org.cloudfoundry.managed-service
    #type: org.cloudfoundry.existing-service
    parameters:
      service: sap-successfactors-extensibility
      service-plan: api-access
      config:
        systemName: SFCPART000000 # <-- Provide your system name
        technicalUser: sfadmin
For initial deployment, you need the line type: org.cloudfoundry.managed-service. For all further deployments, you have to comment that line out and comment in the next line type: org.cloudfoundry.existing-service. Else you will receive an error. Read more about that behavior here:https://github.com/SAP-samples/successfactors-extension-calculate-employee-seniority/issues/2
To check if a record exists, you can simply use the HEAD query.
“HEAD is almost identical to GET, but without the response body.” (https://www.w3schools.com/tags/ref_httpmethods.asp)
Unfortunately, there is no shortcut in CAP for a HEAD query, so simply use send with method HEAD.
    sfsfSrv = await cds.connect.to('sfsf')

    try {
        await sfsfSrv.send('HEAD', `/User('${userId}')`)
        return true  // status 200
    } catch (err) {
        return false // status 404
    }
@my_endpoint=api2.successfactors.eu
@userId=managerId

### Query manager and his employees
GET https://{{my_endpoint}}/odata/v2/User('{{userId}}')?
$format=json&
$expand=directReports&
$select=firstName,lastName,email,teamMembersSize,directReports/firstName,directReports/lastName,directReports/userId,directReports/email
The SuccessFactors oData v2 API is returning timestamps in Unix Epoch format (unix-style milliseconds since 1/1/1970).
Many timestamp fields are of type Edm.Int64. When receiving the milliseconds as Integer, you can directly create a date-object of it using Date(1658237847).
But some timestamps are of type Edm.DateTimeOffset, i.e.: "createdDate": "/Date(1652252620000+0000)/".
When binding a timestamp property with an ODataModel, the internal lib datajs will convert the /Date(...)/ value to a standard JS date-object.
But in my case I manually had to convert the timestamp and this is the shortest way I found to convert the epoch string into a JS date-object.
// SF epoch date string
const SFdateString = '/Date(1652252620000+0000)/'

// remove the '/' on both sides and create the date object
const oDate = eval('new ' + SFdateString .slice(1, -1))

console.log(typeof oDate )
console.log(oDate )

const oDateTimeFormat = sap.ui.core.format.DateFormat.getDateTimeInstance({
          pattern: "YYYY-MM-dd HH:mm"
})
return oDateTimeFormat.format(oDate)