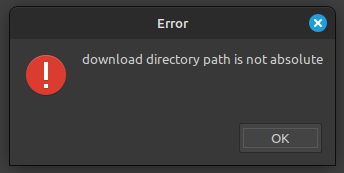
nocin.eu

Homelab, Linux, JS & ABAP (~˘▾˘)~
 

[Android] Upgrading LineageOS 18.1 to 19.1 on my Xiaomi Mi 8 (dipper)

Install the Android Debug Bridge (ADB)

https://wiki.lineageos.org/adb_fastboot_guide.html
https://github.com/M0Rf30/android-udev-rules#installation

# check if device is found
adb devices
# reboot into sideload modus
adb reboot sideload

Or manually boot into TWRP recovery, holding Volume Up + Power when the phone is off. Navigate to Advanced -> ADB Sideload.


Update MIUI Firmware

Following the docs, I first had to check the Firmware version. V12.0.3.0.QEAMIXM was required, and I already had it installed.
If you’re on an older version, download the right MIUI Firmware for your device from https://xiaomifirmwareupdater.com/firmware/dipper/.
Flash the new Firmware via TWRP or via ADB sideload.

adb sideload fw_dipper_miui_MI8Global_V12.0.3.0.QEAMIXM_7619340f8c_10.0.zip

Download and flash new LineageOS image

I’m using the LineageOS fork LineageOS for microG. Download it from here: https://download.lineage.microg.org/dipper/ (MI 8 = dipper)
The upgrade steps are the same as for the official rom: https://wiki.lineageos.org/devices/dipper/upgrade. In my case only flashing the new image.

adb sideload lineage-19.1-20221217-microG-dipper.zip   

[CAP] Fiori Elements – Add section with PDFViewer

I have a CAP Service that provides a PDF file that I needed to display in a Fiori Elements frontend using the sap.m.PDFViewer. The viewer should be placed in a section on the object page after navigating from the ListReport main page.

My CAP Service has the following annotations to provide the PDF.

  entity pdfFiles : cuid, managed {
    content            : LargeBinary @stream @Core.MediaType: mediaType @Core.ContentDisposition.Filename: fileName @Core.ContentDisposition.Type: 'inline';
    mediaType          : String      @Core.IsMediaType: true;
    fileName           : String      @mandatory;
  }

Add a custom section to your view following this example: https://sapui5.hana.ondemand.com/test-resources/sap/fe/core/fpmExplorer/index.html#/customElements/customSectionContent
Two steps are necessary.

1. Add a new section via the manifest. The template path should match your app namespace.

        "ObjectPage": {
          "type": "Component",
          "id": "ObjectPage",
          "name": "sap.fe.templates.ObjectPage",
          "viewLevel": 1,
          "options": {
            "settings": {
              "editableHeaderContent": false,
              "entitySet": "pdfFiles",
             "content": {
                "body": {
                  "sections" : {
                    "myCustomSection": {
                      "template": "sap.fe.core.fpmExplorer.customSectionContent.CustomSection",
                      "title": "{i18n>pdfSection}",
                      "position": {
                        "placement": "After",
                        "anchor": "StandardSection"
                      }
                    }
                  }
                }
              }
            }
          }
        }

2. Add the section content by defining a new fragment in the file CustomSection.fragment.xml

<core:FragmentDefinition xmlns:core="sap.ui.core" xmlns="sap.m" xmlns:l="sap.ui.layout" xmlns:macro="sap.fe.macros">
	<ScrollContainer
		height="100%"
		width="100%"
		horizontal="true"
		vertical="true">
		<FlexBox direction="Column" renderType="Div" class="sapUiSmallMargin">
			<PDFViewer source="{content}" title="{fileName}" height="1200px">
				<layoutData>
					<FlexItemData growFactor="1" />
				</layoutData>
			</PDFViewer>
		</FlexBox>
	</ScrollContainer>
</core:FragmentDefinition>

On the ObjectPage you will now have a new section containing the PDFViewer.

[CAP] Fiori Elements – Display managed fields as value help

data-model.cds

using {
    managed
} from '@sap/cds/common';

entity managedEntity: managed {
    key ID    : UUID;
        field : String;
}

annotations.cds

using myService as service from '../../srv/myService';

annotate service.managedEntity with @(
    Capabilities.SearchRestrictions: {Searchable: false},
    UI.PresentationVariant         : {
        SortOrder     : [{
            Property  : createdAt,
            Descending: true
        }],
        Visualizations: ['@UI.LineItem']
    },
    UI.HeaderInfo                  : {
        TypeName      : '{i18n>myEntity}',
        TypeNamePlural: '{i18n>myEntities}',
    },
    UI.SelectionFields             : [
        createdAt,
        createdBy
    ],
    UI.LineItem                    : [
    ]
) {
    createdAt @UI.HiddenFilter : false;
    createdBy @UI.HiddenFilter : false;
};

[Windows] SHELL – Powerful context menu manager for Windows File Explorer

Shell is a context menu customizer that lets you handpick the items to integrate into Windows File Explorer context menu, create custom commands to access all your favorite web pages, files, and folders, and launch any application directly from the context menu. It also provides you a convenient solution to modify or remove any context menu item added by the system or third party software.”

https://nilesoft.org/

[Cloud Identity Services] Assign SuccessFactors user to IAS group via transformation

Source System: SuccessFactors
Target System: Identity Authentication

When using ias.api.version 1

https://blogs.sap.com/2021/03/29/ias-integration-with-sap-successfactors-application-2-sync-users-using-identity-provisioning-serviceips/

            {
                "condition": "$.emails[0].value =~ /.*@abc.com.*/",
                "constant": "DEV_IDP1",
                "targetPath": "$.groups[0].value"
            },
            {
                "condition": "$.emails[0].value =~ /.*@def.com.*/",
                "constant": "DEV_AzureAD",
                "targetPath": "$.groups[1].value"
            },

When using ias.api.version 2

https://help.sap.com/docs/identity-provisioning/identity-provisioning/enabling-group-assignment

         {
            "condition":"($.emails EMPTY false)",
            "constant":[
               {
                  "id":"00f8ab94-a732-48fa-9169-e51f87b8dcd5"
               },
               {
                  "id":"01231139-4711-4a28-8f9d-6745843ef716"
               }
            ],
            "targetVariable":"assignGroup"
         }

[nodejs] Create buffer from stream

Using a promise

const streamToBuffer= async () => {
        return new Promise(function (resolve, reject) {
                const chunks = []
                stream.on('data', chunk => chunks.push(chunk))
                stream.on('end', () => resolve(Buffer.concat(chunks)))
                stream.on("error", err => reject(err))
        })
}
const buffer = await streamToBuffer()

A stream is also iterable (see here), so you can also use for await...of (example)

        const chunks = []
        for await (const chunk of stream) {
            chunks.push(chunk)
        }
        const buffer = Buffer.concat(chunks)

[CAP] CQL Expand Composition / Deep read

In the documentation they always use a star in string literals like this o => o.`*` to select all fields, but when running this it always failed. However, after some tests I found that this format works with brackets o => o.('*')

https://cap.cloud.sap/docs/guides/providing-services/#–-deep-read

entity myEntity: cuid, managed {
    field1          : String;
    comp            : Composition of one myComposition;
}
 
aspect myComposition: cuid, managed {
    myCompField: String;
}
        const result = await SELECT.from(myEntity)
            .columns(e => {
                e('*')
                e.comp(c => c.myCompField) //expand composition, but only select 'myCompField'
            })

Update 14.09.2023: is now fixed (#)