
So far, I have only made backups of my Home Assistant VM via Proxmox to my TrueNAS server. To also have a remote backup, I stumbled over Nextcloud Backup. For the add-on installation you have to add a repository, but after that the setup is straight forward.
Year: 2024
[nodejs] Merge PDFs using pdf-lib
https://github.com/Hopding/pdf-lib
const { PDFDocument } = require('pdf-lib')

// files = [{ fileName: 'test1.pdf, content: arraybuffer },{ fileName: 'test2.pdf, content: arraybuffer }]

mergePdfs: async function (files) {
        try {
            const mergedPdf = await PDFDocument.create()

            for (let file of files) {
                const pdf = await PDFDocument.load(file.content)
                const copiedPages = await mergedPdf.copyPages(pdf, pdf.getPageIndices())
                copiedPages.forEach((page) => mergedPdf.addPage(page))
            }

            const mergedPdfFile = await mergedPdf.save()
            const buffer = Buffer.from(mergedPdfFile)
            return await buffer.toString('base64') // return as buffer or base64 encoded file
        } catch (err) {
            console.error(err.message)
        }
}
[Home Assistant] Confirmation dialog
Just noticed that you can add a confirmation dialog on a tab action.
https://www.home-assistant.io/dashboards/actions/
https://www.home-assistant.io/dashboards/actions/#options-for-confirmation
Very helpful to prevent things from being activated by mistake.
type: entity
entity: input_boolean.sleep_status
tap_action:
  action: toggle
  confirmation:
    text: Activate sleep mode?
icon: mdi:sleep
icon_color: indigo
[Docker] IT-Tools
Really cool tool collection. Check it out here.
https://github.com/CorentinTh/it-tools
version: '3.3'
services:
    it-tools:
        image: 'corentinth/it-tools:latest'
        container_name: it-tools
        restart: unless-stopped
        ports:
            - 8080:80
        environment:
            - UID=1000
            - GID=1000
[CAP] Approuter – Increase session lifetime
To increase the session lifetime, simply increase the sessionTimeout property in the xs-app.json of your approuter.
https://www.npmjs.com/package/@sap/approuter#xs-appjson-configuration-file
xs-app.json
{
  "welcomeFile": "index.html",
  "authenticationMethod": "route",
  "logout": {
    "logoutEndpoint": "/do/logout"
  },
  "sessionTimeout": 60,
  "routes": []
}
[PDF.js] Get PDF Viewer when it’s available in DOM and fully initialized
https://github.com/mozilla/pdf.js/wiki/Third-party-viewer-usage
<iframe id="pdf-js-viewer" src="/pdf/web/viewer.html?file=" title="webviewer" frameborder="0" width="100%" height="700" allowfullscreen="" webkitallowfullscreen=""/>
            displayPdf: async function (id) {
                const pdfArrayBuffer= await getPdf(id)
                const pdfViewerIFrame = await getPdfViewer()
                await pdfViewerIFrame.contentWindow.PDFViewerApplication.initializedPromise
                await pdfViewerIFrame.contentWindow.PDFViewerApplication.open(pdfArrayBuffer)
            },

            getPdfViewer: function (id = 'pdf-js-viewer') {
                return new Promise((resolve, reject) => {
                    let pdfViewerIFrame = document.getElementById(id)
                    //if already loaded in DOM, return it
                    if (pdfViewerIFrame?.contentWindow?.PDFViewerApplication) {
                        resolve(pdfViewerIFrame)
                    } else {
                        //if not loaded yet, set up eventListener
                        document.addEventListener("webviewerloaded", async () => {
                            pdfViewerIFrame = document.getElementById(id)
                            resolve(pdfViewerIFrame)
                        })
                    }
                })
            }
This logic helped me to get the PDFViewerApplication in every situation correctly, for example when reloading the page with F5 or when having the PDF viewer already loaded and just wanting to open another PDF file.
[JavaScript] Create array of unique property values from an array of objects
const a = [
      {'id': 1, 'name': 'Max'},
      {'id': 2, 'name': 'Tom'},
      {'id': 3, 'name': 'Max'},
      {'id': 4, 'name': 'Max'}
    ];

let r = [...new Set(a.map(u => u.name))] // result ["Max", "Tom"]
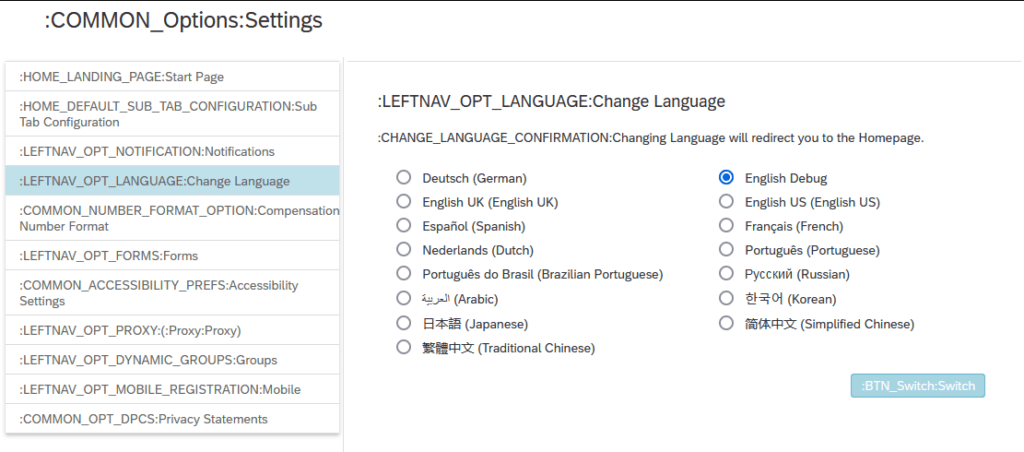
[SuccessFactors] Display technical field names
Go to Settings ⇾ Change Language ⇾ Switch to English Debug
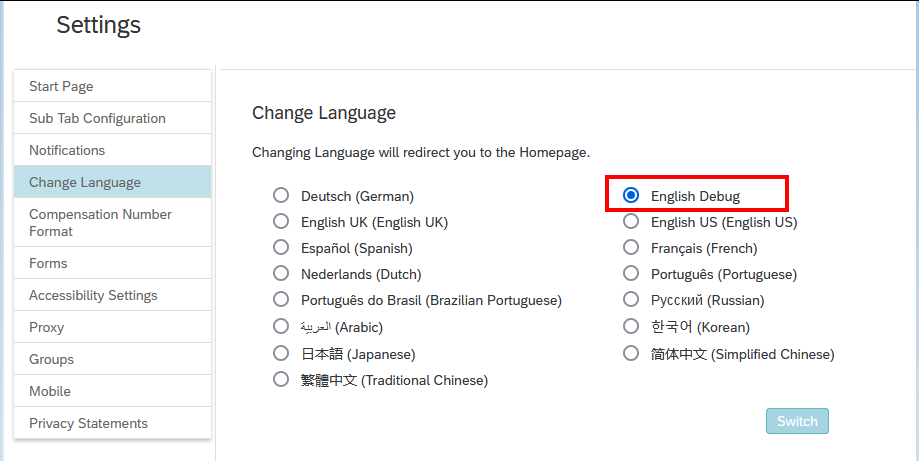
And everything becomes much more beautiful 🙂
[JavaScript] groupBy
https://developer.mozilla.org/en-US/docs/Web/JavaScript/Reference/Global_Objects/Object/groupBy
const people = [
  { name: "Max", age: 10 },
  { name: "Tim", age: 15 },
  { name: "Pip", age: 25 },
]

function adultsOnly({age}) {
if (age >= 18) {
    return 'adult'
  } else {
    return 'minor'
  }
}

const organized = Object.groupBy(people, adultsOnly)

console.log(organized)
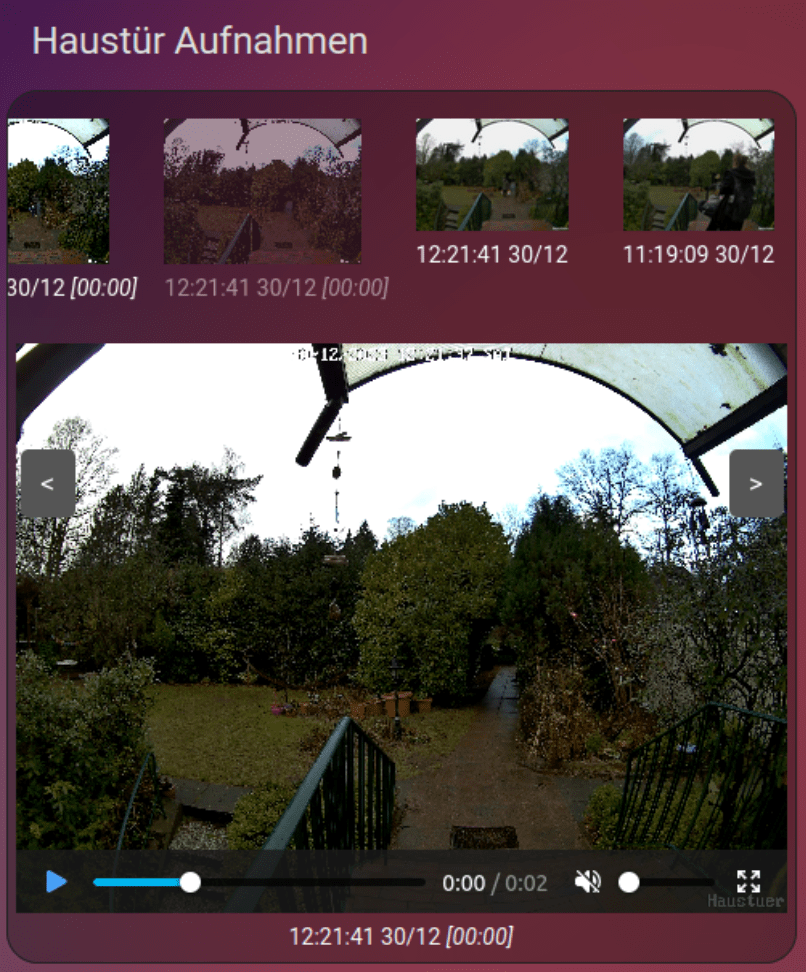
[Home Assistant] Display Reolink Recordings from a NAS using the Gallery Card
A few months ago, I installed a Reolink Doorbell at our front door. Since then, I’ve used it for simple automations like sending a photo when someone is at the door. To capture a photo, I was using the camera.snapshot service. I never used the photos and videos that the doorbell itself recorded and that were stored on my TrueNAS system via FTP. Mainly because I haven’t found a good way to display the captured photos and videos on my Dashboard. But finally I was able to fill the gap with the Gallery Card, which turned out to be exactly what I needed the whole time. By using it, you can simply display the latest images and videos, even when they are stored in some kind of nested folder structure, and it also helps to parse filenames to display them in a more convenient way.
Following a brief overview of what I had to do:
- TrueNAS
- Create dataset, in my case it’s:
data/camera - Share the dataset via NFS
- Sharing → Unix Shares (NFS) → Add → Choose your new dataset
- Create some folder(s) on your new dataset, for example:
/Reolink/Wifi-Doorbell/Recordings(to do that, simply mount the NFS share to your local machine or use the terminal) - Activate the FTP Service
- Services → FTP
- Create dataset, in my case it’s:
- Reolink
- Go to Settings → Surveillance → FTP
- Insert your TrueNAS FTP credentials
- Remote Directory:
/Reolink/Wifi-Doorbell/Recordings - Generate subfolder by:
YYYY-MM-DD - Select what and when you want to record something
- Go to Settings → Surveillance → FTP
- Home Assistant
- Add your Doorbell via Reolink Integration
- Mount NFS Share
- Settings → System → Storage → Add Network Storage
- Name:
Reolink(whatever you like) - Usage:
Media - Path:
/mnt/data/camera
- Check if you can access your recordings
- Media → My media → media → Reolink (NFS name)→ Reolink (my folder name)→ Wifi-Doorbell → Recordings
- If you cannot open your files, you probably have to adjust your permission on the TrueNAS Dataset. Provide at least read permissions (e.g. 655)
- Storage → Pools → camera → Edit Permissions
- Install Gallery Card
- HACS → Frontend → Explore & Download Repositories → Search for Gallery Card
- Go to your Dashboard and add the card
type: custom:gallery-card
entities:
  - media-source://media_source/media/Reolink/Reolink/Wifi-Doorbell/Recordings/
maximum_files: 25
menu_alignment: top
folder_format: YYYY/MM/DD
video_loop: true
video_autoplay: true
video_muted: true
file_name_date_begins: 12
file_name_format: YYYYMMDDHHmmss
caption_format: HH:mm:ss DD/MM
Most variables are self-explanatory and also well explained by the galery-card docs, but below a few words about the settings I used, beginning with the path to the media which is provided on the entities attribute.
entities:
  - media-source://media_source/media/Reolink/Reolink/Wifi-Doorbell/Recordings/
The first part is a default value: media-source://media_source/
Followed by the usage type and name we have chosen when mounting the NSF share: media/Reolink/
Then we need the directory path: Reolink/Wifi-Doorbell/Recordings
Because we chose in the Reolink settings “Generate subfolder by: YYYY-MM-DD“, the files are stored in a hierarchy like this:
- 2023
- 10
- 11
- 12
- 01
- 02
- 03
- 04
- 05
The gallery-card can automatically parse this, if you provide the following setting: folder_format: YYYY/MM/DD.
And because the filenames look like this: Haustuer_00_20231230143626.jpg, you have to add file_name_date_begins: 12 to skip the firs letters, and file_name_format: YYYYMMDDHHmmss to parse the date. With caption_format: HH:mm:ss DD/MM you can define the output, how you want to display the parsed timestamp.
15.03.2025: As the original Gallery Card is discontinued, I switched to a fork.