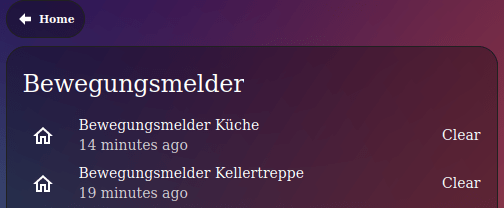
After the last Zigbee2MQTT update to version 1.39.0, suddenly the motion sensors were missing in my auto-entities cards, which I use to display all motions sensors for specific areas.
When checking the changes included in the new Zigbee2MQTT version, I found the reason: https://github.com/Koenkk/zigbee2mqtt/pull/22896 With this pull request, the device_class is motion is replaced with occupancy. After changing the device_class in the auto_entities config, the motions sensors are displayed again.
Alternatively, you can switch the device_class back to motion, like it is described here. This would also bring back the old icon mdi:motion-sensor instead of mdi:home-outline.
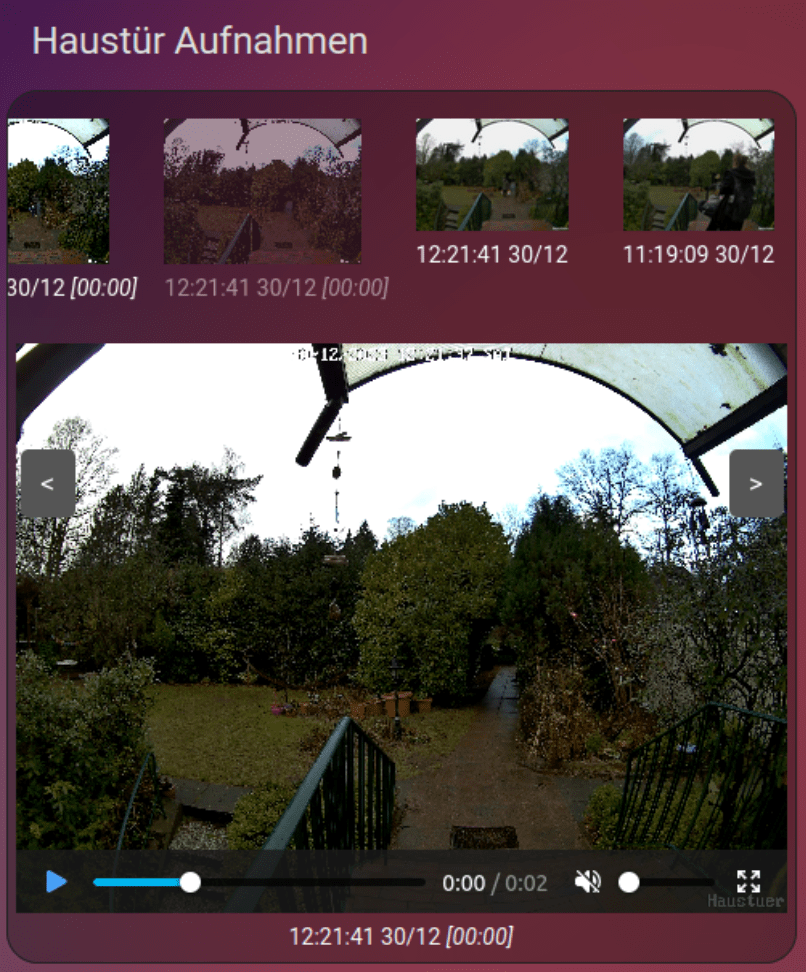
A few months ago, I installed a Reolink Doorbell at our front door. Since then, I’ve used it for simple automations like sending a photo when someone is at the door. To capture a photo, I was using the camera.snapshot service. I never used the photos and videos that the doorbell itself recorded and that were stored on my TrueNAS system via FTP. Mainly because I haven’t found a good way to display the captured photos and videos on my Dashboard. But finally I was able to fill the gap with the Gallery Card, which turned out to be exactly what I needed the whole time. By using it, you can simply display the latest images and videos, even when they are stored in some kind of nested folder structure, and it also helps to parse filenames to display them in a more convenient way.
Following a brief overview of what I had to do:
TrueNAS
Create dataset, in my case it’s: data/camera
Share the dataset via NFS
Sharing → Unix Shares (NFS) → Add → Choose your new dataset
Create some folder(s) on your new dataset, for example: /Reolink/Wifi-Doorbell/Recordings (to do that, simply mount the NFS share to your local machine or use the terminal)
Most variables are self-explanatory and also well explained by the galery-card docs, but below a few words about the settings I used, beginning with the path to the media which is provided on the entities attribute.
The first part is a default value: media-source://media_source/ Followed by the usage type and name we have chosen when mounting the NSF share: media/Reolink/ Then we need the directory path: Reolink/Wifi-Doorbell/Recordings
Because we chose in the Reolink settings “Generate subfolder by: YYYY-MM-DD“, the files are stored in a hierarchy like this:
2023
10
11
12
01
02
03
04
05
The gallery-card can automatically parse this, if you provide the following setting: folder_format: YYYY/MM/DD. And because the filenames look like this: Haustuer_00_20231230143626.jpg, you have to add file_name_date_begins: 12 to skip the firs letters, and file_name_format: YYYYMMDDHHmmss to parse the date. With caption_format: HH:mm:ss DD/MM you can define the output, how you want to display the parsed timestamp.
15.03.2025: As the original Gallery Card is discontinued, I switched to a fork.
I have some lights in my garden which are turned on in the night and are controlled by the Adaptive Lighting component, to automatically adjust brightness and color during the night. But if someone comes home late and this is detected by a motion sensor, I wanted to increase the brightness of all the lights in the garden for a short time.
Increasing the brightness was easy, as it can be done by using the light.turn_on service. However, it took me a few minutes to figure out how to reactivate adaptive lighting on these lights when motion is no longer detected. But it’s actually super simple (and it’s directly written on the GitHub start page here and here). You just have to deactivate the “manually controlled” flag that got activated by “manually” increasing the brightness. Following an example with a single motion sensor (binary_sensor.haustuer_motion), a lamp (light.haustur_light) and the adaptive lightning switch entity (switch.adaptive_lighting_haustuer).
alias: Motion sensor front door
description: "Increase brightness for three minutes when motion is detected"
trigger:
  - platform: state
    entity_id:
      - binary_sensor.haustuer_motion
    to: "on"
condition:
  - condition: state
    entity_id: sun.sun
    state: below_horizon
action:
  - service: light.turn_on
    data:
      transition: 3
      brightness_pct: 70
    target:
      entity_id: light.haustur_light
  - wait_for_trigger:
      - platform: state
        entity_id:
          - binary_sensor.haustuer_motion
        to: "off"
        for:
          hours: 0
          minutes: 3
          seconds: 0
    timeout:
      hours: 0
      minutes: 0
      seconds: 0
      milliseconds: 0
  - service: adaptive_lighting.set_manual_control
    data:
      manual_control: false
      entity_id: switch.adaptive_lighting_haustuer
      lights:
        - light.haustur_light
mode: single
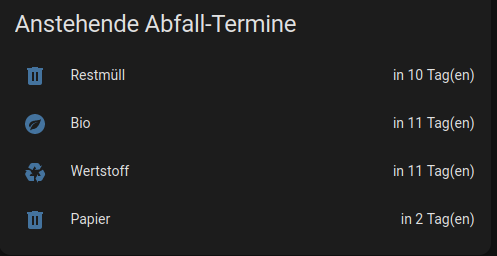
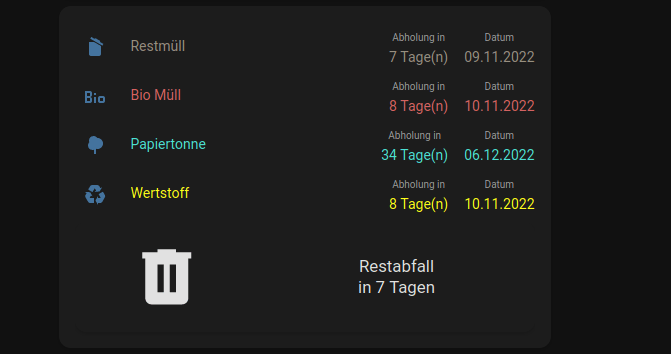
Die Integration bietet eine custom component für die AWSH. Nach Angabe von Ort und Straße bekommt man hier für alle Abfallbehälterarten die entsprechenden Termine zurück. Man muss daher noch die relevanten für sich heraussuchen. Diese kann man unter customize dann angeben und zusätzlich mit einem alias und einem icon versehen.
Alternativ bekommt man hier den Link zu einer .ics Kalenderdatei. Man kann vorher die für sich relevanten Abfallbehälter auswählen. Die .ics kann ebenfalls direkt eingebunden werden (siehe hier)
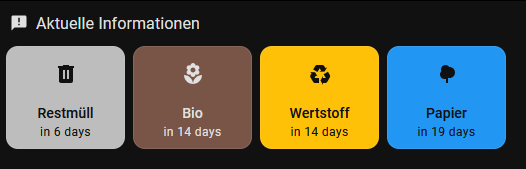
Um immer die Anzahl der Tage bis zum nächsten Abholtermin zu kennen, am besten noch einen weiteren Sensor anlegen und diesem wieder alle Abfallarten zuordnen.
  # Sensor for upcoming waste. Used in my reminder automation
  - platform: waste_collection_schedule
    name: upcomingWaste
    value_template: "{{value.daysTo}}"
    types:
      - Restabfall
      - Bioabfall
      - Wertstoff
      - Papier
Dieser kann dann in einer Erinnerungsautomatisierung verwendet werden, welche z.b. eine Notification am Vortag um 19Uhr verschickt.
Die Notification beinhaltet eine Bestätigungsmöglichkeit. Hat jemand die Tonne herausgestellt, kann dieser darüber dies einfach kurz bestätigen und mit einer zweiten Automatisierung kann man die Benachrichtigung dann bei anderen verschwinden lassen. Mehr dazu hier.
Ein tolles Beispiel für eine schöne Dashboard-Karte findet man hier.
Dafür müssen jedoch noch ein paar weitere Sensoren hinzugefügt werden, wie es hier ebenfalls beschrieben ist.
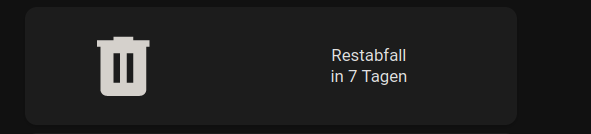
Update 14.08.2025: Mittlerweile nutze ich zusätzlich die Trash-card, die ich mir am Vortag dynamisch anzeigen lasse, wenn der Sensor upcomingwaste kleiner 2 ist.