
Gerade einen hilfreichen Trick gelernt, wie man den Namen einer Tabelle ermitteln kann. Angenommen man ist in der SPRO unterwegs und möchte den Namen der zugehörigen Tabelle des Customizingschritts ermitteln, kann man versuchen über F1 → Technische Info → Tabellenname den Namen zu finden. Häufig steht dort allerdings nur der View-Name, und der muss nicht zwangsläufig den Namen der Tabelle enthalten. Ein Fall wie V_T77PT_OVT_APPL ist einfach, da man nur V_ entfernen muss für den Tabellennamen T77PT_OVT_APPL. Falls man es aber nicht aus dem View-Namen ableiten kann, einfach in der Transaktion SM12 nach den Sperreinträgen zu dem eigenen User schauen. Dort findet man in der letzten Spalte Sperrargument den Tabellennamen. Die Tabelle muss dafür natürlich in einem anderen Modus noch geöffnet sein.
Tag: table
[ABAP] Fill range table directly from select statement
SELECT @if_fsbp_const_range=>sign_include AS sign,
       @if_fsbp_const_range=>option_equal AS option,
       bukrs                              AS low,
       CAST( @space AS CHAR( 4 ) )        AS high
  FROM t001
  INTO TABLE @DATA(range_of_comp_codes).

cl_demo_output=>display( range_of_comp_codes ).
Got this snippet from George Drakos talk from the ABAPConf 2024. Check his Github.
[CAP] Fiori Elements – Add button in table toolbar to trigger action
A button for calling an action or function can be added to a table header with a single line in the annotations.cds file:
UI.LineItem : [
        { $Type: 'UI.DataFieldForAction', Action: 'myService.EntityContainer/myAction', Label: 'This is my button label' },
...
    ],
[ABAP] Display Table data as HTML
REPORT z_table_to_html.

TRY.

    SELECT * FROM sflight INTO TABLE @DATA(flights) UP TO 100 ROWS.

    cl_demo_output=>write_data( flights ).

    DATA(lv_html) = cl_demo_output=>get( ).

    cl_abap_browser=>show_html( title       = 'Flights'
                                html_string = lv_html
                                container   = cl_gui_container=>default_screen ).

    " force cl_gui_container=>default_screen
    WRITE: space.

  CATCH cx_root INTO DATA(e).
    WRITE: / e->get_text( ).
ENDTRY.
[ABAP] ALV traffic lights
TYPES: BEGIN OF ty_log,
         status TYPE icon-id,
       END OF ty_log.

DATA gt_log TYPE TABLE OF ty_log.

gt_log = VALUE #( ( status = icon_red_light    )
                  ( status = icon_yellow_light )
                  ( status = icon_green_light  ) ).

TRY.
    cl_salv_table=>factory( IMPORTING r_salv_table = DATA(alv_table)
                            CHANGING  t_table      = gt_log ).

    alv_table->display( ).

  CATCH cx_salv_msg.
ENDTRY.
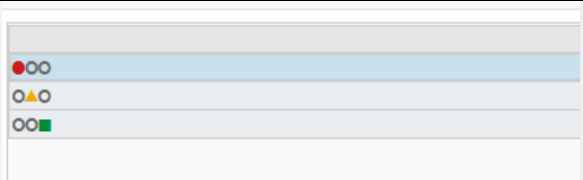
icon_red, icon_yellow etc. will be automatically loaded from the TYPE-POOL: icon during runtime.
You can check all available icons via the table icon.
SELECT SINGLE id INTO @DATA(icon_red) FROM icon WHERE name = 'ICON_RED_LIGHT'.
[ABAP] Delete all rows from index
If you want to delete all lines from a certain index, e.g. 6, you can do the following:
DELETE lt_data FROM 6 TO lines( lt_data ).
As result, your table will only hold the first 5 rows.
[SAPUI5] Get data of an Item of a List or Table
All options have in common that you first try to get the binding context from the list/table element via the event. Having the right context, you can either use the getProperty() function to get a specific property, or use the getObject() function to get all data.
onClick: function (oEvent) {
    // Option 1
    oEvent.getParameters().item.getBindingContext().getProperty("ID")
    // Option 2
    oEvent.getParameters().item.getBindingContext().getObject().ID
    // Option 3
    oEvent.getParameter("item").getBindingContext().getObject().ID
    // Option 4
    oEvent.getSource().getBindingContext().getObject().ID
}
Note: When using a List, it’s oEvent.getParameters().listItem instead of oEvent.getParameters().item.
Or you could also use the sPath property from the binding context and directly get the data from the model.
onClick: function (oEvent) {
    // Option 5
    const sPath = oEvent.getSource().getBindingContext().sPath
    // 5a
    this.getView().getModel().getProperty(sPath).ID
    // 5b
    this.getView().getModel().getProperty(sPath + "/ID")
}
[ABAP] Include table fields in local type
Somehow I always forget the syntax for this….
    TYPES: BEGIN OF ty_test.
             INCLUDE TYPE z_table.
    TYPES:   my_new_field TYPE string,
           END OF ty_test.
[SAPUI5] Copy Table Row
Button für das Kopieren einer Zeile hinzufügen.
<Table id="itemsTable" items="{oModel>/ITEMS}">
<columns>
      <Column id="splitColumn" hAlign="Center" demandPopin="false">
            <Text text="{i18n>SPLIT}"/>
      </Column>
</columns>
<items>
      <ColumnListItem>
            <cells>
                  <Button press="onSplitPressed" id="SPLIT_ROW" icon="{= ${oModel>CUSTOM_ITEM} === true ? 'sap-icon://delete' : 'sap-icon://add'}"/>
            </cells>
      </ColumnListItem>
</items>
</Table>
Nur neu hinzugefügte Zeilen sollen auch wieder gelöscht werden dürfen, daher werden manuell hinzugefügte Zeilen markiert mit CUSTOM_ITEM = True;
Via Expression Binding wird dann das erforderliche Icon bestimmt.

onSplitPressed: function (oEvent) {
		var oContext = oEvent.getSource().getBindingContext("oModel");
		var path = oContext.getPath();
		var oModel = oContext.getModel();
		var oItems = oModel.getProperty("/ITEMS");
		var index = path.substr(path.length - 1);

		//selektiertes Item lesen
		var oItem = oModel.getProperty(path);

		//was soll passieren? Zeile hinzufügen oder entfernen?
		if (oItem.CUSTOM_ITEM !== true) {

			//Neues Item anlegen
			var oNewItem = JSON.parse(JSON.stringify(oItem));
			//Markiere neue Zeile, da nur diese auch wieder gelöscht werden darf
			oNewItem.CUSTOM_ITEM = true;
			// +1 weil Zeile soll ja nach der Aktuellen einfügt werden
			index++;
			oItems.splice(index, 0, oNewItem);

		} else {
			// Item löschen
			oItems.splice(index, 1);
		}

		oModel.setProperty("/ITEMS", oItems);
	},