
const cds = require('@sap/cds');

module.exports = async srv => {

     const { Objects } = srv.entities // entities from myService.cds

     srv.on("myAction", async req => {
        const query = SELECT.one.from(Objects).where({ id: req.data.myId })
        const srv = await cds.connect.to('myService')
        const data = await srv.run(query)
        console.log(data)
        return data
    })

    srv.on("READ", Objects, async req => {
        console.log("Objects called")
        // Select data from db or forward query to external system
        // ...
        // return data
    })

}
Category: SAP
SAP
[SuccessFactors] Create JavaScript Date-Object from DateTimeOffset
The SuccessFactors oData v2 API is returning timestamps in Unix Epoch format (unix-style milliseconds since 1/1/1970).
Many timestamp fields are of type Edm.Int64. When receiving the milliseconds as Integer, you can directly create a date-object of it using Date(1658237847).
But some timestamps are of type Edm.DateTimeOffset, i.e.: "createdDate": "/Date(1652252620000+0000)/".
When binding a timestamp property with an ODataModel, the internal lib datajs will convert the /Date(...)/ value to a standard JS date-object.
But in my case I manually had to convert the timestamp and this is the shortest way I found to convert the epoch string into a JS date-object.
// SF epoch date string
const SFdateString = '/Date(1652252620000+0000)/'

// remove the '/' on both sides and create the date object
const oDate = eval('new ' + SFdateString .slice(1, -1))

console.log(typeof oDate )
console.log(oDate )

const oDateTimeFormat = sap.ui.core.format.DateFormat.getDateTimeInstance({
          pattern: "YYYY-MM-dd HH:mm"
})
return oDateTimeFormat.format(oDate)
[Workflow] You are not one of the possible agents of task ‘&1’
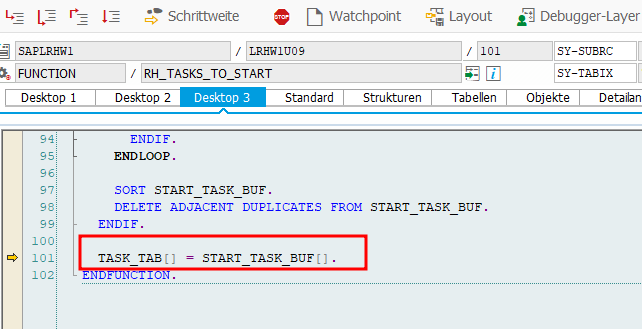
The Function Module SAP_WAPI_START_WORKFLOW uses RH_TASK_START_CHECK to check, if the calling user is allowed to start the Workflow.
In it RH_TASKS_TO_START is used to read the WF and Task IDs which the user is allowed to call. But it uses a buffer and if you just did some changes to the Workflow Classification, i.e. setting it to General Task,
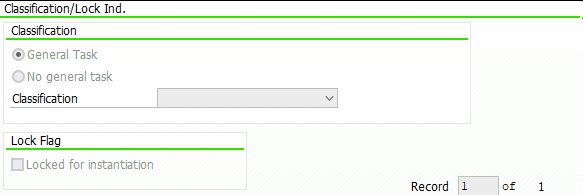
it can be that this check will continue to fail as it is reading old data from the buffer.
You will receive an error message from Message Class WZ: You are not one of the possible agents of task ‘&1’

I had this problem sometimes when transporting objects to the next system, but until now I could not figure out when it happens and when not.
Luckily the solution is pretty simple, just call T-Code SWU_OBUF and do a buffer refresh/synchronization.
Rob Dielemans has explained the cause very well here.
[ABAP] Read ACTION_COMMENTS from a Workitem
If you want to use the decision note / action comment of a Workitem in a mail step, you have to write a method to read the comment and then pass it to the mail step. To do this, I always create a method in my Workflow helper class called READ_DECISION_NOTE with the following parameters:

For the importing parameter, you must store the Workitem ID of your Decision Step in you Workflow Container, by creating a Container Element like DecisionWIID of type SWW_WIID and fill it with the Workitem ID of your decision step. Then use it later for calling your method READ_DECISION_NOTE.
Regarding the exporting parameter; If you want to send a mail via class cl_cbs you’re a fine reading the comment as string. But if you want to use the default workflow mail step, and you are expecting comments with more than >255 characters, you will need the comment as SOLI_TAB.
If you take a look at the decision Workitem, you will properly find the Attribute ACTION_COMMENTS, which is of type SWC_VALUE and is of type char with length 255. But this is only the case, if the entered text has less than < 255 characters.

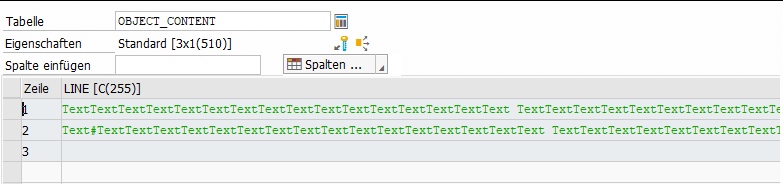
If the user entered a text with more than 255 characters, the text is split and there are more elements named with ACTION_COMMENTS_1, ACTION_COMMENTS_2 etc. (Note 3017539)

There is the function module SAP_WAPI_READ_CONTAINER to read Workitems. As input for the function module, you need the Workitem ID from the decision step. You will then find the ACTION_COMMENTS in the simple_container table.
    DATA: return_code              TYPE sy-subrc,
          simple_container         TYPE TABLE OF swr_cont,
          message_lines            TYPE TABLE OF swr_messag,
          message_struct           TYPE TABLE OF swr_mstruc,
          subcontainer_bor_objects TYPE TABLE OF swr_cont,
          subcontainer_all_objects TYPE TABLE OF swr_cont,
          object_content           TYPE TABLE OF solisti1.

    " Read the work item container from the work item ID
    CALL FUNCTION 'SAP_WAPI_READ_CONTAINER'
      EXPORTING
        workitem_id              = iv_wiid
      IMPORTING
        return_code              = return_code
      TABLES
        simple_container         = simple_container
        message_lines            = message_lines
        message_struct           = message_struct
        subcontainer_bor_objects = subcontainer_bor_objects
        subcontainer_all_objects = subcontainer_all_objects.


    TRY.
        DATA(text) = simple_container[ element = 'ACTION_COMMENTS' ]-value.
      CATCH cx_sy_itab_line_not_found.
      " Check for ACTION_COMMENTS_1 etc.
      " or follow the approach below
    ENDTRY.
The comment is also added as SOFM-Object (SAP-Office-Document) to the Workitem. Just check the table subcontainer_all_objects, which is also returned by the previous function module, for attribute _ATTACH_COMMENT_OBJECTS (or _ATTACH_OBJECTS or DECISION_NOTE or _DECISION_COMMENT). With function module SO_DOCUMENT_READ_API1 you can then get the actual comment.
    " Read the _ATTACH_COMMENT_OBJECTS element
    " There can be more than one comment, just take the last one
    LOOP AT subcontainer_all_objects INTO DATA(comment_object) WHERE element = '_ATTACH_COMMENT_OBJECTS'.
    ENDLOOP.

    CHECK comment_object-value IS NOT INITIAL.

    " Read the SOFM Document
    CALL FUNCTION 'SO_DOCUMENT_READ_API1'
      EXPORTING
        document_id    = CONV so_entryid( comment_object-value )
      TABLES
        object_content = object_content
      EXCEPTIONS
        OTHERS         = 1.

    et_decision_note = object_content.

* Or create a single string
*    LOOP AT object_content INTO DATA(lv_soli).
*      CONCATENATE text lv_soli-line INTO text.
*    ENDLOOP.
This SOLI_TAB can be passed to a default mail step and will keep line breaks etc.
Update 02.06.2026: A shorter approach can be the following.
    DATA(lo_workitem) = NEW /iwwrk/cl_wf_read_workitem( iv_wiid ).

    lo_workitem->get_wi_appr_comments( IMPORTING et_wi_appr_comm = DATA(lt_wi_appr_comm)
                                                 ev_return_code  = DATA(lv_return_code) ).

    READ TABLE lt_wi_appr_comm INTO DATA(ls_decision) WITH KEY obj_name = 'COMMENT' obj_type = 'TXT'.

    DATA(soli_tab) = cl_document_bcs=>string_to_soli( ls_decision-text ).
But string to soli_tab is always a bit risky when having a text with >255 characters (see here).
[CAP] SSH into application instance running on CF
# check if ssh is enabled
cf ssh-enabled myapp

# if it's not, enable it and restart app
cf enable-ssh myapp
cf restart myapp

# access with
cf ssh myapp
[SAPUI5] Get i18n texts
To simply get access to i18n texts, I useally add this helper function to my BaseController.js
// helper for direct access to the ResourceBundle getText() function
getText : function (sTextKey, aParamter) {
    return this.getOwnerComponent().getModel("i18n").getResourceBundle().getText(sTextKey, aParamter)
}
Texts can then be read in every controller with
// i18n: objects=Amount of objects: {0}
this.getText("objects", [iLength])
[CAP] Login to CF using a bash script
Create your script file, make it executeable and add it to your .gitignore as it contains sensitive information:
touch login.sh
chmod +x login.sh
echo login.sh >> .gitignore
Open the file and paste the following:
#! /bin/bash
cf login <<!
myemail@mail.com
mypassword
1
!
With “1” you select your target space. Save your script and run it using:
./login.sh
After some time, it can happen that the default identity provider of the SAP BTP (SAP ID service) is asking for a password change. I don’t know exactly, but it seems to be every 90 days?!
The login process will fail with the following output:
$ ./scripts/login.sh
API endpoint: https://api.cf.eu10.hana.ondemand.com

Email: myemail@mail.com
Password:

Authenticating...
{"error":"invalid_grant","error_description":"User authentication failed: PASSWORD_CHANGE_REQUIRED"}
To change your password, just go to https://account.sap.com or https://accounts.sap.com/, and it should directly open the password change screen.
Update 06.09.2024: The login can now also be done by completely using the cf command.
cf login -a https://api.cf.eu10.hana.ondemand.com -o myOrg -s mySpace -u myEmail@mail.com -p myPassword
[CAP] Create and deploy bookshop sample app
Since CDS 5.9.2 this is the quickest way of creating and deploying the bookshop sample:
cds init bookshop
cd bookshop
cds add samples
cds add hana
cds add xsuaa
cds add mta
npm install
mbt build
cf deploy mta_archives/bookshop_1.0.0.mtar
[ABAP] Include table fields in local type
Somehow I always forget the syntax for this….
    TYPES: BEGIN OF ty_test.
             INCLUDE TYPE z_table.
    TYPES:   my_new_field TYPE string,
           END OF ty_test.
[CAP] Get destination data using sap-cloud-sdk
https://sap.github.io/cloud-sdk/docs/js/features/connectivity/destination
const { getDestination } = require("@sap-cloud-sdk/connectivity")
const myDestination= await getDestination("myDestination")
if (myDestination === null) throw Error(`Destination "myDestination" not found`)
for (let key in myDestination) {
       console.log(key, myDestination[key])
}