npm outdated
npm update
Tag: npm
[nodejs] APIs and Microservices Projects
These are my notes while doing the course APIs and Microservices on https://www.freecodecamp.org. I highly recommend it if you prefer to try things directly rather than watching videos.
Timestamp Microservice
https://repl.it/@nocin/boilerplate-project-timestamp#server.js
app.get("/api/timestamp/", (req, res) => {
  res.json({ unix: Date.now(), utc: Date() });
});

app.get("/api/timestamp/:date?", (req, res) => {

  //utc date?
  let date = new Date(req.params.date)
  if (date != "Invalid Date") {
   res.json({unix: date.getTime(), utc: date.toUTCString()});
  }

  //unix timestamp?
  const dateInt = parseInt(req.params.date);
  date = new Date(dateInt).toUTCString();
  if (date != "Invalid Date") {
    res.json({unix: dateInt, utc: date});
  }

  //invalid input
  res.json({ error: date });
});
Request Header Parser Microservice
https://repl.it/@nocin/boilerplate-project-headerparser#server.js
https://www.npmjs.com/package/express-useragent
https://www.npmjs.com/package/express-request-language
var useragent = require('express-useragent');
var cookieParser = require('cookie-parser');
var requestLanguage = require('express-request-language');

// stuff...

app.use(useragent.express());
app.use(cookieParser());
app.use(requestLanguage({
  languages: ['en-US', 'zh-CN'],
  cookie: {
    name: 'language',
    options: { maxAge: 24*3600*1000 },
    url: '/languages/{language}'
  }
}));

app.get("/api/whoami", (req, res) => {
  res.json({"ipaddress": req.ip,
            "language": req.language,
            "software": req.useragent.source });
});
URL Shortener Microservice
https://repl.it/@nocin/boilerplate-project-urlshortener#server.js
require('dotenv').config();
const express = require('express');
const cors = require('cors');
const app = express();
const bodyParser = require('body-parser');
const dns = require('dns');


// Basic Configuration
const port = process.env.PORT || 3000;

app.use(cors());

app.use('/public', express.static(`${process.cwd()}/public`));

app.get('/', function(req, res) {
  res.sendFile(process.cwd() + '/views/index.html');
});

app.use(bodyParser.urlencoded({extended: false}));

let urls = [];

//POST
app.post("/api/shorturl/new", function(req, res) {

  const getHostnameFromRegex = (url) => {
  // run against regex
  const matches = url.match(/^https?\:\/\/([^\/?#]+)(?:[\/?#]|$)/i);
  // extract hostname (will be null if no match is found)
  return matches && matches[1];
  }

  hostname = getHostnameFromRegex(req.body.url);
  console.log("Hostname: " + hostname);

  // if no hostname found, return here
  if (!hostname) res.json({ error: 'invalid url' });

  // check if url is valid
  dns.lookup(hostname, (error, addresses) => {
    console.error(error);
    console.log(addresses);

    if (!error) {
       let newUrl = { original_url : req.body.url, short_url : urls.length + 1};
      urls.push(newUrl);
      res.json(newUrl);
    } else {
      res.json({ error: 'invalid url' });
    }

  });

});

//GET
app.get('/api/shorturl/:num', function(req, res) {

  for (let i = 0; i < urls.length; i++) {
    console.log(urls[i].original_url);
    if (urls[i].short_url == req.params.num) {
        res.redirect(urls[i].original_url);
    }
  }

});

app.listen(port, function() {
  console.log(`Listening on port ${port}`);
});
Exercise Tracker
https://repl.it/@nocin/boilerplate-project-exercisetracker#server.js
const express = require('express')
const app = express()
const cors = require('cors')
require('dotenv').config()
const bodyParser = require('body-parser');
const mongoose = require('mongoose');

app.use(cors())
app.use(express.static('public'))
app.get('/', (req, res) => {
    res.sendFile(__dirname + '/views/index.html')
});


const listener = app.listen(process.env.PORT || 3000, () => {
    console.log('Your app is listening on port ' + listener.address().port)
})


//BodyParser
app.use(bodyParser.urlencoded({ extended: false }));

//DB connect
mongoose.connect(process.env.MONGO_URI, { useNewUrlParser: true, useUnifiedTopology: true });

const { Schema } = mongoose;

//User Schema
const userSchema = new Schema({
    username: { type: String, required: true },
});
const User = mongoose.model("User", userSchema);

//Exercise Schema
const exerciseSchema = new Schema({
    userId: Schema.Types.ObjectId,
    description: { type: String, required: true },
    duration: { type: Number, required: true },
    date: { type: Date, default: Date.now }
});
const Exercise = mongoose.model("Exercise", exerciseSchema);


//POST user to DB
app.post("/api/exercise/new-user", (req, res) => {

    let user = new User({ username: req.body.username });

    user.save((err, data) => {
        //console.log("created User: " + data);
        if (err) return console.error(err);
        res.json({ username: data.username, _id: data._id });
    });

});


//GET all users from DB
app.get("/api/exercise/users", (req, res) => {
    User.find((err, usersFound) => {
        if (err) return console.error(err);
        //console.error("users found: " + usersFound);
        res.json(usersFound);
    })
});


//POST exercise form data
app.post("/api/exercise/add", (req, res) => {

    let exercise = new Exercise({
        userId: req.body.userId,
        description: req.body.description,
        duration: req.body.duration,
        date: req.body.date ? req.body.date : Date.now()
    });

    exercise.save((err, data) => {
        //console.log("created exercise: " + data);
        if (err) return console.error(err);
        User.findById(exercise.userId, (err, userFound) => {
            if (err) return console.error(err);
            //console.log("userFound " + userFound.username);
            res.json({
                _id: data.userId,
                username: userFound.username,
                date: data.date.toDateString(),
                duration: data.duration,
                description: data.description
            });
        });
    });
});


//GET exercise log
app.get("/api/exercise/log", (req, res) => {
    console.log(req.query.userId);
    console.log(req.query.from);
    console.log(req.query.to);
    console.log(req.query.limit);

    let userId = req.query.userId;
    let limit = Number(req.query.limit);

    //create query filter
    let filter = {};
    filter.userId = userId;

    if (req.query.from && req.query.to) {
        let fromDate = new Date(req.query.from);
        let toDate = new Date(req.query.to);
        filter.date = { $gte: fromDate, $lte: toDate };
    }

    console.log("Filter " + JSON.stringify(filter));

    const queryExercises = (done) => {
        Exercise.find(filter)
            .limit(limit)
            .exec((err, exercices) => {
                if (err) return console.error(err);
                done(exercices);
            })
    };

    const paseExercises = (exercices) => {
        let logArray = [];

        for (let i = 0; i < exercices.length; i++) {
            var obj = exercices[i];
            logArray.push({
                description: obj.description,
                duration: obj.duration,
                date: obj.date.toDateString()
            });
        }
        console.log(logArray);

        User.findById(userId, (err, userFound) => {
            if (err) return console.error(err);
            let logger = {
                _id: userId,
                username: userFound.username,
                count: logArray.length,
                log: logArray
            };
            res.json(logger);
        });
    }

    //Execute Query
    queryExercises(paseExercises);

});
File Metadata Microservice
https://repl.it/@nocin/boilerplate-project-filemetadata#server.js
https://www.npmjs.com/package/multer
var express = require('express');
var cors = require('cors');
require('dotenv').config()
var multer  = require('multer')
var upload = multer({ dest: 'uploads/' });

var app = express();

app.use(cors());
app.use('/public', express.static(process.cwd() + '/public'));

app.get('/', function (req, res) {
    res.sendFile(process.cwd() + '/views/index.html');
});


const port = process.env.PORT || 3000;
app.listen(port, function () {
  console.log('Your app is listening on port ' + port)
});


//POST
app.post('/api/fileanalyse', upload.single('upfile'), (req, res, next) => {
  res.json({ name: req.file.originalname, type: req.file.mimetype, size: req.file.size  });
})
[nodejs] MongoDB and Mongoose Challenges
These are my notes while doing the course APIs and Microservices on https://www.freecodecamp.org. I highly recommend it if you prefer to try things directly rather than watching videos.
MongoDB is a database that stores data records (documents) for use by an application. Mongo is a non-relational, “NoSQL” database. This means Mongo stores all associated data within one record, instead of storing it across many preset tables as in a SQL database.
Mongo’s use of JSON as its document storage structure makes it a logical choice when learning backend JavaScript. Accessing documents and their properties is like accessing objects in JavaScript.
Mongoose.js is an npm module for Node.js that allows you to write objects for Mongo as you would in JavaScript.
MongoDB Atlas is a MongoDB Database-as-a-Service platform.
Install and Set Up Mongoose
Add mongodb and mongoose to the project’s package.json.
    "dependencies": {
        "body-parser": "^1.15.2",
        "dotenv": "^8.2.0",
        "express": "^4.12.4",
        "mongodb": "^3.6.4",
        "mongoose": "^5.11.15"
    },
Store your MongoDB Atlas database URI in a private .env file as MONGO_URI. Replace user and password.
MONGO_URI=mongodb+srv://<User>:<Password>@cluster0.xvsqx.mongodb.net/<dbname>?retryWrites=true&w=majority
Connect to the database using the following syntax:
const mongoose = require('mongoose');
mongoose.connect(process.env.MONGO_URI, { useNewUrlParser: true, useUnifiedTopology: true });
Create a Model
Everything in Mongoose starts with a Schema. Each schema maps to a MongoDB collection and defines the shape of the documents within that collection.
const { Schema } = mongoose;

const personSchema = new Schema({
  name: { type: String, required: true },
  age: Number,
  favoriteFoods: [String]
});

const Person = mongoose.model("Person", personSchema);
Create and Save a Record of a Model
The done() function is a callback that tells us that we can proceed after completing an asynchronous operation such as inserting, searching, updating, or deleting. It’s following the Node convention, and should be called as done(null, data) on success, or done(err) on error.
const createAndSavePerson = (done) => {

  let max = new Person({name: "Max", age: 31, favoriteFoods: ["Pasta"]});

  max.save((err, data) => {
    if (err) return console.error(err);
    done(null, data)
  });

};
Create Many Records with model.create()
var arrayOfPeople = [
    {name: "Max", age: 31, favoriteFoods: ["Pasta"]},
    {name: "Toni", age: 21, favoriteFoods: ["Pizza"]},
    {name: "Paul", age: 34, favoriteFoods: ["Bolo", "Penne"]}
    ];

const createManyPeople = (arrayOfPeople, done) => {
  Person.create(arrayOfPeople, (err, people) => {
    if (err) return console.error(err);
    done(null, people);
  });
};
Use model.find() to Search Your Database
Model.find() accepts a query document (a JSON object) as the first argument, then a callback. It returns an array of matches.
const findPeopleByName = (personName, done) => {
  Person.find({name: personName}, (err, personFound) => {
    if (err) return console.error(err);
    done(null, personFound);
  })
};
Use model.findOne() to Return a Single Matching Document from Your Database
Model.findOne() behaves like Model.find(), but it returns only one document (not an array), even if there are multiple items.
const findOneByFood = (food, done) => {
  Person.findOne({favoriteFoods: food}, (err, personFound) => {
    if (err) return console.error(err);
    done(null, personFound);
  })
};
Use model.findById() to Search Your Database By _id
When saving a document, MongoDB automatically adds the field _id, and set it to a unique alphanumeric key.
const findPersonById = (personId, done) => {
  Person.findById({_id: personId}, (err, personFound) => {
    if (err) return console.error(err);
    done(null, personFound);
  })
};
Perform Classic Updates by Running Find, Edit, then Save
const findEditThenSave = (personId, done) => {
  const foodToAdd = 'hamburger';

  Person.findById(personId, (err, person) => {
    if(err) return console.log(err);

    person.favoriteFoods.push(foodToAdd);
    person.save((err, updatedPerson) => {
      if(err) return console.log(err);
      done(null, updatedPerson)
    })
  })
};
Perform New Updates on a Document Using model.findOneAndUpdate()
Use the function parameter personName as the search key. Set the person’s age to 20.
Note: You should return the updated document. To do that, you need to pass the options document { new: true } as the 3rd argument to findOneAndUpdate(). By default, these methods return the unmodified object.
const findAndUpdate = (personName, done) => {
  const ageToSet = 20;

  Person.findOneAndUpdate({name: personName}, {age: ageToSet}, { new: true }, (err, updatedDoc) => {
    if (err) return console.error(err);
    done(null, updatedDoc)
  })
};
Delete One Document Using model.findByIdAndRemove()
const removeById = (personId, done) => {

  Person.findByIdAndRemove(personId, (err, personDeleted) => {
    if (err) return console.error(err);
    done(null, personDeleted)
  })
};
Delete Many Documents with model.remove()
const removeManyPeople = (done) => {
  const nameToRemove = "Mary";

  Person.remove({name: nameToRemove}, (err, personsDeleted) => {
    if (err) return console.error(err);
    done(null, personsDeleted)
  })
};
Chain Search Query Helpers to Narrow Search Results
const queryChain = (done) => {
  const foodToSearch = "burrito";

  Person.find({favoriteFoods: foodToSearch})
  .sort({name: 1}) //sort bei name
  .limit(2) //only 2 results
  .select({age: 0})  //hide age
  .exec((err, twoPersonFound) => {
    if (err) return console.error(err);
    done(null, twoPersonFound)
  })
};
[nodejs] Managing Packages with NPM
These are my notes while doing the course APIs and Microservices on https://www.freecodecamp.org. I highly recommend it if you prefer to try things directly rather than watching videos.
The Node Package Manager (npm) is a command-line tool to share and control modules (or packages) of JavaScript code written for use with Node.js.
When starting a new project, npm generates a package.json file. This file lists the package dependencies for your project. Since npm packages are regularly updated, the package.json file allows you to set specific version numbers for each dependency. This ensures that updates to a package don’t break your project.
npm saves packages in a folder named node_modules. These packages can be installed in two ways:
- globally in a root
node_modulesfolder, accessible by all projects. - locally within a project’s own
node_modulesfolder, accessible only to that project.
The package.json file is the center of any Node.js project or npm package. It stores information about your project, similar to how the <head> section of an HTML document describes the content of a webpage. It consists of a single JSON object where information is stored in key-value pairs.
https://github.com/freeCodeCamp/boilerplate-npm/
{
  "name": "fcc-learn-npm-package-json", // your project name
  "author": "Max Mustermann",
  "description": "A project that does something awesome",
  "keywords": [ "descriptive", "related", "words", "freecodecamp" ],
  "license": "MIT", // inform users of what they are allowed to do with your project
  "version": "1.2.0", // describes the current version of your project
  "dependencies": {
    "package-name": "MAJOR.MINOR.PATCH", // Semantic Versioning
    "express": "^4.14.0",
    "moment": "~2.10.2" // handy library for working with time and dates.
  }
}
PATCHes are bug fixes and MINORs add new features but neither of them break what worked before. Finally, MAJORs add changes that won’t work with earlier versions. Find a more detailed explanation here.
To allow an npm dependency to update to the latest PATCH version, you can prefix the dependency’s version with the tilde (~) character.
The caret (^) will allow both MINOR updates and PATCHes.
[OpenUI5] SAP Fiori elements add-on for OpenUI5 using an OData V4 service
Recently I found this blog post about the new SAP Fiori elements add-on for OpenUI5.
https://blogs.sap.com/2020/12/21/now-available-sap-fiori-elements-add-on-for-openui5/
It includes a little exercise to try it out for yourself. I wrote down all steps I had to make on my Linux Mint 20 installation.
These two links also helped me a lot.
https://github.com/sap-samples/cloud-cap-samples
https://cap.cloud.sap/docs/get-started/
Prerequisites (Node.js, Visual Studio Code, SAP Fiori tools, Git)
curl -sL https://deb.nodesource.com/setup_15.x | sudo -E bash -
sudo apt-get install -y nodejs
node --version
npm -v
Change npm’s default directory to prevent permission errors.
https://docs.npmjs.com/resolving-eacces-permissions-errors-when-installing-packages-globally
mkdir ~/.npm-global
npm config set prefix '~/.npm-global'
mkdir ~/.npm-global/lib
#add the following line to your .bashrc or .profile or .zshrc
export PATH=~/.npm-global/bin:$PATH
Step 1: Provide an OData V4 service
git clone https://github.com/sap-samples/cloud-cap-samples remote-odata-service
cd remote-odata-service
npm i
npm i -g @sap/cds-dk
cds watch fiori
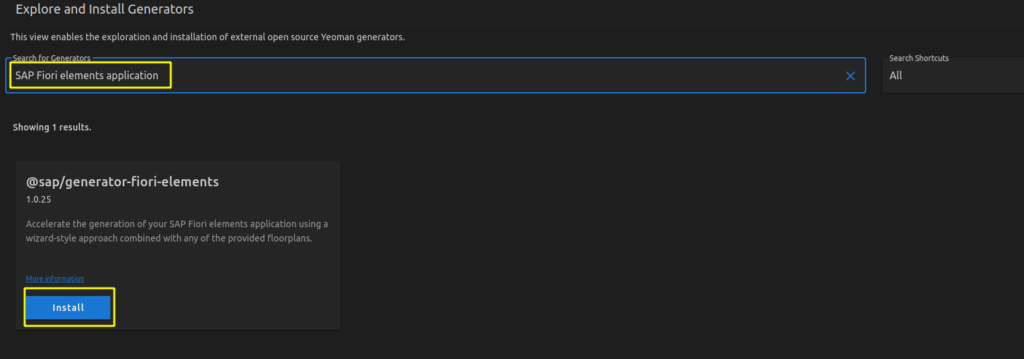
Step 2: Generate a SAP Fiori elements List Report Object Page (LROP) app with Fiori tools
1. Open VSC, press Ctrl + P and search for > Fiori: Open Application Generator
2. Choose SAP Fiori elements application
In my case there was no default generator, so first I had to install it.
npm install -g @sap/generator-fiori-elements@latest
This can also be done directly in VSC.

3. Select List Report Object Page
4. Select Connect to an OData Service as Data source and enter as URL http://localhost:4004/browse
5. Choose Books as the Main entity and texts as Navigation entity
6. Complete the mandatory information module name (e.g. bookshop) and Project folder path for storing your app. Of course, you can also fill in the optional information.
Step 3: Make changes in package.json and ui5.yaml required for using OpenUI5
package.json
{
	"name": "fiorielements_openui5",
	"version": "0.0.1",
	"private": true,
	"sapux": true,
	"description": "A Fiori application.",
	"keywords": [
		"ui5",
		"openui5",
		"sapui5"
	],
	"main": "webapp/index.html",
	"scripts": {
		"start": "fiori run --open index.html",
		"start-local": "fiori run --config ./ui5-local.yaml --open index.html",
		"build": "ui5 build -a --clean-dest --include-task=generateManifestBundle generateCachebusterInfo",
		"deploy": "fiori add deploy-config"
	},
	"devDependencies": {
		"@sap/ux-specification": "latest",
		"@sap/ux-ui5-tooling": "1",
		"@ui5/cli": "2.5.0",
		"@ui5/fs": "2.0.1",
		"@ui5/logger": "2.0.0"
	},
	"ui5": {
		"dependencies": [
			"@sap/ux-ui5-tooling",
			"@sap/open.fe"
		]
	},
	"dependencies": {
		"@sap/open.fe": "1.85.0"
	}
}
ui5.yaml
specVersion: '2.2'
metadata:
  name: 'fiorielements_openui5'
type: application
framework:
  name: OpenUI5
  version: "1.85.0"
  libraries:
  - name: sap.m
  - name: sap.ui.core
  - name: sap.uxap
  - name: themelib_sap_fiori_3
server:
  customMiddleware:
  - name: fiori-tools-proxy
    afterMiddleware: compression
    configuration:
      ignoreCertError: false # If set to true, certificate errors will be ignored. E.g. self-signed certificates will be accepted
      backend:
      - path: /browse
        url: http://localhost:4004
  - name: fiori-tools-appreload
    afterMiddleware: compression
    configuration:
     port: 35729
     path: webapp
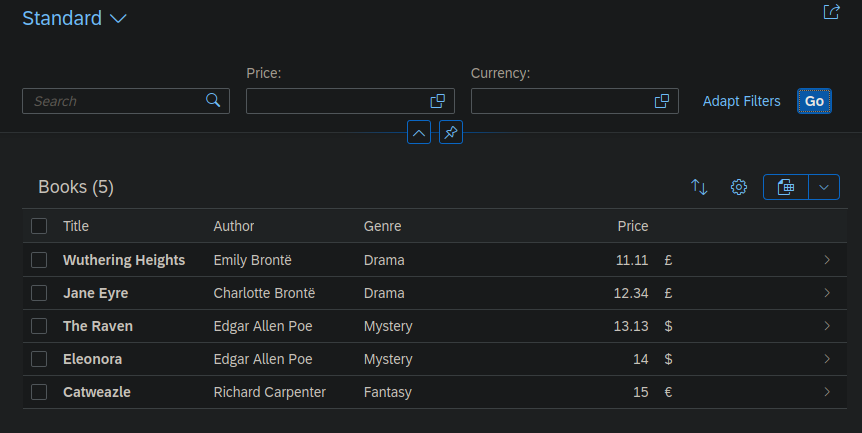
Step 4: Run the V4 application
cd ~/projects/fiorielements_openui5
npm i
npm start
Now http://localhost:8080/index.html should be opened in your browser.
“Note: Clicking on the Go button in List Report application might request user and password. Please enter user alice, no password.”
Finally I got my list items.