As I have a FritzBox at home, I’m using the AVM FRITZ!Box Tools Integration, which has “presence detection by looking at connected devices”.
You can find your devices using the developer tools and looking for the device_tracker entity. I then use the devices in a group to easily check if anyone is home.
Update 19.04.2024: Instead of a group, you could also use the zone.home entity and check if its numeric value is 0 (not_home) or above 0 (home) in your automations. The zone.home entity relates to the person and the device that belong to a person, that you can configure under Settings → People → Select a Person → Select the devices that belong to this person.
# check if device is found
adb devices
# reboot into sideload modus
adb reboot sideload
Or manually boot into TWRP recovery, holding Volume Up + Power when the phone is off. Navigate to Advanced-> ADB Sideload.
Update MIUI Firmware
Following the docs, I first had to check the Firmware version. I was running V12.0.2.0.QEAMIXM, but V12.0.3.0.QEAMIXM is required. Download the right MIUI Firmware for your device from https://xiaomifirmwareupdater.com/firmware/dipper/. Flash the new Firmware via TWRP or via ADB sideload.
TYPES: BEGIN OF ty_log,
         status TYPE icon-id,
       END OF ty_log.

DATA gt_log TYPE TABLE OF ty_log.

gt_log = VALUE #( ( status = icon_red_light    )
                  ( status = icon_yellow_light )
                  ( status = icon_green_light  ) ).

TRY.
    cl_salv_table=>factory( IMPORTING r_salv_table = DATA(alv_table)
                            CHANGING  t_table      = gt_log ).

    alv_table->display( ).

  CATCH cx_salv_msg.
ENDTRY.
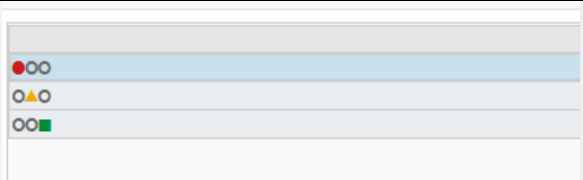
icon_red, icon_yellow etc. will be automatically loaded from the TYPE-POOL: icon during runtime.
You can check all available icons via the table icon.
SELECT SINGLE id INTO @DATA(icon_red) FROM icon WHERE name = 'ICON_RED_LIGHT'.
When using a blob or base64 data to open a file in PDF.js, the viewer is not able to get the correct filename. So when downloading the pdf using the download button inside the viewer, it will always download as document.pdf. To manually set a filename, you can use the setTitleUsingUrl function.
This report can be handy, especially since S/4HANA 2023 seems to have restricted the “classic” import way by using TCode CG3Y and CG3Z. See note 1949906, where it is recommended to create a custom report.
*&---------------------------------------------------------------------*
*& Report ZIP_TRANSPORT
*&---------------------------------------------------------------------*
*&
*&---------------------------------------------------------------------*
REPORT zip_transport.

SELECTION-SCREEN BEGIN OF BLOCK bl01 WITH FRAME TITLE TEXT-t01.
PARAMETERS p_trkorr LIKE e070-trkorr OBLIGATORY.
PARAMETERS p_ttext  TYPE as4text.
SELECTION-SCREEN END OF BLOCK bl01.

SELECTION-SCREEN BEGIN OF BLOCK bl02 WITH FRAME TITLE TEXT-t02.
PARAMETERS p_sapdir TYPE string LOWER CASE OBLIGATORY DEFAULT '/usr/sap/trans/'.
PARAMETERS p_lcldir TYPE string LOWER CASE OBLIGATORY DEFAULT 'C:\temp\'.
SELECTION-SCREEN END OF BLOCK bl02.


START-OF-SELECTION.

  " Check if Transport is released
  DATA ls_request TYPE trwbo_request.
  CALL FUNCTION 'TR_READ_REQUEST'
    EXPORTING
      iv_read_e070     = abap_true
      iv_read_e07t     = abap_true
      iv_trkorr        = p_trkorr
    CHANGING
      cs_request       = ls_request
    EXCEPTIONS
      error_occured    = 1
      no_authorization = 2
      OTHERS           = 3.
  IF ls_request-h-trstatus <> 'R'.
    MESSAGE 'Transport not yet released' TYPE 'E'.
  ENDIF.


  " Read released Transport
  DATA lv_xcontent_k TYPE xstring.
  DATA lv_xcontent_r TYPE xstring.

  DATA(lv_transdir_k) = |{ p_sapdir }cofiles/K{ p_trkorr+4 }.{ p_trkorr(3) }|.
  DATA(lv_transdir_r) = |{ p_sapdir }data/R{    p_trkorr+4 }.{ p_trkorr(3) }|.


  TRY.

      " K
      OPEN  DATASET lv_transdir_k FOR INPUT IN BINARY MODE.
      READ  DATASET lv_transdir_k INTO lv_xcontent_k.
      CLOSE DATASET lv_transdir_k.

      " R
      OPEN  DATASET lv_transdir_r FOR INPUT IN BINARY MODE.
      READ  DATASET lv_transdir_r INTO lv_xcontent_r.
      CLOSE DATASET lv_transdir_r.

      " Add to ZIP
      DATA(lo_zipper) = NEW cl_abap_zip( ).

      lo_zipper->add( name    = |K{ p_trkorr+4 }.{ p_trkorr(3) }|
                      content = lv_xcontent_k ).

      lo_zipper->add( name    = |R{ p_trkorr+4 }.{ p_trkorr(3) }|
                      content = lv_xcontent_r ).


      " Download ZIP
      DATA(lv_xzip) = lo_zipper->save( ).

      " Convert to raw data
      DATA(lt_data) = cl_bcs_convert=>xstring_to_solix( iv_xstring = lv_xzip ).

      " Set zip filename
      DATA(lv_zip_name) = COND #( WHEN p_ttext IS INITIAL THEN |{ ls_request-h-as4text }_{ p_trkorr }|
                                                          ELSE |{ p_ttext              }_{ p_trkorr }| ).

      " Replace every character that is not [a-zA-Z0-9_] with '_'.
      REPLACE ALL OCCURRENCES OF REGEX '[^\w]+' IN lv_zip_name WITH '_'.

      cl_gui_frontend_services=>gui_download( EXPORTING filename = p_lcldir && lv_zip_name && '.zip'
                                                        filetype = 'BIN'
                                              CHANGING  data_tab = lt_data ).

    CATCH cx_root INTO DATA(e_text).
      MESSAGE e_text->get_text( ) TYPE 'E'.
  ENDTRY.

  MESSAGE |{ lv_zip_name }.zip created and downloaded to { p_lcldir }| TYPE 'S'.
With this simple command, you can download the MTA deployment logs of your recent deployment. Instead of manually having to use cf dmol -i <operation id>, just save the command (replace appId with your Id) as a shell script, make it executable (chmod +x) and run the script after your deployment. It stores the recent logs into the folder logs.
Die Integration bietet eine custom component für die AWSH. Nach Angabe von Ort und Straße bekommt man hier für alle Abfallbehälterarten die entsprechenden Termine zurück. Man muss daher noch die relevanten für sich heraussuchen. Diese kann man unter customize dann angeben und zusätzlich mit einem alias und einem icon versehen.
Alternativ bekommt man hier den Link zu einer .ics Kalenderdatei. Man kann vorher die für sich relevanten Abfallbehälter auswählen. Die .ics kann ebenfalls direkt eingebunden werden (siehe hier)
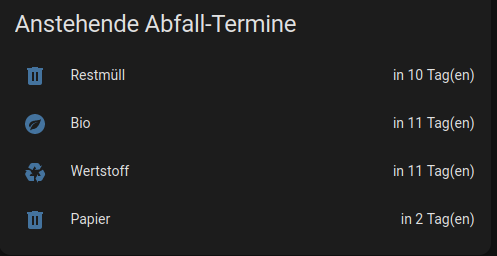
Um immer die Anzahl der Tage bis zum nächsten Abholtermin zu kennen, am besten noch einen weiteren Sensor anlegen und diesem wieder alle Abfallarten zuordnen.
  # Sensor for upcoming waste. Used in my reminder automation
  - platform: waste_collection_schedule
    name: upcomingWaste
    value_template: "{{value.daysTo}}"
    types:
      - Restabfall
      - Bioabfall
      - Wertstoff
      - Papier
Dieser kann dann in einer Erinnerungsautomatisierung verwendet werden, welche z.b. eine Notification am Vortag um 19Uhr verschickt.
Die Notification beinhaltet eine Bestätigungsmöglichkeit. Hat jemand die Tonne herausgestellt, kann dieser darüber dies einfach kurz bestätigen und mit einer zweiten Automatisierung kann man die Benachrichtigung dann bei anderen verschwinden lassen. Mehr dazu hier.
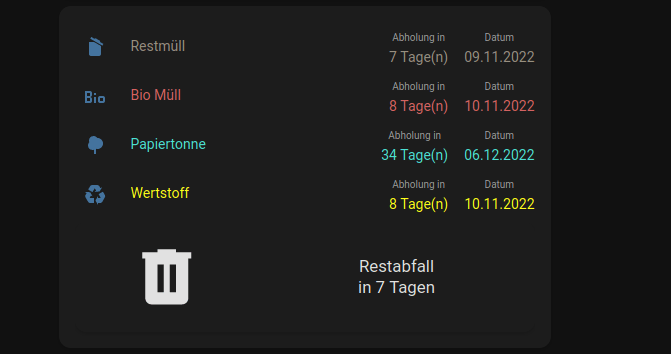
Ein tolles Beispiel für eine schöne Dashboard-Karte findet man hier.
Dafür müssen jedoch noch ein paar weitere Sensoren hinzugefügt werden, wie es hier ebenfalls beschrieben ist.
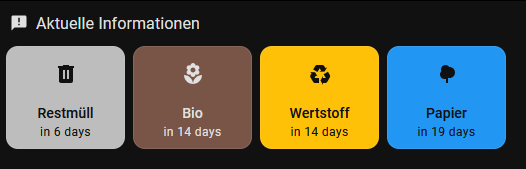
Update 14.08.2025: Mittlerweile nutze ich zusätzlich die Trash-card, die ich mir am Vortag dynamisch anzeigen lasse, wenn der Sensor upcomingwaste kleiner 2 ist.
Using regex, you can simply reorder the parts of your date string to create a compatible ISO 8601 date string which is accepted by the new Date() constructor.