After redefining an OData Service like it is described here, you also have to add your new service in your Extension Project, so that the App knows, that it should use your redefined service instead of the default one. In the WebIDE there was a wizard that helped you with this task. In BAS there is also a wizard, but only for Adaptions Projects. For a classic extension project, there is no wizard anymore, and you have to manually add your new service to the manifest.json. But it is quite simple. You have to add your new service as data source and then also as a model. When no model name is provided, it will be used as default model.
I was wondering for quite some time, what the difference is between Extension Projects and Adaptions Projects. In the comments to this blog post, I finally found the answer from Oliver Graeff:
Adaptation projects are one of the capabilities of SAPUI5 flexibility, which lets developers, key users and end users adapt/extend SAPUI5 applications. Adaptation projects are the go-to solution for developer adaptation in SAPUI5 and are the ‘next-generation’ extension projects. Using the concepts of SAPUI5 flexibility, adaptation projects offer many more possibilities, such as extending SAP Fiori elements applications or extending apps without pre-defined extension points.
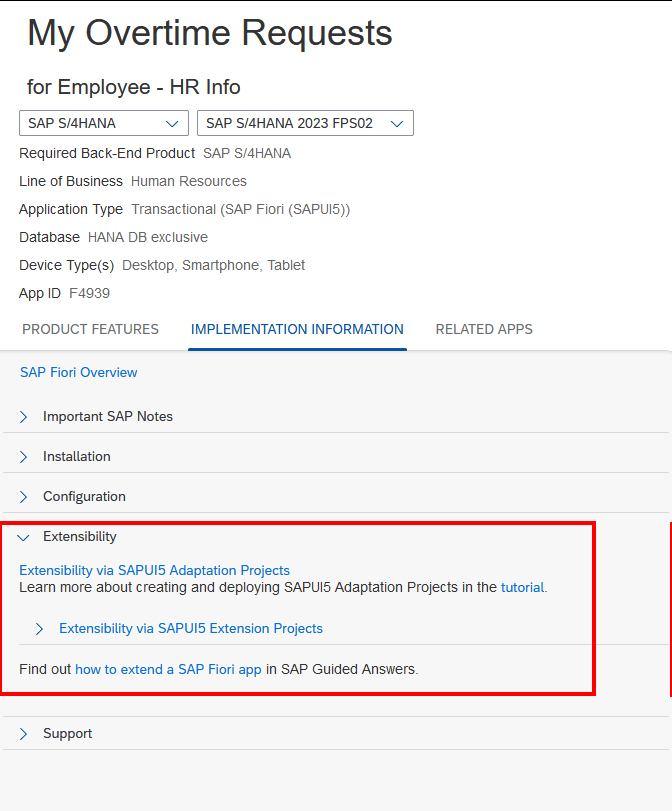
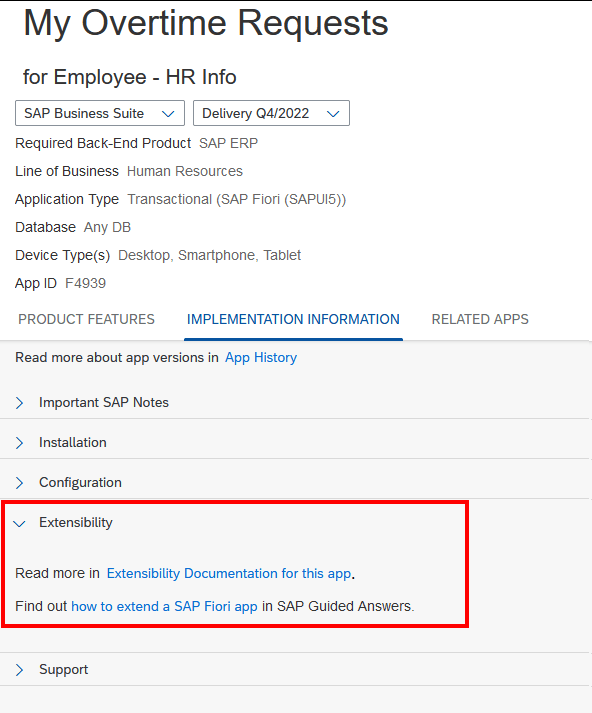
To check for a specific application, what the recommended extension approach is, simply go to the Fiori Reference Library, search for your app, choose the backend system (S/4 or Business Suite) and the current release version, navigate to Implementation Information and expand Extensibility. For example, My Overtime Requests on S/4HANA can be extended via an Adaption Project.
But on R/3, the only approach is an Extension Project.
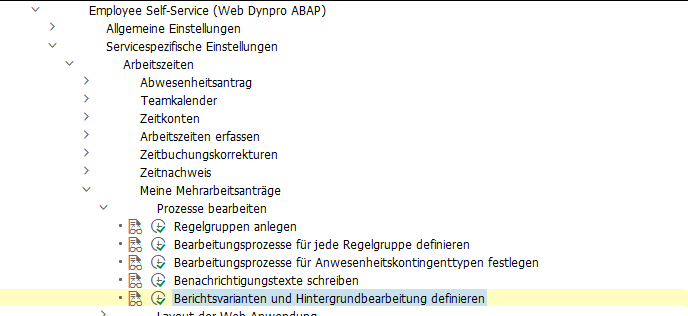
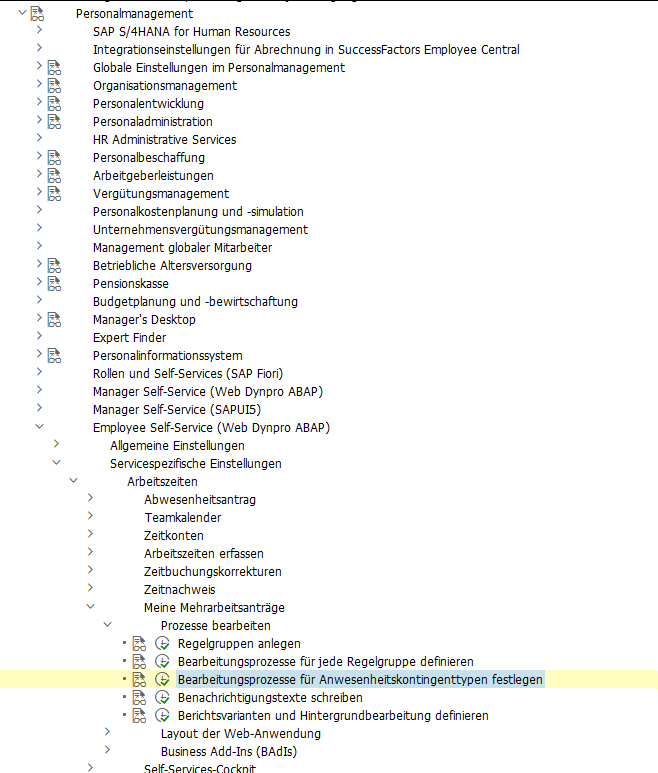
Customizing SPRO → Personnel Management → Employee Self-Service (Web Dynpro ABAP) → Service-Specific Settings → Working Time → My Overtime Requests.
Adjusting the Fiori UI
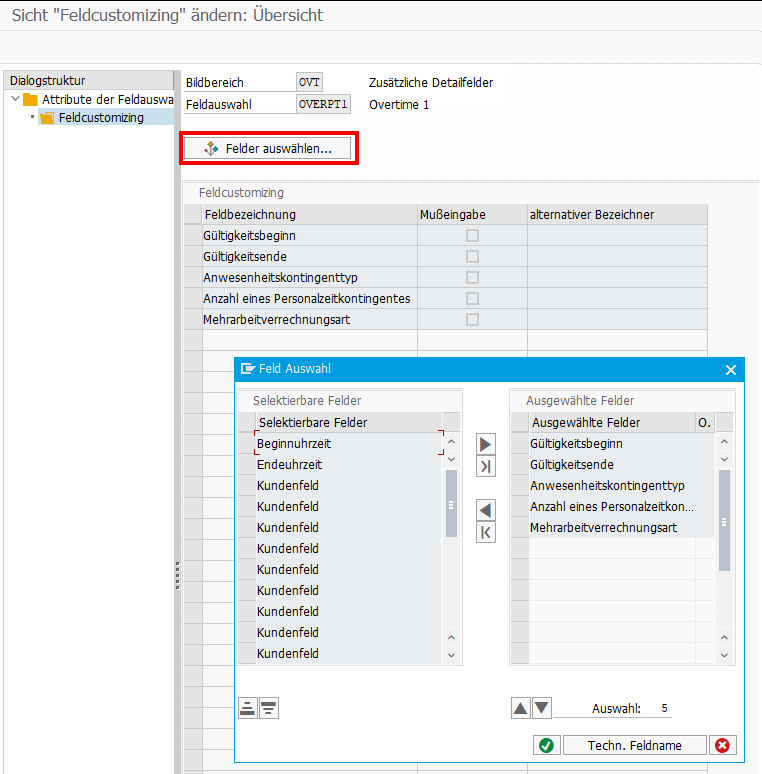
If you want to hide fields in the Fiori frontend, or you want to adjust some labels, you can simply do this via Customizing: My Overtime Requests → Layout of the Web Application → Define Field Selection
Multi-Level Approval for Time Data Requests (HRPT_B_TMD_MULTI_APPROVERS)
The BAdI is called when opening the My Overtime Request App and a second time when clicking on the New Button to create a new OVT request. It’s not triggered when sending the request, what I initially expected. To reuse the code from the sample class,
*    "Determine approver level
*    DATA(cust_key_request_fields) = VALUE cl_hrpt_ovt_const=>ovt_cust_key_request_fields( pernr = iv_pernr
*                                                                                          ktart = iv_subtype
*                                                                                          date  = is_request_period-start_date ).
*    TRY.
*        DATA(approval_settings) = cl_hrpt_ovt_cust_factory=>get_customizing_reader( )->get_approval_settings( REF #( cust_key_request_fields ) ).
*      CATCH cx_hrpt_tmd.
*        RETURN.
*    ENDTRY.
*    IF approval_settings-use_multiple_approver = abap_false.
*      RETURN.
*    ENDIF.

....

*    "If no last approvers exist, use line manager, HR BP and HR Admin by default
*    CALL FUNCTION 'BAPI_GET_LINE_MANAGER'
*      EXPORTING
*        im_objid       = iv_pernr
*      IMPORTING
*        es_approver    = line_manager
*        ev_has_manager = approver_exists.
*    IF approver_exists = abap_true.
*      last_seqnr = last_seqnr + 1.
*      line_manager-seqnr = last_seqnr.
*      APPEND line_manager TO rt_approver_tab.
*      IF lines( rt_approver_tab ) >= approval_settings-approver_level.
*        RETURN.
*      ENDIF.
*    ENDIF.
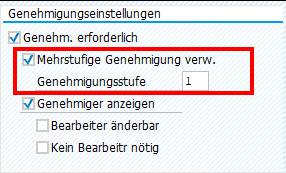
you have to set the amount of approval steps in the customizing.
Also, a Filter must be set for the BAdI:
When you run into a permission issue when opening an overtime request in MyInbox, take a look in the HCMFAB_COMMON BAdI. Perhaps the GET_CONFIGURATION method must be implemented
  method if_ex_hcmfab_common~get_configuration.

    ev_hide_employee_picture     = abap_false.
    ev_hide_employee_number      = abap_false.
    ev_hide_ce_button            = abap_false.
    ev_enable_onbehalf           = abap_false.
    ev_show_empl_number_wo_zeros = abap_false.

* On_behalf is switched off by default for compatibility reasons
* To activate it for all users who are mangers the following code could be used:

    case iv_application_id.
      when gc_application_id-myovertimequota.
        ev_enable_onbehalf = boolc( go_employee_api->is_manager( iv_application_id = iv_application_id
                                                                 iv_pernr          = iv_employee_number ) = abap_true ).
    endcase.

* In case that on behalf is active, transfer all data to the frontend. This is faster for small number of employees.
* The backend search would only transfer the visible employees to the frontend, at the cost of multiple smaller requests.

    ev_use_onbehalf_backend_search = abap_false.

  endmethod.
Custom Workflow
If you want to replace the default Workflow WS02400057 (PT_OVTREQ) with a custom one, you must adjust the customizing (as described here for the standard WF), and you’ll need to create a new BAdI Implementation for /IWWRK/ES_WF_WI_BEFORE_UPD_IB analog HCMFAB_MYOTQ_APPROVAL_INBOX to get the Approve and Rejects Buttons working by providing the Workflow-ID and decision Step-ID.
Extensibility
Although it should be possible to extend both Fiori Apps via Adaptation Projects, I was unable to do so. Either it’s a problem with the new adaption editor, which got new released while writing the blog, or it is a problem with the apps itself. Whatever I tried, I was always running in issues.
Therefore, I did it the “classic” way and created an Extension Project and used the provided Extension Points. For the Approval App, I was unable to preview the application directly in BAS, perhaps because it is only an Inbox integration and does not run standalone. I therefore always had to deploy, to test my changes.
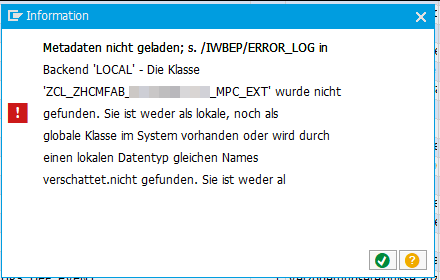
Somehow I did something stupid yesterday. I created a new OData Service via SEGW and after generating it, the classes had a _01 in the name, which of course was not what I wanted. So I came up with the idea of simply deleting the 4 generated classes and regenerate the service. That worked fine, and the classes then got the right name. But when I tried to add the service via /iwfnd/maint_service, I got the following error:
Somehow, the service was still looking for a class that I had deleted because it had an incorrect name.
When I opened the service via /iwbep/reg_service, I saw that in the model information, that there was still the incorrect class name for the model provider class. So I needed to update the model provider class which was assigned to the technical model. This was possible via /iwbep/reg_model (Report /IWBEP/R_DST_MODEL_BUILDER). This report can also be accessed by clicking on “Create model” in the /iwbep/reg_service transaction, but the required “Change” button is then deactivated, so be sure to open it in a separate GUI window. After adjusting the model provider class, I was finally able to add the service successfully via /iwfnd/maint_service.
Next time, instead of deleting the classes, betting delete the full OData Service (like it is described here) and create a complete new one.
Recently I was continuing an enhancement project of a standard Fiori Application. The already existing enhancement project was created using WebIDE a few years ago. Now I needed to add some more functionality to the enhancement project using the Business Application Studio. To my surprise, the automatic migration of the WebIDE project to a BAS project was working without any issues. Nice! I could make my changes and everything was fine until I tried to deploy the application.
The abap_deploy_taskaborted with the error “Request is not a local Request” (in German “Auftrag ist kein lokaler Auftrag“).
Somehow it did not deploy in my Workbench Transport Request and was expecting a Local Transport Request.
At first, I thought, this was a problem in the ui5-deploy.yaml configuration of my App, and therefore I was looking in the wrong direction. But after checking the package of the already deployed enhancement project in the backend, I finally found the reason. The Transport Layer of the Package containing the BSP application was not correct. It turned out, that the previous developer was not able to deploy from his WebIDE directly to the system, instead he deployed to another system, exported and then imported the transport request manually. Therefore, the “Original System” of all objects was incorrect and also the Transport Layer on the Package. After updating both (like described here), I was able to deploy the enhancement project successfully in my Workbench Transport Request.
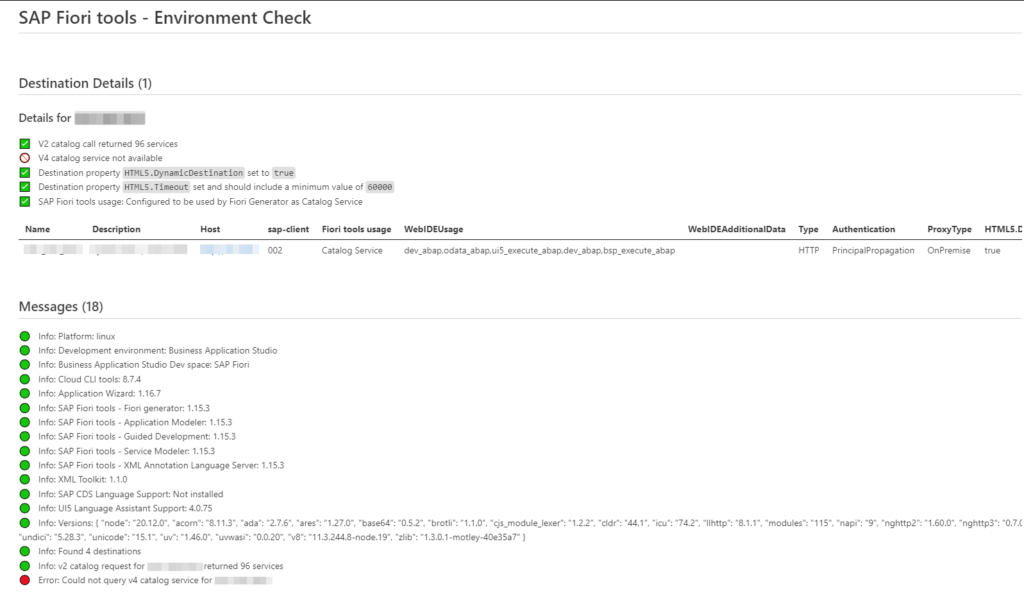
Recently found the Environment Check functionality in BAS, which really helped me to check destinations on different customer BAS instances, where I didn’t have direct access to the BTP instance. I’m just posting this here so I don’t forget.
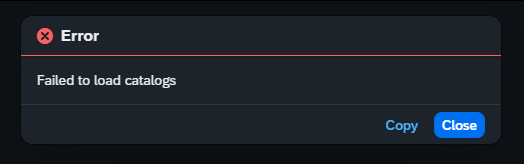
Recently, I was confronted with the “Failed to load catalogs” error message when starting the Fiori Launchpad (/ui2/flp) and navigating to the App Finder.
The system was quite new and the Fiori Customizing was not completely done yet. When opening the Dev Tools, I saw a failed request to
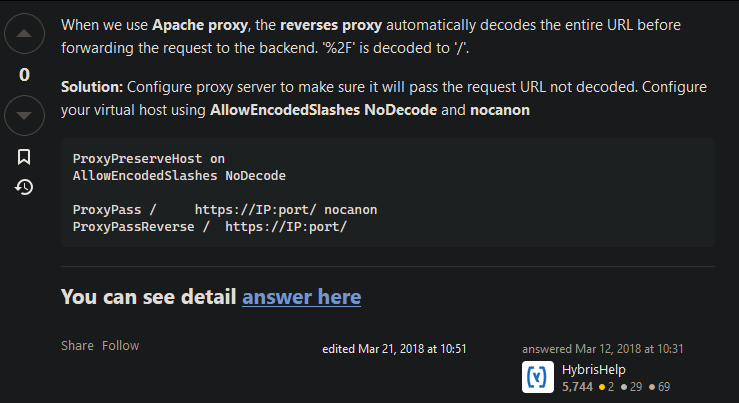
Opening this failed request in a new tab results in an HTTP 404 from an Apache web service. So it looked like an Apache was set up as reverse proxy in front of the sap system. I tried to call the PageSets endpoint without providing the key %2FUI2%2FFiori2LaunchpadHome and got an HTTP 200. So in general, Apache was working, and the service endpoint page_builder_pers was responding. Next, I did the same service calls from the gateway client and both calls were working fine. So it looked like Apache was the problem when providing the PageSets key. After a quick search, I found this post on Stack Overflow:
So the issue was some (in this case) incorrect decoding of ‘%2F’. After contacting the basis team and adding the proposed Apache configs, the request finally resolved successfully, and the Launchpad was displaying some apps.
This is discussed for many years and unfortunately will not be implemented in the UI5 framework itself (see here). There are already different blogs describing how to build a wrapper for oData requests (for example here and here).
But with ES2024 it now got super simple to do this:
this.getView().bindElement({
				path: sObjectPath,
				events: {
					dataRequested: (oEvent) => {}, // Executed when a request to server is send
					dataReceived: (oEvent) => {},  // Executed when data from server is received
					change:(oEvent) => {},         // Executed everytime you do ElementBinding
				}
			})
The events for dataRequested and dataReceived are only fired, when data is requested or data is received from a backend. This is not the case, when the requested data is already available in the model from a previous backend call. In such situations, the change event comes in handy.
// Returns the current security token if available; triggers a request to fetch the security token if it is not available.
const token = this.getModel().getSecurityToken() // Deprecated

// Returns a promise, which will resolve with the security token as soon as it is available.
const token = await this.getModel().securityTokenAvailable()