Homelab, Linux, JS & ABAP (~˘▾˘)~
 

[SuccessFactors] Insert balances via TimeAccountDetail API

I had the task to insert additional vacation days to the TimeAccount of some employees. To do this, you have to insert some new entries in the related TimeAccountDetail entity.

The official documentation states that you can create a TimeAccountDetail via UPSERT, and there is even an example. A very bad formatted example….
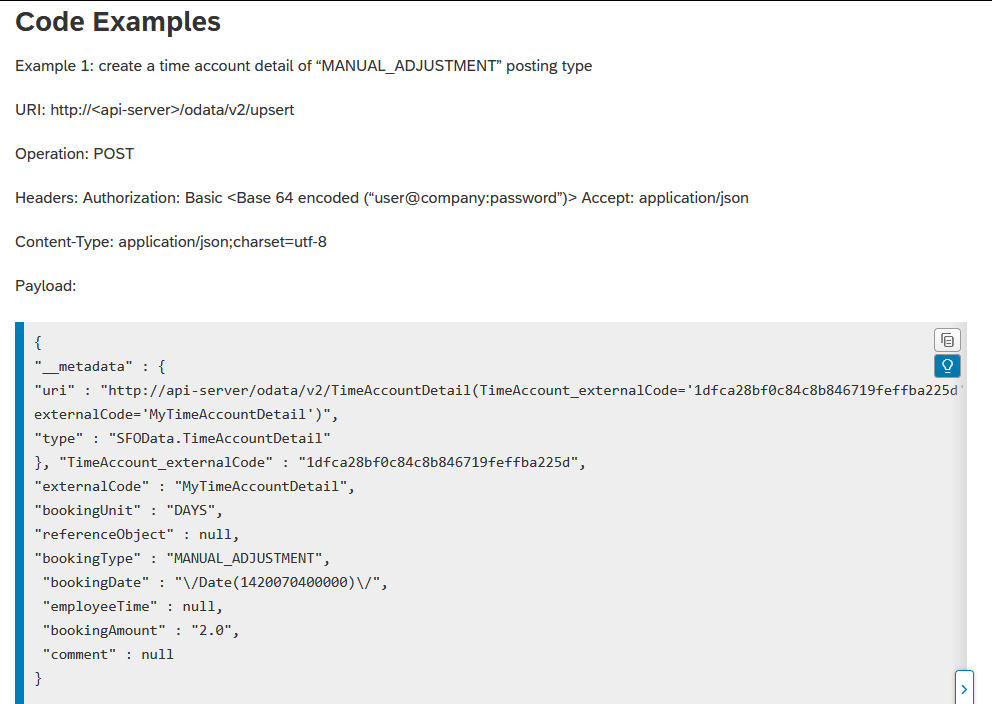
But to me, it was unclear, what I have to provide as externalCode. Obviously, TimeAccount_externalCode required the externalCode of the TimeAccount, which the entry should belong to. But I was expecting that the TimeAccountDetail externalCode should be created, when UPSERTing the entry. Somehow the documentation is missing some explanation here… But in the note 2243841 I found the missing hint:

While using API calls, Successfactors system would not generate unique external Code for TimeAccountDetail API. You will have to explicitly provide external code which should be unique.

Ok, so simply provide a random externalCode. Following my UPSERT Request:

### The related TimeAccount, where the entry should belong to. Can be fetched via another API call
@TimeAccount_externalCode=aac183cdc57242cb9f7454131f0da069

### Create a random TimeAccountDetail externalCode 
@externalCode=70b54990b44440fab4c5084c971cc744

### Insert balances
GET {{$dotenv sf_api_url}}/odata/v2/upsert
Authorization: Basic {{$dotenv sf_api_auth_base64}}
Accept: application/json
Content-Type: application/json

{ 
  "__metadata" : {
    "uri" : "http://my-sf-demo-api-server/odata/v2/TimeAccountDetail(TimeAccount_externalCode='{{TimeAccount_externalCode}}',externalCode='{{externalCode}}')", 
    "type" : "SFOData.TimeAccountDetail"
  },
  "TimeAccount_externalCode" : "{{TimeAccount_externalCode}}", 
  "externalCode" : "{{externalCode}}", 
  "bookingUnit" : "DAYS", 
  "bookingType" : "MANUAL_ADJUSTMENT", 
  "bookingDate" : "\/Date(1747872000000)\/", 
  "bookingAmount" : "1", 
  "comment" : "Urlaub"
}

But what ever I tried as externalCode, it always failed…

In note 2243841, there is also the last sentence:

We generally do not suggest to use Upsert operation for TimeAccountDetail OData API due to external code limitation.

This confused me even more, but as the note is from 2016, I thought it could be outdated, and the official API documentation is correct. But it seems the opposite is right….
When trying a normal POST instead of an UPSERT, it immediately worked.

### The related TimeAccount, where the entry should belong to. Can be fetched via another API call
@TimeAccount_externalCode=aac183cdc57242cb9f7454131f0da069

### Create a random TimeAccountDetail externalCode 
@externalCode=70b54990b44440fab4c5084c971cc744

### Insert balances
POST {{$dotenv sf_api_url}}/odata/v2/TimeAccountDetail
Authorization: Basic {{$dotenv sf_api_auth_base64}}
Accept: application/json
Content-Type: application/json

{ 
  "TimeAccount_externalCode" : "{{TimeAccount_externalCode}}", 
  "externalCode" : "{{externalCode}}", 
  "bookingUnit" : "DAYS", 
  "bookingType" : "MANUAL_ADJUSTMENT", 
  "bookingDate" : "\/Date(1747872000000)\/", 
  "bookingAmount" : "1", 
  "comment" : "Urlaub"
}

Not sure if I did something wrong when using UPSERT, but why should I even use an UPSERT, if I can simply use a normal POST request. Once again, poor SAP documentation has cost me a lot of my lifetime…

[CAP] CQL Expand two levels deep

I’ve already made a post about expanding compositions or associations (see here), but this time I had to extend two levels deep.

My entity structure looked something to this:

entity Header: cuid, managed {
    Items           : Composition of many Header.Items
                          on Items.purgeRun = $self;
}

entity Header.Items : cuid, managed {
    file            : Association to Files @mandatory @assert.target;
    header: Association to Header;
}

entity Files : cuid, managed {          
    content         : LargeBinary @Core.MediaType: mediaType  @Core.ContentDisposition.Filename: fileName  @Core.ContentDisposition.Type: 'inline';
    mediaType       : String      @Core.IsMediaType: true;
    fileName        : String      @mandatory;
    size            : Integer;
}   

It is possible to query all data in a single HTTP call using $expand twice.

### Header + Items + File
GET {{server}}/odata/v4/service/MainEntity/{{ID}}
?$expand=Items($expand=file)
Authorization: Basic {{username}} {{password}}

However, if you want to fetch the same data using CQL, the following query is required:

        const data = await SELECT(Header, ID)
            .columns(h => {
                h('*')
                h.Items(i => {
                    i('*')
                    i.file(f => f('*'))
                })
            })

This syntax is really hard to remember…

[VSC] Get X-CSRF-Token via REST Client

### Get CSRF-Token
# @name tokenResponse
HEAD https://url.com/api/endpoint HTTP/1.1
Authorization: Basic {{$dotenv auth_base64}}
x-csrf-token: Fetch

@x-csrf-token = {{ tokenResponse.response.headers.x-csrf-token }}   


### Use Token
POST https://url.com/api/endpoint HTTP/1.1
Authorization: Basic {{$dotenv auth_base64}}
Content-Type: application/json
x-csrf-token: {{x-csrf-token}}

{
      "data" : 1
}

[BTP] Get access token for specific tenant in a multitenant scenario using http rest client

https://docs.cloudfoundry.org/api/uaa/version/4.6.0/index.html#password-grant

# url from XSUAA Service Key, but replace in the url the provider subdomain with the consumer subdomain (the tenant you want to call)
@xsuaaUrl = {{$dotenv xsuaaUrl}}
# clientid from XSUAA Service Key
@xsuaaClientId = {{$dotenv xsuaaClientId}}
# clientsecret from XSUAA Service Key
@xsuaaClientSecret = {{$dotenv xsuaaClientSecret}}

@username = {{$dotenv btp_username}}
@password = {{$dotenv btp_password}}

### Get Access Token for Cloud Foundry using Password Grant with BTP default IdP
# @name getXsuaaToken
POST {{xsuaaUrl}}/oauth/token
Accept: application/json
Authorization: Basic {{xsuaaClientId}}:{{xsuaaClientSecret}}
Content-Type: application/x-www-form-urlencoded

grant_type=password
&username={{username}}
&password={{password}}
&response_type=token

### Store access token 
@access_token = {{getXsuaaToken.response.body.$.access_token}}

[BTP] How to use the refresh_token to get a new valid access_token

https://oauth.net/2/refresh-tokens

https://www.oauth.com/oauth2-servers/making-authenticated-requests/refreshing-an-access-token

https://docs.cloudfoundry.org/api/uaa/version/4.6.0/index.html#refresh-token

# url from XSUAA Service Key
@xsuaaUrl = {{$dotenv xsuaaUrl}}
# clientid from XSUAA Service Key
@xsuaaClientId = {{$dotenv xsuaaClientId}}
# clientsecret from XSUAA Service Key
@xsuaaClientSecret = {{$dotenv xsuaaClientSecret}}

#==================================================================#

### Get Access Token for Cloud Foundry using Grant Type Password with BTP default IdP 
# @name token_response
POST {{xsuaaUrl}}/oauth/token
Authorization: Basic {{xsuaaClientId}}:{{xsuaaClientSecret}}
Accept: application/json;charset=utf8
Content-Type: application/x-www-form-urlencoded

grant_type=password
&username={{$dotenv btp_username}}
&password={{$dotenv btp_password}}
&response_type=token

### Store access token and refresh token
@access_token = {{token_response.response.body.$.access_token}}
@refresh_token = {{token_response.response.body.$.refresh_token}}


### Use Refresh Token
# @name token_response
POST {{xsuaaUrl}}/oauth/token
Authorization: Basic {{xsuaaClientId}}:{{xsuaaClientSecret}}
Accept: application/json;charset=utf8
Content-Type: application/x-www-form-urlencoded

grant_type=refresh_token
&refresh_token={{refresh_token}}

### Store access token and refresh token
@access_token = {{token_response.response.body.$.access_token}}
@refresh_token = {{token_response.response.body.$.refresh_token}}

[SuccessFactors] Get Recruiting information for a given User via Process Trigger

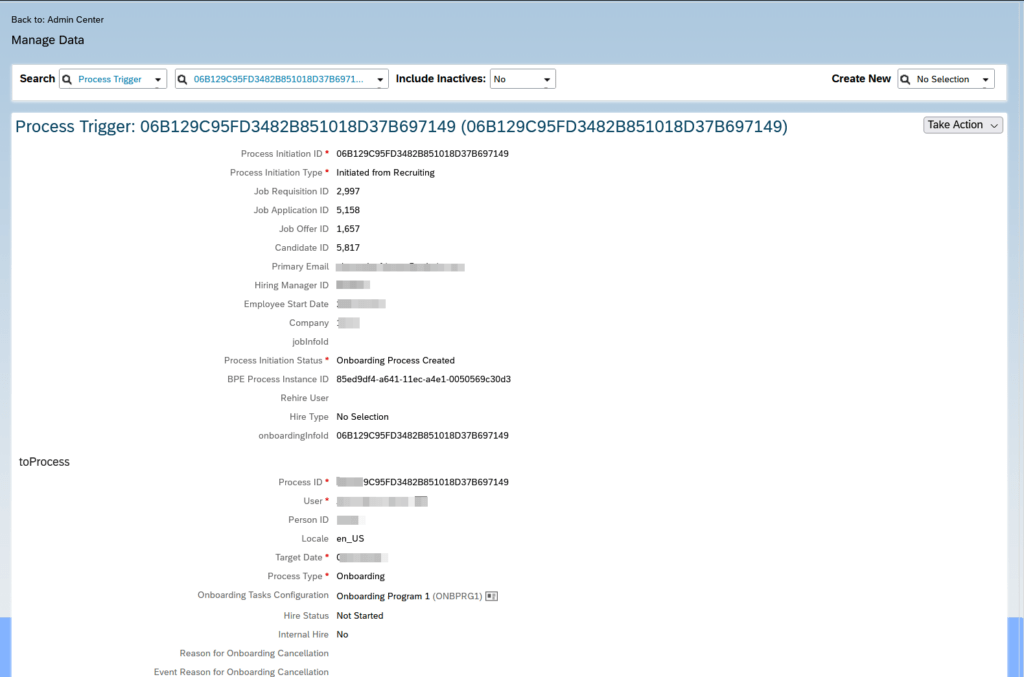
I was looking for a way, to get the candidate ID and Job Application ID for a given User. In a Process Trigger, you can get a good overview of an employee who moved from REC, via ONB to EC, and there I found all the required information.

Manage Data → Search → Process Trigger

This information can also be fetched via API.

API Entity: ONB2Process

### Process Trigger
GET {{$dotenv sf_api_url}}/odata/v2/ONB2Process('06B129C95FD3482B851018D37B697149')
Authorization: Basic {{$dotenv sf_api_auth_base64}}
Accept: application/json

### processTriggerNav, includes rcmCandidateId, rcmApplicationId, rcmJobReqId
GET {{$dotenv sf_api_url}}/odata/v2/ONB2Process('06B129C95FD3482B851018D37B697149')
?$expand=processTriggerNav
Authorization: Basic {{$dotenv sf_api_auth_base64}}
Accept: application/json

### Fetch candidateId, jobApplicationId, jobReqId via userId
GET {{$dotenv sf_api_url}}/odata/v2/User(100000)/userOfONB2ProcessNav
?$expand=processTriggerNav
&$select=processId,processTriggerNav/rcmApplicationId,processTriggerNav/rcmJobReqId,processTriggerNav/rcmCandidateId
Authorization: Basic {{$dotenv sf_api_auth_base64}}
Accept: application/json

[SuccessFactors] OData V2 – filter in (VSC Rest-API Client)

When filtering an OData V2 endpoint, you can simply list your values separated by a comma after the keyword in (option 2). Much shorter than having to repeat your filter statement all the time, like in option 1.

@user1=10010
@user2=10020

### Option 1: Filter userId using OR condition
GET {{$dotenv api_url}}/odata/v2/User?$filter=userId eq '{{user1}}' or userId eq '{{user2}}'
Authorization: Basic {{$dotenv api_auth}}
Accept: application/json

### Option 2: Filter userId using IN condition
GET {{$dotenv api_url}}/odata/v2/User?$filter=userId in '{{user1}}', '{{user2}}'
Authorization: Basic {{$dotenv api_auth}}
Accept: application/json

[VSC] Create/Read/Delete File in CMIS Repository via VSC Rest-API Client

API Specification: http://docs.oasis-open.org/cmis/CMIS/v1.1/os/examples/browser/

Helpful Postman Collection: https://gist.github.com/aborroy/3f1f2360b0e85067675643aa648a8112

Create:

@folderId = <myFolderID>
@fileName = <myFileName>

### Create Object
# @name object
POST http://localhost:8080/alfresco/api/-default-/public/cmis/versions/1.1/browser/root
Authorization: Basic user:password
Content-Type: multipart/form-data; boundary=boundary

--boundary
Content-Disposition: form-data; name="succinct"
Content-Type: text/plain; charset=utf-8

true
--boundary
Content-Disposition: form-data; name="cmisaction"
Content-Type: text/plain; charset=utf-8

createDocument
--boundary
Content-Disposition: form-data; name="objectId"
Content-Type: text/plain; charset=utf-8

{{folderId}}
--boundary
Content-Disposition: form-data; name="propertyId[0]"
Content-Type: text/plain; charset=utf-8

cmis:name
--boundary
Content-Disposition: form-data; name="propertyValue[0]"
Content-Type: text/plain; charset=utf-8

{{fileName}}
--boundary
Content-Disposition: form-data; name="propertyId[1]"
Content-Type: text/plain; charset=utf-8

cmis:objectTypeId
--boundary
Content-Disposition: form-data; name="propertyValue[1]"
Content-Type: text/plain; charset=utf-8

cmis:document
--boundary
Content-Disposition: form-data; name="content"; filename=image.png
Content-Type: image/png
Content-Transfer-Encoding: binary

< image.png

--boundary--

### Fill Variable from Response
@ID = {{object.response.body.succinctProperties.cmis:objectId}}

Read:

### Get Object properties
GET http://localhost:8080/alfresco/api/-default-/public/cmis/versions/1.1/browser/root
?cmisselector=properties
&objectId={{ID}}
Authorization: Basic user:password

### Get Object content
GET http://localhost:8080/alfresco/api/-default-/public/cmis/versions/1.1/browser/root
?cmisselector=content
&objectId={{ID}}
Authorization: Basic user:password

### Get Object content stream
GET http://localhost:8080/alfresco/api/-default-/public/cmis/versions/1.1/browser/root
?getContentStream
&objectId={{ID}}
Authorization: Basic user:password

Delete:

### Delete Object
POST http://localhost:8080/alfresco/api/-default-/public/cmis/versions/1.1/browser/root
Authorization: Basic user:password
Content-Type: multipart/form-data; boundary=boundary

--boundary
Content-Disposition: form-data; name="objectId"
Content-Type: text/plain; charset=utf-8

{{ID}}
--boundary
Content-Disposition: form-data; name="cmisaction"
Content-Type: text/plain; charset=utf-8

delete
--boundary--

[VSC] Post form-data via VSC Rest-API Client

Next to the .http file in the same folder, place your .env for hostname and authorization and the file you want to upload.
The parameter name="file" stands for the key that the files should belong to.

### Post form-data
POST {{$dotenv hostname}}/my/endpoint HTTP/1.1
Authorization: Basic {{$dotenv auth_in_base64}}
Content-Type: multipart/form-data; boundary=boundary
Accept: */*

--boundary
Content-Disposition: form-data; name="file"; filename="image.png"
Content-Type: image/png

< ./image.png

--boundary--

[CAP] UploadSet http test file

How to create an uploadSet in combination with a CAP backend: https://blogs.sap.com/2021/08/18/my-journey-towards-using-ui5-uploadset-with-cap-backend/

You can test the uploadSet CAP backend part using these http calls:

### Create file
# @name file
POST http://localhost:4004/v2/admin/Files
Authorization: Basic admin:
Content-Type: application/json

{
    "mediaType": "image/png",
    "fileName": "picture.png",
    "size": 1000
}

### Fill Variable from Response
@ID = {{file.response.body.$.d.ID}}

### Upload Binary PNG content
PUT http://localhost:4004/v2/admin/Files({{ID}})/content
Authorization: Basic admin:
Content-Type: image/png

< ./picture.png

### Get uploaded png
GET http://localhost:4004/v2/admin/Files({{ID}})/content
Authorization: Basic admin:

The picture.png file must be in the same folder as the http test file.