SPRO → Personalmanagement → Employee-Self-Service (SAPUI5) → Arbeitszeiten → Arbeitszeiten erfassen → Erfassungsprofile einrichten

SPRO → Personalmanagement → Employee-Self-Service (SAPUI5) → Arbeitszeiten → Arbeitszeiten erfassen → Erfassungsprofile einrichten
DATA ls_return TYPE bapireturn.

CALL FUNCTION 'BAPI_EMPLOYEE_CHECKEXISTENCE'
  EXPORTING
    number = 99999999
  IMPORTING
    return = ls_return.
IF ls_return-type = 'E'.
  MESSAGE ls_return-message TYPE ls_return-type.
ENDIF.
On newer systems there is also class CL_HRPA_MAINTAIN_EMPLOYEE with method PERSONNEL_NUMBER_EXISTS.
Or class CL_HRPA_MAINTAIN_EMPLOYEE_UTIL and method EXIST_EMPLOYEE.
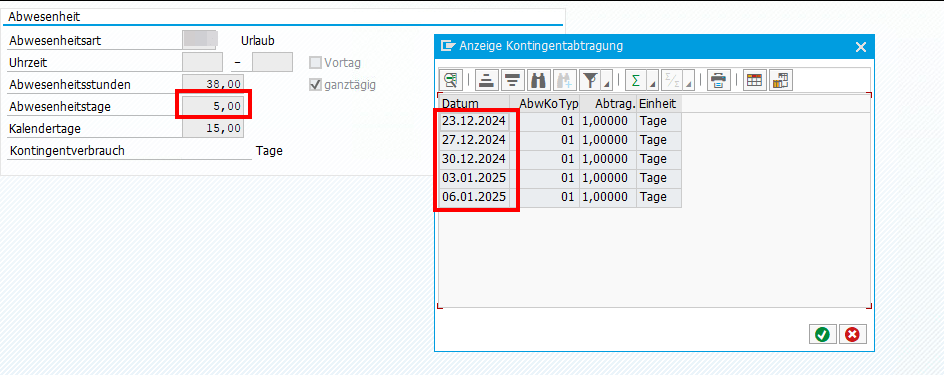
Bei einer Abwesenheit wie z.B. Urlaub, die über eine Monatsgrenze oder über einige Feiertage hinweg geht, kann es hilfreich sein, die konkreten Abtragungen einzusehen, um zu verstehen, welche Tage in dem Zeitraum denn wirklich Urlaub waren.
Dazu einfach die Abwesenheit öffnen in der PA20 und auf Springen → Abtragungen (Shift+F8) gehen.

Man kann die Kontingentabtragung auch für das komplette Kontingent eines Jahres einsehen via IT2006.
Die zugehörige Datenbanktabelle ist PTQUODED. Um die Abträge für eine bestimmte Abwesenheitsart zu selektieren, muss noch ein JOIN auf die PA2001 über die DOCNR gemacht werden. Zumindest ist das der einzige Weg, den ich herausfinden konnte. 🙂
SELECT SUM( a~quode )
    FROM ptquoded AS a
    JOIN pa2001   AS b
      ON a~pernr = b~pernr
     AND a~docnr = b~docnr
    INTO DATA(urlaubsabtrag)
    WHERE a~pernr = pernr-pernr
     AND a~datum BETWEEN pn-begda AND pn-endda
     AND b~subty = 0100. " Abwesenheitsart, welche Selektiert werden soll
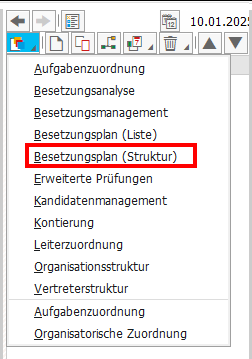
Da ich nur selten mit dem OM arbeite, vergessen ich immer wieder, wie man das OM “umdreht”, wenn man eine Person ausgewählt hat. Also die Anzeige von P – S – O umkehrt auf O – S – P.
Dabei ist es total einfach! Die Org. Einheit markieren und links oben in der Toolbar auf den Dropdown Button (Springen) gehen und Besetzungsplan (Struktur) auswählen und man erhält die gewünschte Ansicht.
Gute Zusammenfassung: https://www.iprocon.de/abbildung-des-a1-meldeverfahrens-in-sap-hcm/
2682093 – Informationen zur Umsetzung des A1-Meldeverfahrens im SAP-System (siehe auch das PDF im Hinweis)
2730927 – A1-Verfahren: Hilfestellung zum Customizing
2841779 – A1-Verfahren: ESS-Szenario (Web-Dynpro ABAP) (Paket PAOC_ESS_A1_DE)
Die Datenerfassung der Antragsdaten erfolgt im Infotyp: 0700 (Elektronischer Datenaustausch)
Subtypen:
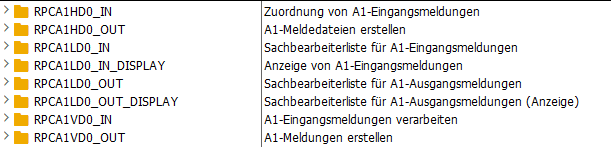
Reports zur Erstellung der Meldungen und der Meldedateien:
Reports zur Verarbeitung der Eingangsmeldungen:
Behördenkommunikation (B2A): Transaktion PB2A
Paket: P01S
Reports:
Klassen:
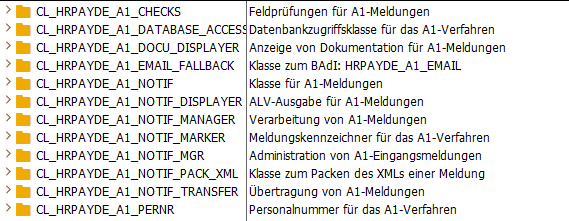
Für mich hilfreich waren folgenden Klassen:
*&---------------------------------------------------------------------*
*& Tabellen A1-Meldeverfahren:
*& P01A1_STAT    - A1-Verfahren: Verwaltungstabelle
*& P01A1_RAWDATA - A1-Verfahren: Rohdaten einer Meldung
*&---------------------------------------------------------------------*

GET peras.

  SELECT * INTO TABLE @DATA(lt_p01a1_stat) FROM p01a1_stat
    WHERE pernr  = @pernr-pernr
      AND mdtyp  = '2'
      AND status = '23'
      AND mzbeg <= @pn-endda
      AND mzbeg >= @pn-begda.

  LOOP AT lt_p01a1_stat INTO DATA(ls_p01a1_stat).

    SELECT SINGLE * INTO @DATA(ls_p01a1_rawdata) FROM p01a1_rawdata
      WHERE guid = @ls_p01a1_stat-guid
        AND lfdnr = ( SELECT MAX( lfdnr ) FROM p01a1_rawdata WHERE guid = @ls_p01a1_stat-guid ). "höchste lfdnr nehmen

    DATA(pdf_xstring) = ls_p01a1_rawdata-rawdata.

  ENDLOOP.
When searching for a way to select quotas without doing a manual select, I found the following class is the Fiori odata packages.
DATA pernr TYPE pernr_d VALUE 1.

DATA(time_accounts) = cl_hcmfab_att_abs_bl_apis=>get_instance( )->read_time_accounts( iv_pernr = pernr
                                                                                      iv_begda = sy-datum
                                                                                      iv_endda = sy-datum ). "iv_endda is never used!

cl_demo_output=>display( time_accounts ).
But although there is an obligatory iv_endda parameter, it is never used inside of method read_time_accounts. Instead, there is some logic which checks for a T77S0 Parameter, and it will use either highdate or begda as endda value.

IMO, it would have made sense to mark iv_endda as optional, so it would be downward compatible and the parameter could be omitted on newer releases. Now it is a bit misleading.
However, if you look inside the method read_time_accounts you’ll find another class that is used to read the quotas. The names of the result fields are slightly different, but at least the endda is used in this case.
  cl_pt_arq_timeaccounts=>get_instance( )->get_time_accounts( EXPORTING im_pernr        = pernr
                                                                        im_begda        = sy-datum
                                                                        im_endda        = sy-datum
                                                              IMPORTING ex_timeaccounts = DATA(time_accounts) ).
Here are the notes I took while investigating SAP’s relatively ‘new’ overtime apps.
SAP Fiori for SAP Business Suite
– My Overtime Requests (Fiori 2.0)
– Approve Overtime Requests (Fiori 2.0)
SAP S/4HANA
– My Overtime Requests (Fiori 2.0)
– Approve Overtime Requests (Fiori 2.0)
SAP Fiori Apps Reference Library
– F4939
– F4937
Component:
– PA_FIO_OVT
Packages:
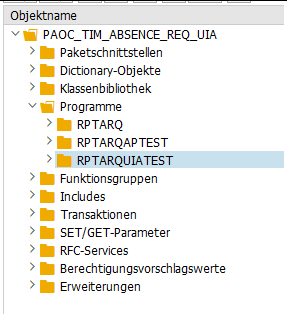
– PAOC_TIM_OVERTIMEQTA_REQ_CORE (Mein Mehrarbeitskontingent: Core-Funktionen)
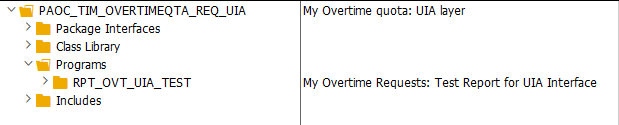
– PAOC_TIM_OVERTIMEQTA_REQ_UIA (UIA = User Interface Adapter)
– PAOC_TM_TIMEDATE_REQ_CORE (Zeitdatenanforderung: Core-Funktionen)
– ODATA_HCMFAB_MYOVERTIMEQUOTA
– HCM_FAB_MYOVERTIMEQUOTA (contains BSP HCMFAB_OT_MAN)
– HCM_FAB_APPROVE_OVERTIME (contains BSP HCMFAB_OTQ_APR)
Reports
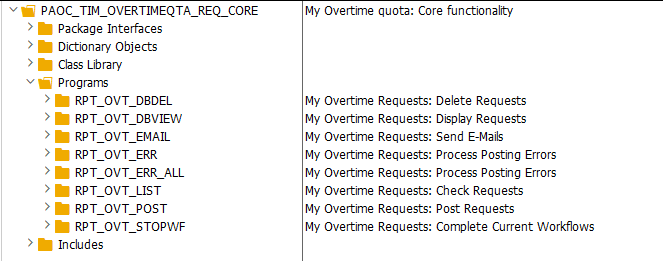
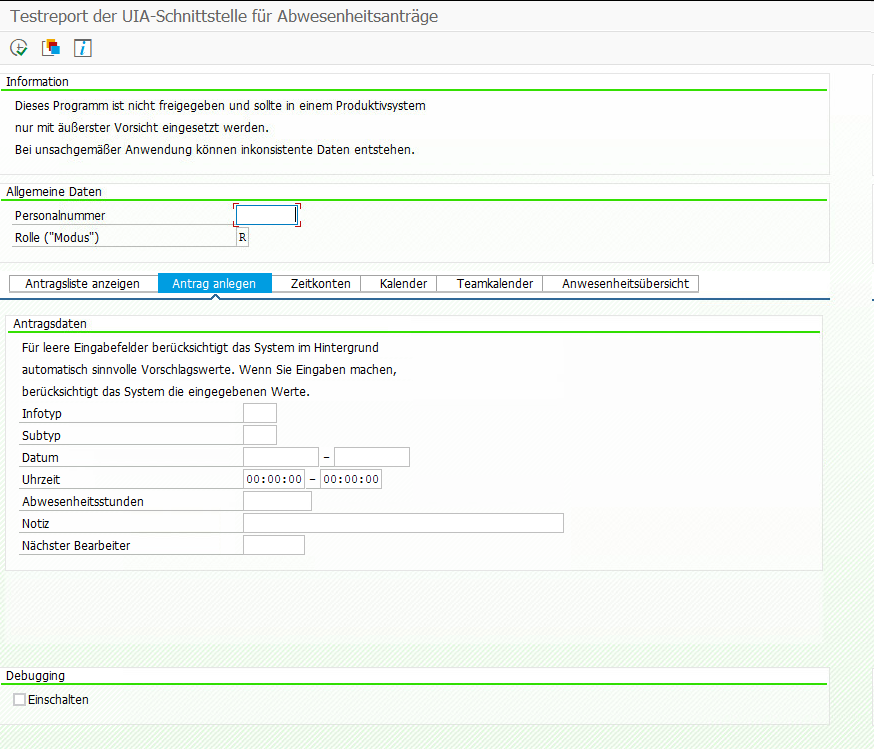
Using RPT_OVT_UIA_TEST, you can simply simulate Overtime Requests in the backend to test your customizing.
Jobs
It is recommended to run the reports RPT_OVT_EMAIL, RPT_OVT_POST and RPT_OVT_STOPWF as a job.

OData
– HCMFAB_MYOVERTIMEQUOTA_SRV (service name)
– HCMFAB_MYOVERTIMEQUOTA (SEGW Project)
Workflow
– WS02400057 (PT_OVTREQ)
Cluster Tables
– PTREQ_HEADER
– PTREQ_ITEMS
– PTREQ_ACTOR
– PTREQ_NOTICE
“On Behalf of” is supported
– 2806560
Customizing
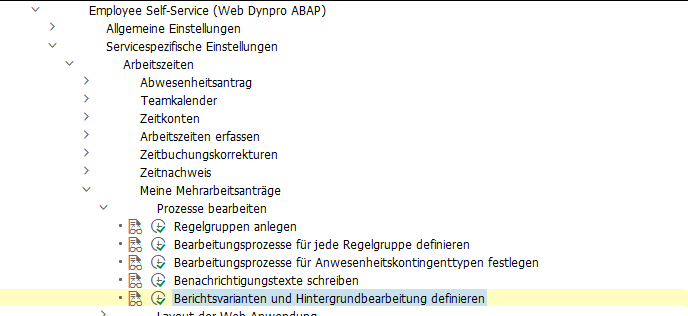
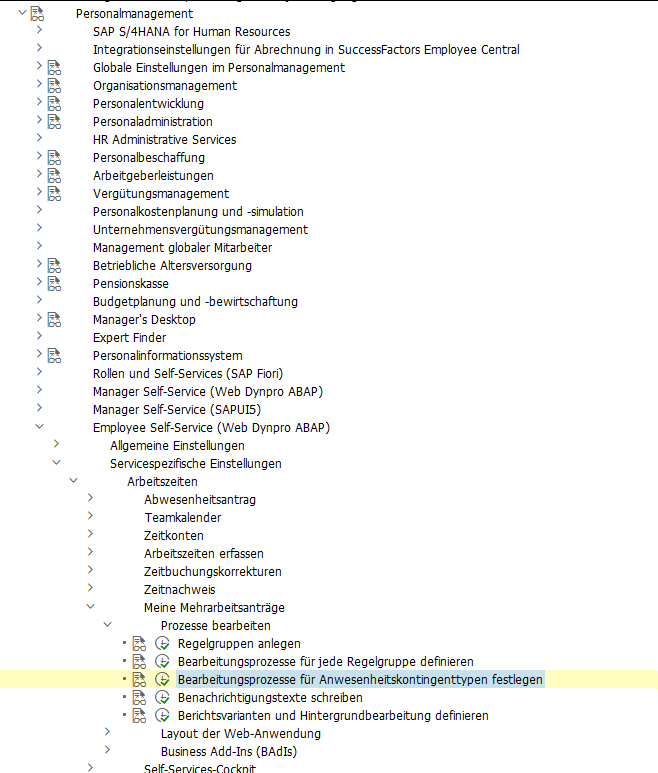
SPRO → Personnel Management → Employee Self-Service (Web Dynpro ABAP) → Service-Specific Settings → Working Time → My Overtime Requests.
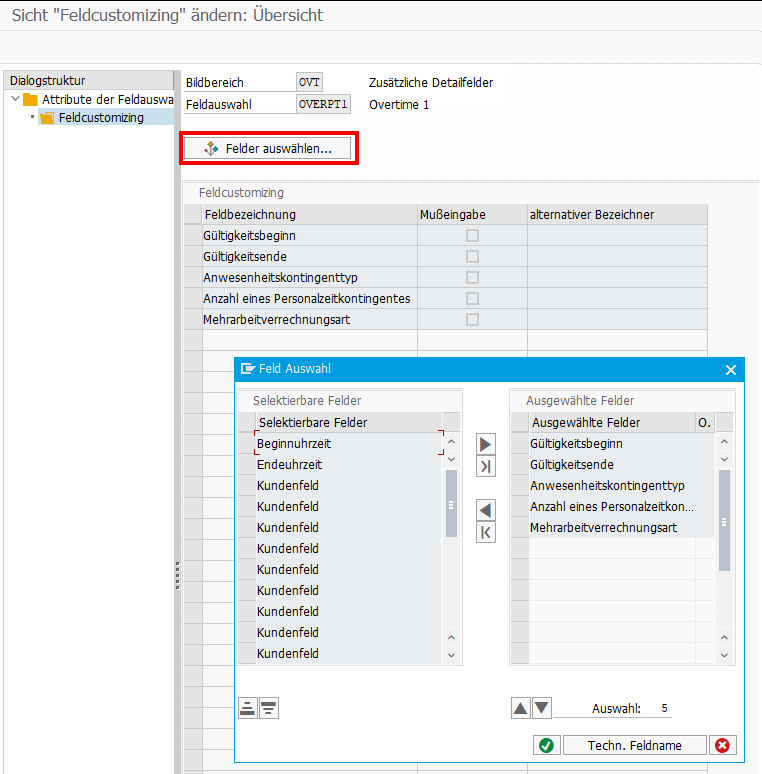
Adjusting the Fiori UI
If you want to hide fields in the Fiori frontend, or you want to adjust some labels, you can simply do this via Customizing:
My Overtime Requests → Layout of the Web Application → Define Field Selection
Multi-Level Approval for Time Data Requests (HRPT_B_TMD_MULTI_APPROVERS)
The BAdI is called when opening the My Overtime Request App and a second time when clicking on the New Button to create a new OVT request. It’s not triggered when sending the request, what I initially expected.
To reuse the code from the sample class,
*    "Determine approver level
*    DATA(cust_key_request_fields) = VALUE cl_hrpt_ovt_const=>ovt_cust_key_request_fields( pernr = iv_pernr
*                                                                                          ktart = iv_subtype
*                                                                                          date  = is_request_period-start_date ).
*    TRY.
*        DATA(approval_settings) = cl_hrpt_ovt_cust_factory=>get_customizing_reader( )->get_approval_settings( REF #( cust_key_request_fields ) ).
*      CATCH cx_hrpt_tmd.
*        RETURN.
*    ENDTRY.
*    IF approval_settings-use_multiple_approver = abap_false.
*      RETURN.
*    ENDIF.

....

*    "If no last approvers exist, use line manager, HR BP and HR Admin by default
*    CALL FUNCTION 'BAPI_GET_LINE_MANAGER'
*      EXPORTING
*        im_objid       = iv_pernr
*      IMPORTING
*        es_approver    = line_manager
*        ev_has_manager = approver_exists.
*    IF approver_exists = abap_true.
*      last_seqnr = last_seqnr + 1.
*      line_manager-seqnr = last_seqnr.
*      APPEND line_manager TO rt_approver_tab.
*      IF lines( rt_approver_tab ) >= approval_settings-approver_level.
*        RETURN.
*      ENDIF.
*    ENDIF.
you have to set the amount of approval steps in the customizing.
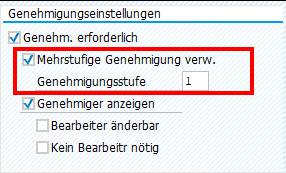
Also, a Filter must be set for the BAdI:

When you run into a permission issue when opening an overtime request in MyInbox, take a look in the HCMFAB_COMMON BAdI. Perhaps the GET_CONFIGURATION method must be implemented
  method if_ex_hcmfab_common~get_configuration.

    ev_hide_employee_picture     = abap_false.
    ev_hide_employee_number      = abap_false.
    ev_hide_ce_button            = abap_false.
    ev_enable_onbehalf           = abap_false.
    ev_show_empl_number_wo_zeros = abap_false.

* On_behalf is switched off by default for compatibility reasons
* To activate it for all users who are mangers the following code could be used:

    case iv_application_id.
      when gc_application_id-myovertimequota.
        ev_enable_onbehalf = boolc( go_employee_api->is_manager( iv_application_id = iv_application_id
                                                                 iv_pernr          = iv_employee_number ) = abap_true ).
    endcase.

* In case that on behalf is active, transfer all data to the frontend. This is faster for small number of employees.
* The backend search would only transfer the visible employees to the frontend, at the cost of multiple smaller requests.

    ev_use_onbehalf_backend_search = abap_false.

  endmethod.
Custom Workflow
If you want to replace the default Workflow WS02400057 (PT_OVTREQ) with a custom one, you must adjust the customizing (as described here for the standard WF), and you’ll need to create a new BAdI Implementation for /IWWRK/ES_WF_WI_BEFORE_UPD_IB analog HCMFAB_MYOTQ_APPROVAL_INBOX to get the Approve and Rejects Buttons working by providing the Workflow-ID and decision Step-ID.
Extensibility
Although it should be possible to extend both Fiori Apps via Adaptation Projects, I was unable to do so. Either it’s a problem with the new adaption editor, which got new released while writing the blog, or it is a problem with the apps itself. Whatever I tried, I was always running in issues.
Therefore, I did it the “classic” way and created an Extension Project and used the provided Extension Points. For the Approval App, I was unable to preview the application directly in BAS, perhaps because it is only an Inbox integration and does not run standalone. I therefore always had to deploy, to test my changes.
PT_CLSTB2 → SALDO

Report: RPCLSTB2 – Anzeige Zeitauswertungsergebnisse (Cluster B2)
DATA pernr TYPE pernr_d.
DATA saldo TYPE TABLE OF pc2b5.

CALL FUNCTION 'HR_TIME_RESULTS_GET'
  EXPORTING
    get_pernr             = pernr
    get_pabrj             = CONV pabrj( sy-datum(4) )
    get_pabrp             = CONV pabrp( sy-datum(6) )
  TABLES
    get_saldo             = saldo
  EXCEPTIONS
    no_period_specified   = 1
    wrong_cluster_version = 2
    no_read_authority     = 3
    cluster_archived      = 4
    technical_error       = 5
    OTHERS                = 6.
IF sy-subrc <> 0.
* Implement suitable error handling here
ENDIF.
Um direkt für mehrere Perioden zulesen, diesen Baustein verwenden:
DATA: time_results TYPE TABLE OF ptm_time_results.

  CALL FUNCTION 'HR_TIME_RESULTS_IN_INTERVAL'
    EXPORTING
      int_pernr             = pernr-pernr
      int_begda             = pn-begda
      int_endda             = pn-endda
    TABLES
      int_time_results      = time_results
    EXCEPTIONS
      no_period_specified   = 1
      wrong_cluster_version = 2
      no_read_authority     = 3
      cluster_archived      = 4
      technical_error       = 5
      OTHERS                = 6.