Die Datenerfassung der Antragsdaten erfolgt im Infotyp: 0700 (Elektronischer Datenaustausch) Subtypen:
DXA1 (A1: Antrag Entsendebescheinigung)
DXAV (A1: Antrag Ausnahmevereinbarung)
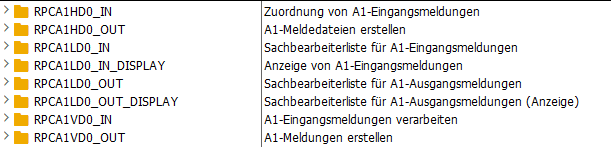
Reports zur Erstellung der Meldungen und der Meldedateien:
Personal → Personalabrechnung → Europa → Deutschland → Folgeaktivitäten → Periodenunabhängig → Abrechnungszusatz → A1-Meldeverfahren → Ausgangsmeldungen
Reports zur Verarbeitung der Eingangsmeldungen:
Personal → Personalabrechnung → Europa → Deutschland → Folgeaktivitäten → Periodenunabhängig → Abrechnungszusatz → A1-Meldeverfahren → Eingangsmeldungen
Behördenkommunikation (B2A): Transaktion PB2A
Personal → Personalabrechnung → Europa → Deutschland → Folgeaktivitäten → Periodenunabhängig → Behördenkommunikation (B2A) → B2A-Manager
Hilfreiche Entwicklungsobjekte
Paket: P01S
Reports:
Klassen:
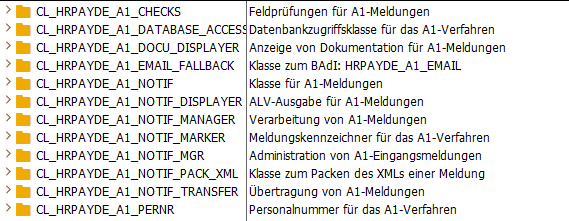
Für mich hilfreich waren folgenden Klassen:
CL_HRPAYDE_A1_NOTIF (Klasse für A1-Meldungen)
CL_HRPAYDE_A1_NOTIF_DISPLAYER (ALV-Ausgabe für A1-Meldungen)
CL_HRPAYDE_A1_ALV_EVNT_HANDLER (Ereignisbehandler für A1-spezifische Ereignisse)
PDFs der A1-Meldungen von Datenbank lesen
*&---------------------------------------------------------------------*
*& Tabellen A1-Meldeverfahren:
*& P01A1_STAT    - A1-Verfahren: Verwaltungstabelle
*& P01A1_RAWDATA - A1-Verfahren: Rohdaten einer Meldung
*&---------------------------------------------------------------------*

GET peras.

  SELECT * INTO TABLE @DATA(lt_p01a1_stat) FROM p01a1_stat
    WHERE pernr  = @pernr-pernr
      AND mdtyp  = '2'
      AND status = '23'
      AND mzbeg <= @pn-endda
      AND mzbeg >= @pn-begda.

  LOOP AT lt_p01a1_stat INTO DATA(ls_p01a1_stat).

    SELECT SINGLE * INTO @DATA(ls_p01a1_rawdata) FROM p01a1_rawdata
      WHERE guid = @ls_p01a1_stat-guid
        AND lfdnr = ( SELECT MAX( lfdnr ) FROM p01a1_rawdata WHERE guid = @ls_p01a1_stat-guid ). "höchste lfdnr nehmen

    DATA(pdf_xstring) = ls_p01a1_rawdata-rawdata.

  ENDLOOP.
I had to calculate the difference between two times, even if the end time goes beyond the 0 o’clock day limit, e.g. 20:00 to 02:00 should be 6h. I found the following two function modules doing the job:
* Option 1
CALL FUNCTION 'CATS_COMPUTE_HOURS'
  EXPORTING
    pernr                    = pernr
    date                     = date
*   NO_BREAK_DEDUCTION       = ' '
    row                      = row
  TABLES
    return                   = return
  CHANGING
    catshours                = catshours
    beguz                    = beguz
    enduz                    = enduz
    vtken                    = vtken.

* Option 2 (I think it's only available on S/4 HANA)
CALL FUNCTION 'CATS_DETERMINE_HOURS'
  CHANGING
    catshours                = catshours
    beguz                    = beguz
    enduz                    = enduz.
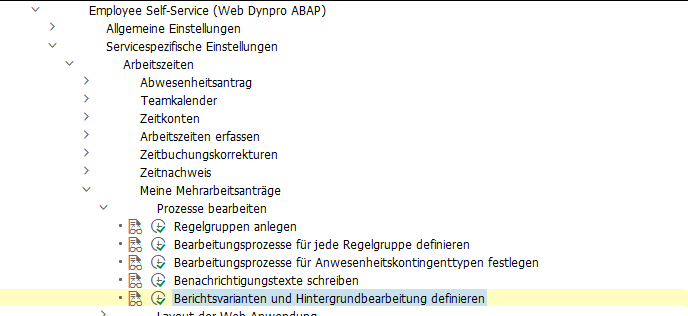
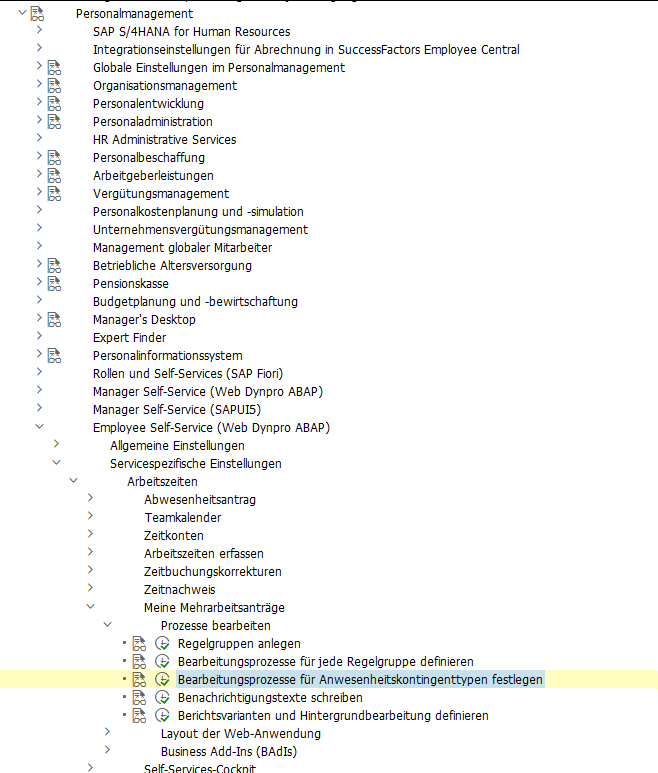
Customizing SPRO → Personnel Management → Employee Self-Service (Web Dynpro ABAP) → Service-Specific Settings → Working Time → My Overtime Requests.
Adjusting the Fiori UI
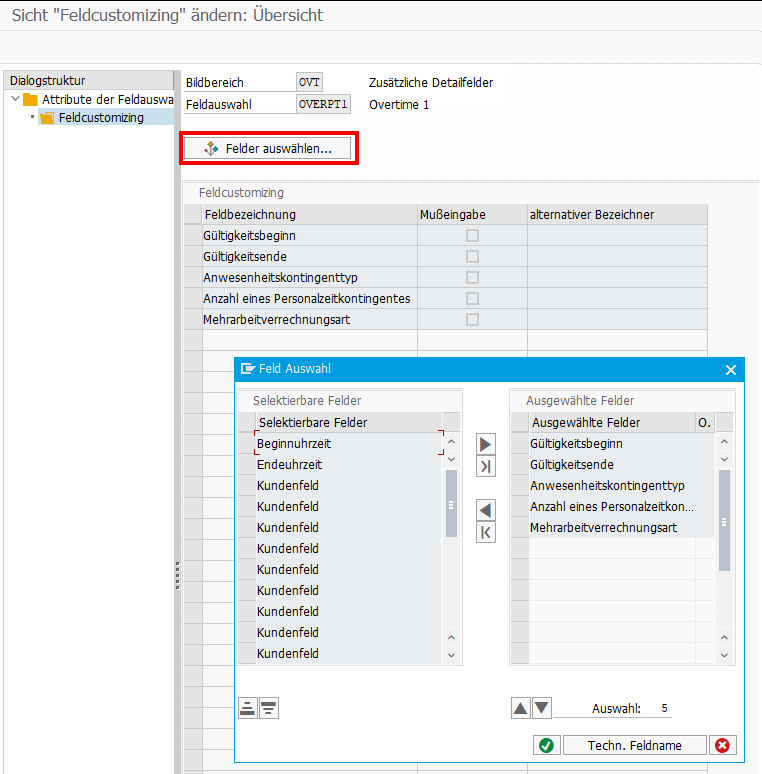
If you want to hide fields in the Fiori frontend, or you want to adjust some labels, you can simply do this via Customizing: My Overtime Requests → Layout of the Web Application → Define Field Selection
Multi-Level Approval for Time Data Requests (HRPT_B_TMD_MULTI_APPROVERS)
The BAdI is called when opening the My Overtime Request App and a second time when clicking on the New Button to create a new OVT request. It’s not triggered when sending the request, what I initially expected. To reuse the code from the sample class,
*    "Determine approver level
*    DATA(cust_key_request_fields) = VALUE cl_hrpt_ovt_const=>ovt_cust_key_request_fields( pernr = iv_pernr
*                                                                                          ktart = iv_subtype
*                                                                                          date  = is_request_period-start_date ).
*    TRY.
*        DATA(approval_settings) = cl_hrpt_ovt_cust_factory=>get_customizing_reader( )->get_approval_settings( REF #( cust_key_request_fields ) ).
*      CATCH cx_hrpt_tmd.
*        RETURN.
*    ENDTRY.
*    IF approval_settings-use_multiple_approver = abap_false.
*      RETURN.
*    ENDIF.

....

*    "If no last approvers exist, use line manager, HR BP and HR Admin by default
*    CALL FUNCTION 'BAPI_GET_LINE_MANAGER'
*      EXPORTING
*        im_objid       = iv_pernr
*      IMPORTING
*        es_approver    = line_manager
*        ev_has_manager = approver_exists.
*    IF approver_exists = abap_true.
*      last_seqnr = last_seqnr + 1.
*      line_manager-seqnr = last_seqnr.
*      APPEND line_manager TO rt_approver_tab.
*      IF lines( rt_approver_tab ) >= approval_settings-approver_level.
*        RETURN.
*      ENDIF.
*    ENDIF.
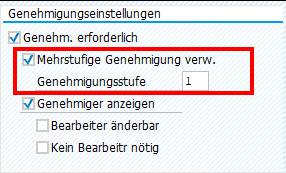
you have to set the amount of approval steps in the customizing.
Also, a Filter must be set for the BAdI:
When you run into a permission issue when opening an overtime request in MyInbox, take a look in the HCMFAB_COMMON BAdI. Perhaps the GET_CONFIGURATION method must be implemented
  method if_ex_hcmfab_common~get_configuration.

    ev_hide_employee_picture     = abap_false.
    ev_hide_employee_number      = abap_false.
    ev_hide_ce_button            = abap_false.
    ev_enable_onbehalf           = abap_false.
    ev_show_empl_number_wo_zeros = abap_false.

* On_behalf is switched off by default for compatibility reasons
* To activate it for all users who are mangers the following code could be used:

    case iv_application_id.
      when gc_application_id-myovertimequota.
        ev_enable_onbehalf = boolc( go_employee_api->is_manager( iv_application_id = iv_application_id
                                                                 iv_pernr          = iv_employee_number ) = abap_true ).
    endcase.

* In case that on behalf is active, transfer all data to the frontend. This is faster for small number of employees.
* The backend search would only transfer the visible employees to the frontend, at the cost of multiple smaller requests.

    ev_use_onbehalf_backend_search = abap_false.

  endmethod.
Custom Workflow
If you want to replace the default Workflow WS02400057 (PT_OVTREQ) with a custom one, you must adjust the customizing (as described here for the standard WF), and you’ll need to create a new BAdI Implementation for /IWWRK/ES_WF_WI_BEFORE_UPD_IB analog HCMFAB_MYOTQ_APPROVAL_INBOX to get the Approve and Rejects Buttons working by providing the Workflow-ID and decision Step-ID.
Extensibility
Although it should be possible to extend both Fiori Apps via Adaptation Projects, I was unable to do so. Either it’s a problem with the new adaption editor, which got new released while writing the blog, or it is a problem with the apps itself. Whatever I tried, I was always running in issues.
Therefore, I did it the “classic” way and created an Extension Project and used the provided Extension Points. For the Approval App, I was unable to preview the application directly in BAS, perhaps because it is only an Inbox integration and does not run standalone. I therefore always had to deploy, to test my changes.
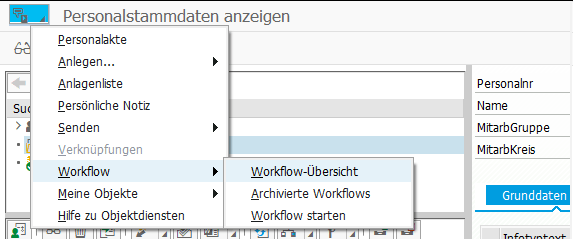
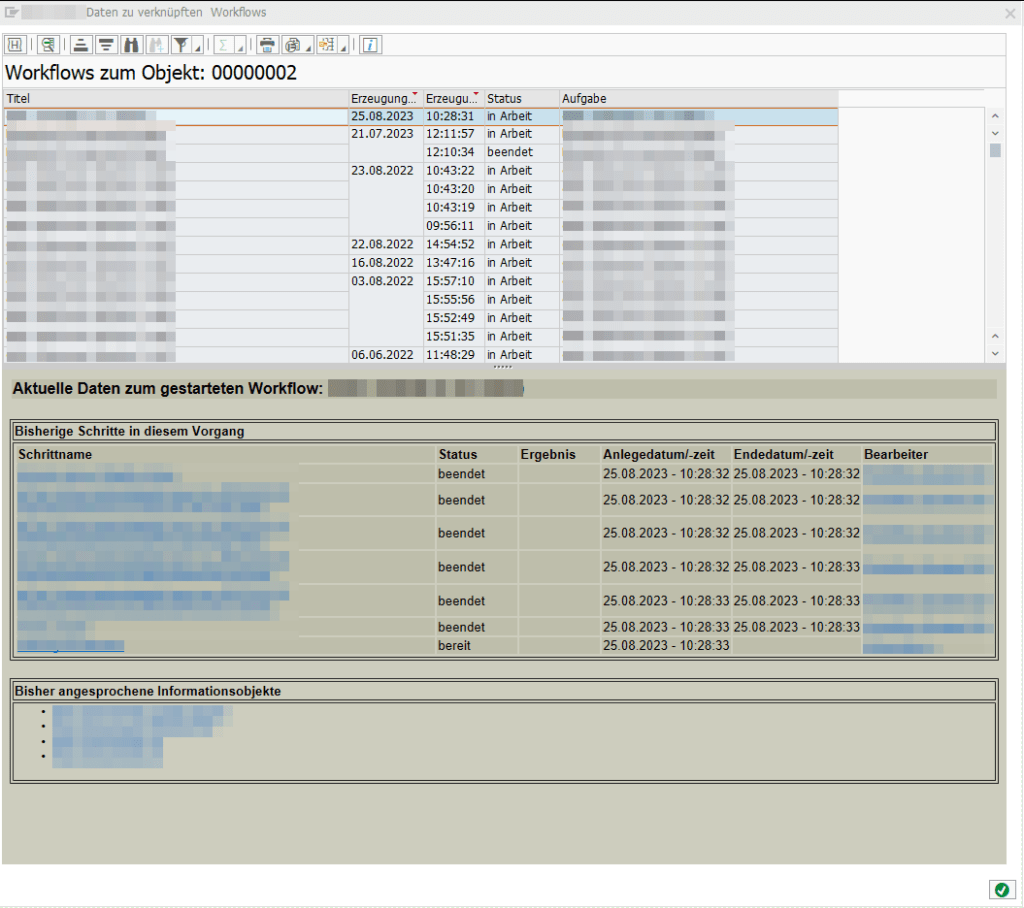
If you have connected any workflows to a pernr via BUS1065 (like it is described here), you can receive all related workflows/workitems related to this pernr via the following code:
    NEW cl_def_im_com_bsp_workflow( )->if_ex_com_bsp_workflow~read_workitems_for_object( EXPORTING iv_swo_objtype = 'BUS1065'
                                                                                                   iv_swo_objkey  = CONV #( lv_pernr )
                                                                                         IMPORTING et_workitems   = DATA(lt_workitems) ).

    LOOP AT lt_workitems ASSIGNING FIELD-SYMBOL(<workitems>).
      "If you are only interested in specific workflows, you could filter here
      "WHERE wi_rh_task = 'WSxxxxxxxx'
      "AND   wi_stat    =  'STARTED'.

      NEW /iwwrk/cl_wf_read_workitem( <workitems>-wi_id )->get_wi_container( IMPORTING et_wi_container = DATA(lt_wi_container) ).
      " access container items via lt_wi_container[ element = 'IV_PERNR'  ]-value

    ENDLOOP.
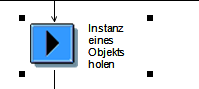
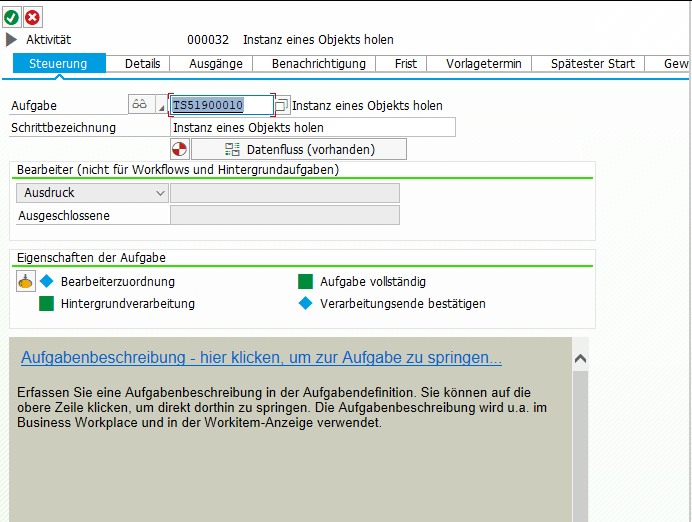
To attach your own workflow in this overview, you have to add the Task TS51900010 to your workflow and pass over the employee number to the Business Object “Employee” (BUS1065)
@my_endpoint=api2.successfactors.eu
@userId=managerId

### Query manager and his employees
GET https://{{my_endpoint}}/odata/v2/User('{{userId}}')?
$format=json&
$expand=directReports&
$select=firstName,lastName,email,teamMembersSize,directReports/firstName,directReports/lastName,directReports/userId,directReports/email
The SuccessFactors oData v2 API is returning timestamps in Unix Epoch format (unix-style milliseconds since 1/1/1970).
Many timestamp fields are of type Edm.Int64. When receiving the milliseconds as Integer, you can directly create a date-object of it using Date(1658237847).
But some timestamps are of type Edm.DateTimeOffset, i.e.: "createdDate": "/Date(1652252620000+0000)/". When binding a timestamp property with an ODataModel, the internal lib datajs will convert the /Date(...)/ value to a standard JS date-object.
But in my case I manually had to convert the timestamp and this is the shortest way I found to convert the epoch string into a JS date-object.
// SF epoch date string
const SFdateString = '/Date(1652252620000+0000)/'

// remove the '/' on both sides and create the date object
const oDate = eval('new ' + SFdateString .slice(1, -1))

console.log(typeof oDate )
console.log(oDate )

const oDateTimeFormat = sap.ui.core.format.DateFormat.getDateTimeInstance({
          pattern: "YYYY-MM-dd HH:mm"
})
return oDateTimeFormat.format(oDate)