
In the Configure Custom Navigation settings, you can define different places where an external application (for example, a link to a side-by-side application) should be visible.
SAP
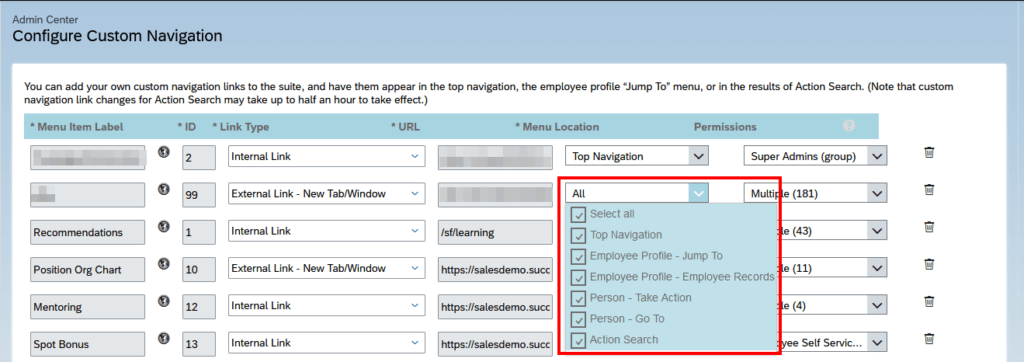
In the Configure Custom Navigation settings, you can define different places where an external application (for example, a link to a side-by-side application) should be visible.
this.getView().bindElement({
				path: sObjectPath,
				events: {
					dataRequested: (oEvent) => {}, // Executed when a request to server is send
					dataReceived: (oEvent) => {},  // Executed when data from server is received
					change:(oEvent) => {},         // Executed everytime you do ElementBinding
				}
			})
The events for dataRequested and dataReceived are only fired, when data is requested or data is received from a backend. This is not the case, when the requested data is already available in the model from a previous backend call. In such situations, the change event comes in handy.
The same can also be done via XML:
binding="{
  path: '/myEntitySet',
  events: {
    dataRequested: 'onDataRequested',
    dataReceived: 'onDataReceived',
    change: 'onDataChange'
  }
}"
This URL will return details about the logged-in user. The identity provider can either be the default or a custom identity provider configured in the BTP Trust Configuration. The response will differ for OpenID Connect and SAML protocol.
https://<domain>.authentication.<region>.hana.ondemand.com/config?action=who&details=true
https://docs.cloudfoundry.org/api/uaa/version/4.6.0/index.html#password-grant
# url from XSUAA Service Key, but replace in the url the provider subdomain with the consumer subdomain (the tenant you want to call)
@xsuaaUrl = {{$dotenv xsuaaUrl}}
# clientid from XSUAA Service Key
@xsuaaClientId = {{$dotenv xsuaaClientId}}
# clientsecret from XSUAA Service Key
@xsuaaClientSecret = {{$dotenv xsuaaClientSecret}}

@username = {{$dotenv btp_username}}
@password = {{$dotenv btp_password}}

### Get Access Token for Cloud Foundry using Password Grant with BTP default IdP
# @name getXsuaaToken
POST {{xsuaaUrl}}/oauth/token
Accept: application/json
Authorization: Basic {{xsuaaClientId}}:{{xsuaaClientSecret}}
Content-Type: application/x-www-form-urlencoded

grant_type=password
&username={{username}}
&password={{password}}
&response_type=token

### Store access token
@access_token = {{getXsuaaToken.response.body.$.access_token}}
https://oauth.net/2/refresh-tokens
https://www.oauth.com/oauth2-servers/making-authenticated-requests/refreshing-an-access-token
https://docs.cloudfoundry.org/api/uaa/version/4.6.0/index.html#refresh-token
# url from XSUAA Service Key
@xsuaaUrl = {{$dotenv xsuaaUrl}}
# clientid from XSUAA Service Key
@xsuaaClientId = {{$dotenv xsuaaClientId}}
# clientsecret from XSUAA Service Key
@xsuaaClientSecret = {{$dotenv xsuaaClientSecret}}

#==================================================================#

### Get Access Token for Cloud Foundry using Grant Type Password with BTP default IdP
# @name token_response
POST {{xsuaaUrl}}/oauth/token
Authorization: Basic {{xsuaaClientId}}:{{xsuaaClientSecret}}
Accept: application/json;charset=utf8
Content-Type: application/x-www-form-urlencoded

grant_type=password
&username={{$dotenv btp_username}}
&password={{$dotenv btp_password}}
&response_type=token

### Store access token and refresh token
@access_token = {{token_response.response.body.$.access_token}}
@refresh_token = {{token_response.response.body.$.refresh_token}}


### Use Refresh Token
# @name token_response
POST {{xsuaaUrl}}/oauth/token
Authorization: Basic {{xsuaaClientId}}:{{xsuaaClientSecret}}
Accept: application/json;charset=utf8
Content-Type: application/x-www-form-urlencoded

grant_type=refresh_token
&refresh_token={{refresh_token}}

### Store access token and refresh token
@access_token = {{token_response.response.body.$.access_token}}
@refresh_token = {{token_response.response.body.$.refresh_token}}
Just noticed, that with UI5 version 1.119.0 the getSecurityToken() function got replaced with securityTokenAvailable().
https://sapui5.hana.ondemand.com/#/api/sap.ui.model.odata.v2.ODataModel%23methods/getSecurityToken
// Returns the current security token if available; triggers a request to fetch the security token if it is not available.
const token = this.getModel().getSecurityToken() // Deprecated

// Returns a promise, which will resolve with the security token as soon as it is available.
const token = await this.getModel().securityTokenAvailable()
SELECT * FROM sflight INTO TABLE @DATA(flights).

LOOP AT flights INTO DATA(flight).
  WAIT UP TO 1 SECONDS.
  cl_progress_indicator=>progress_indicate( i_text               = |Processing flight { flight-connid } as { sy-tabix } / { lines( flights ) }|
                                            i_processed          = sy-tabix
                                            i_total              = lines( flights )
                                            i_output_immediately = abap_true ).
ENDLOOP.

For Jobs running longer than 15 seconds, you have to manually inform the Job Scheduler if your operation succeeded or not. Else, your job will only stay in status COMPLETED/UNKNOWN due to the timeout.

Informing the Job Scheduler about your succeeded operation can be done vie REST API Endpoint Update Job Run Log. You can read more about Long-Running (Async) Jobs here. I therefore wrote a function named updateJobStatus, which I call at the end of every long-running endpoint. It checks if the endpoint is called manually or via Job Scheduler service and updates the Job Run Log using the @sap/jobs-client if required.
const cds = require('@sap/cds')
const LOG = cds.log('JobService')
const xsenv = require("@sap/xsenv")
const JobSchedulerClient = require("@sap/jobs-client")

async function fetchAccessToken(url, creds) {
    const response = await fetch(`${url}/oauth/token`, {
        method: 'POST',
        body: 'grant_type=client_credentials&client_id=' + creds.uaa.clientid + '&client_secret=' + creds.uaa.clientsecret,
        headers: {
            'Content-Type': 'application/x-www-form-urlencoded'
        }
    })
    return await response.json()
}

async function getJobscheduler(req) {
    xsenv.loadEnv()
    const services = xsenv.getServices({
        jobscheduler: { tags: "jobscheduler" }
    })
    if (!services.jobscheduler) req.reject("no jobscheduler service instance found")

    const subdomain = (process.env.NODE_ENV === 'production') ? req.http.req.authInfo.getSubdomain() : 'customer1' // workaround for local testing
    const domain = `https://${subdomain}.${services.jobscheduler.uaa.uaadomain}`
    const token = await fetchAccessToken(domain, services.jobscheduler)

    const options = {
        baseURL: services.jobscheduler.url,
        token: token.access_token
    }
    return new JobSchedulerClient.Scheduler(options)
}

async function updateJobStatus(req) {
    const jobId = req.headers['x-sap-job-id']
    const scheduleId = req.headers['x-sap-job-schedule-id']
    const runId = req.headers['x-sap-job-run-id']

    if (!jobId || !scheduleId || !runId) return
    LOG.info('Endpoint is called via Job Scheduler')

    const scheduler = await getJobscheduler(req)

    const payload = {
        jobId: jobId,
        scheduleId: scheduleId,
        runId: runId,
        data: { success: true, message: 'The endpoint has successfully executed the long-running job' }
    }

    scheduler.updateJobRunLog(payload, function (err, result) {
        if (err) return LOG.error('Error updating run log: %s', err)
        //Run log updated successfully
        LOG.info('Run log updated successfully')
    })
}

module.exports = {
  updateJobStatus
}
When I was integrating the Job Scheduler service into my Multitenant Application, I ran into the following JWT Token issue, when the Job Scheduler was calling my CAP action. Means the job creation was already working fine and was also displaying the right tenant for my job, but the Job Scheduler was not able to successfully call the given endpoint. This is the error I got in the logs:
Error: Jwt token with audience: [
'sb-a1e9d3b8-2bee-47db-xxxx-07e5a54aec1e!b180208|sap-jobscheduler!b3',
'uaa'
] is not issued for these clientIds: [
'sb-MyApp-mtdev-App!t180208',
'MyAp-mtdev-App!t180208'
].
After reading some of the great blogs from Carlos Roggan, I noticed that I forgot to grant the Job Scheduler the necessary authority to actual call my CAP action. So I added the following lines to the xs-security.json file
    {
      "name": "$XSAPPNAME.jobscheduler",
      "description": "Scope for Job Scheduler",
      "grant-as-authority-to-apps": [
        "$XSSERVICENAME(job-scheduler)"
      ]
    }
and also annotated my CAP action using the new scope @(requires: ['jobscheduler']).
I redeployed everything, but the issue still persists. 🙁
Turned out, for the standard plan, tokens are cached in Job Scheduler up to 12 hours.
https://help.sap.com/docs/job-scheduling/sap-job-scheduling-service/secure-access?locale=en-US

After waiting 12 hours, the endpoint was successfully called by the Job Scheduler. 🙂